Spring AI实战构建基于MongoDB记忆存储的Agent应用


头像
崧峻.
原创
发布时间: 2026-08-09 20:17:35 | 阅读数 0收藏数 0评论数 0
封面
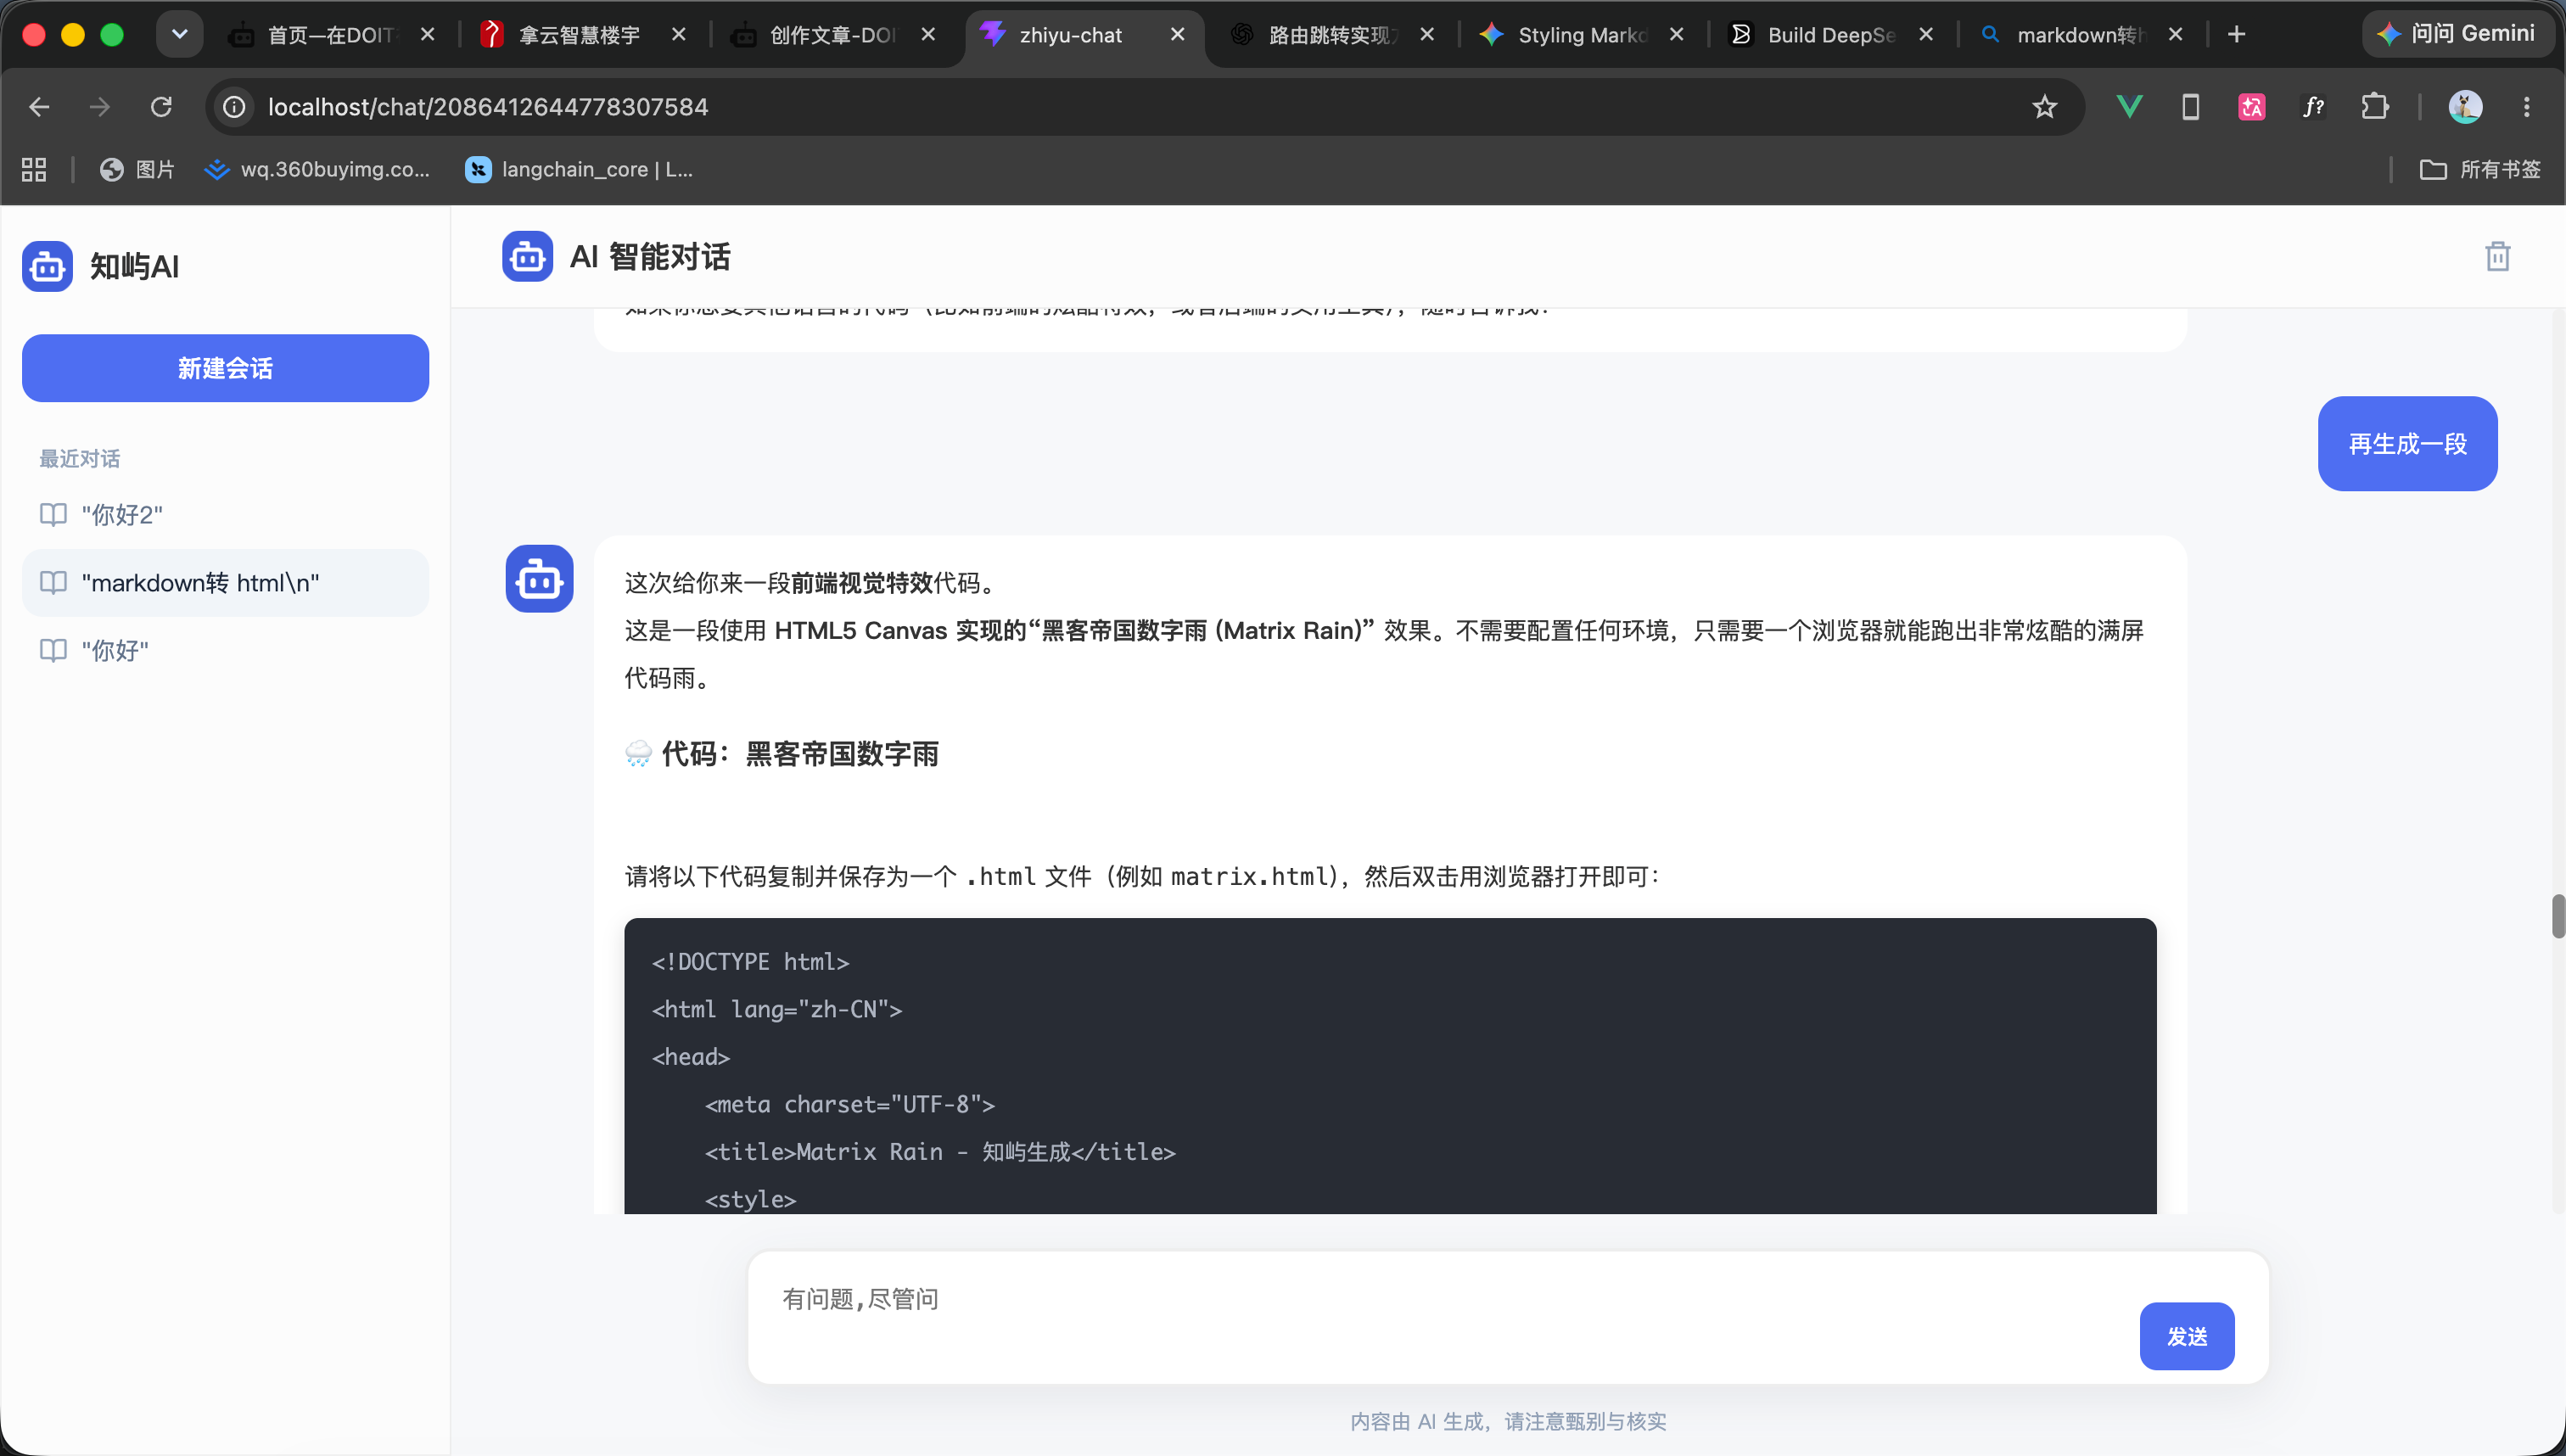
本文介绍如何使用 Spring AI 搭建一个具备上下文记忆能力的 Agent 应用。项目采用 Vue3 + Spring Boot 前后端分离架构,通过 Spring AI 接入大模型服务,并结合 MongoDB 作为记忆存储,实现对话内容保存和历史信息关联,让应用能够在多轮交流中保持连续的对话体验。项目完整实现了聊天窗口、会话创建、会话列表展示、历史会话管理、消息交互以及聊天记录持久化等功能。通过这个项目,可以了解 Spring AI 在实际开发中的使用方式,以及如何利用 MongoDB 实现 Agent 的记忆能力,为后续开发更加完善的智能应用提供参考。

准备工作:


工具:

工具名称
数量
备注
mongdb
1
用于数据记忆存储
1

介绍

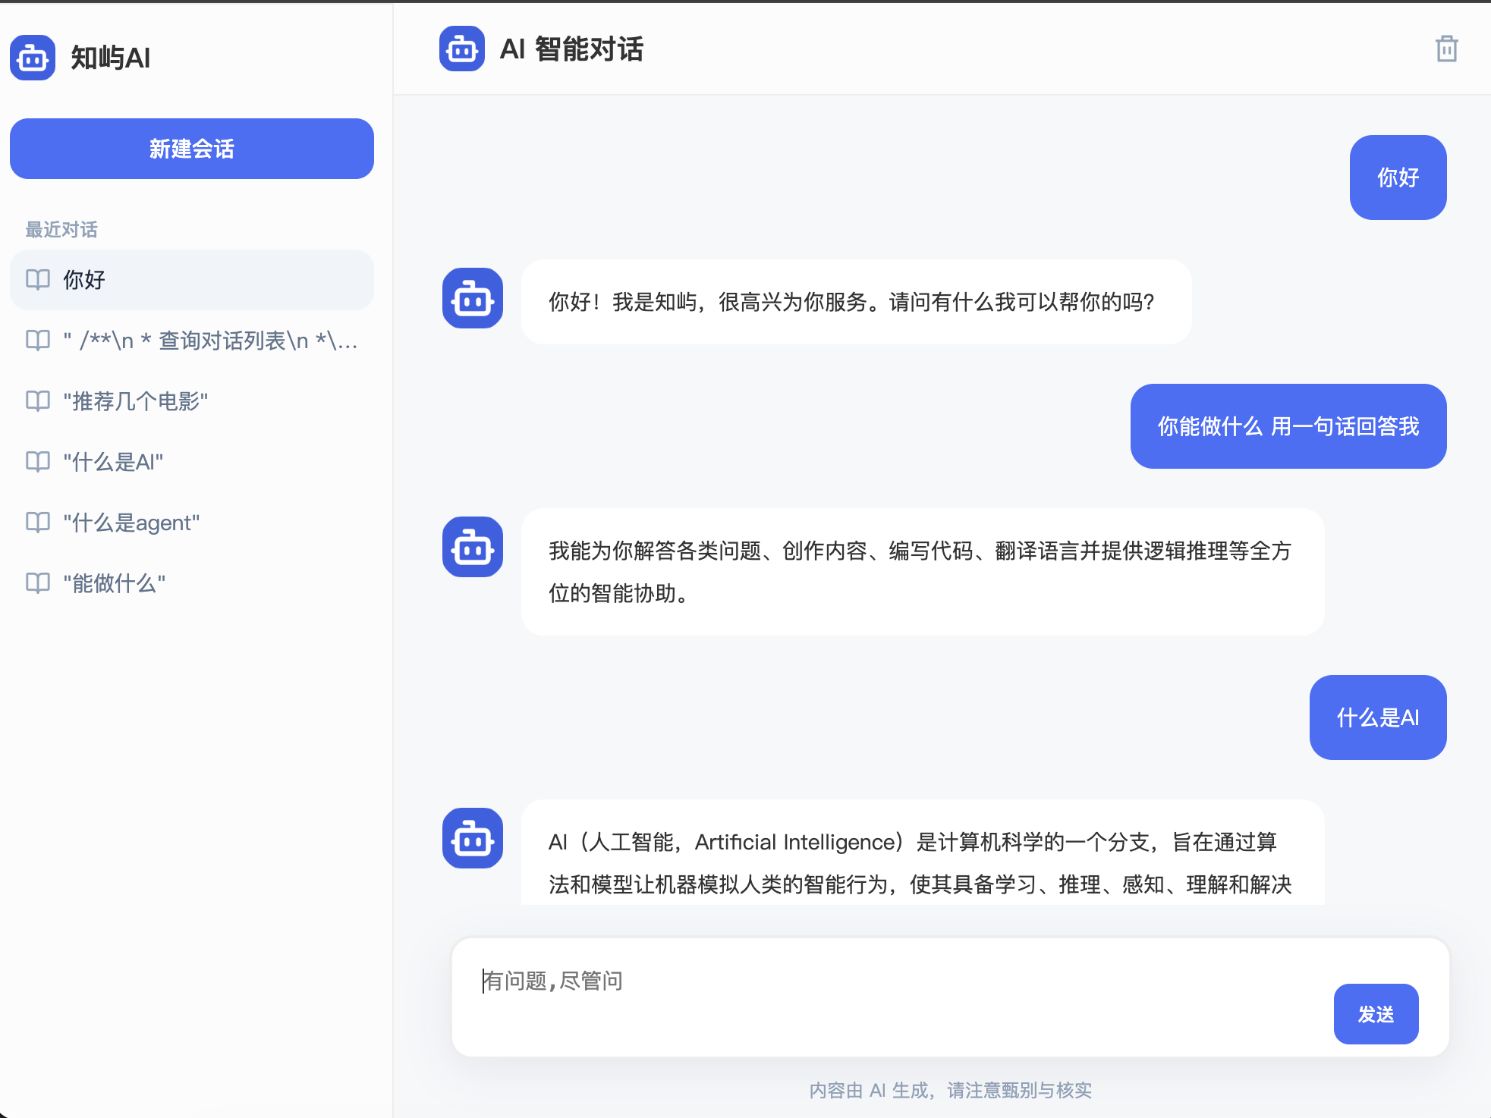
本身是用springai搭建的一个agent项目 记忆存储用的mongodb 所以没有mongodb的需要先安装 演示功能看视频

2

创建前端项目

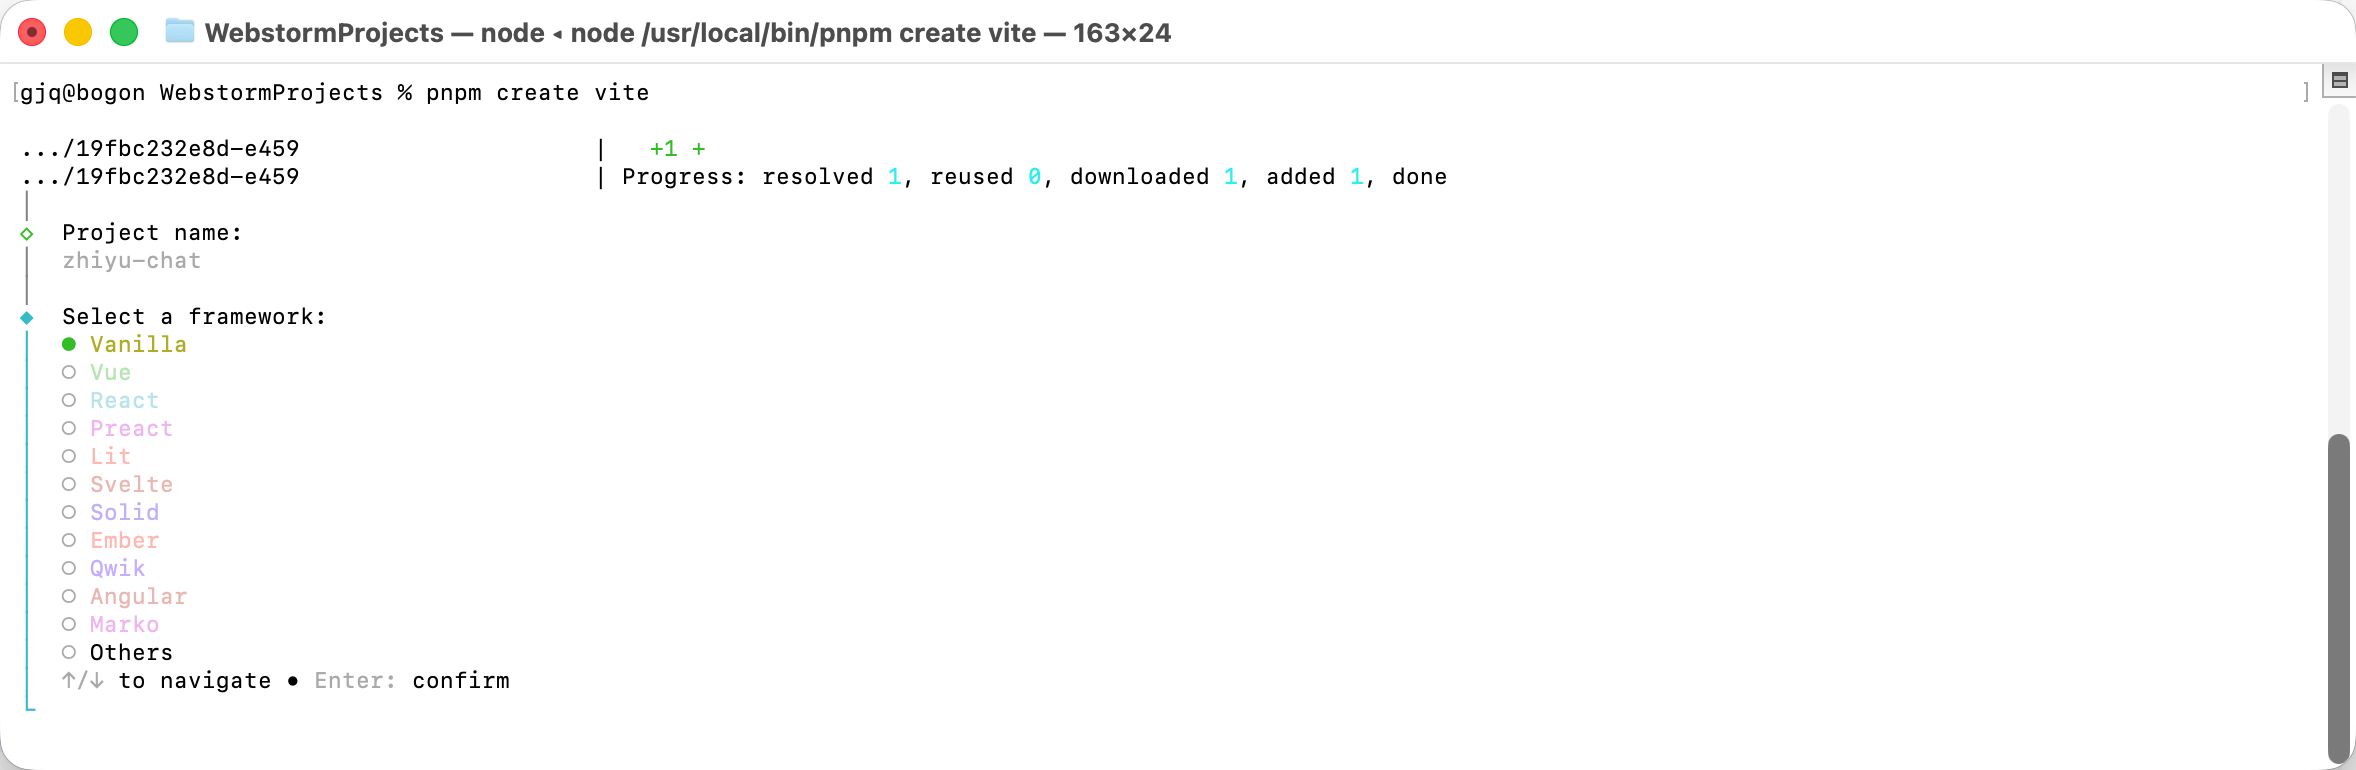
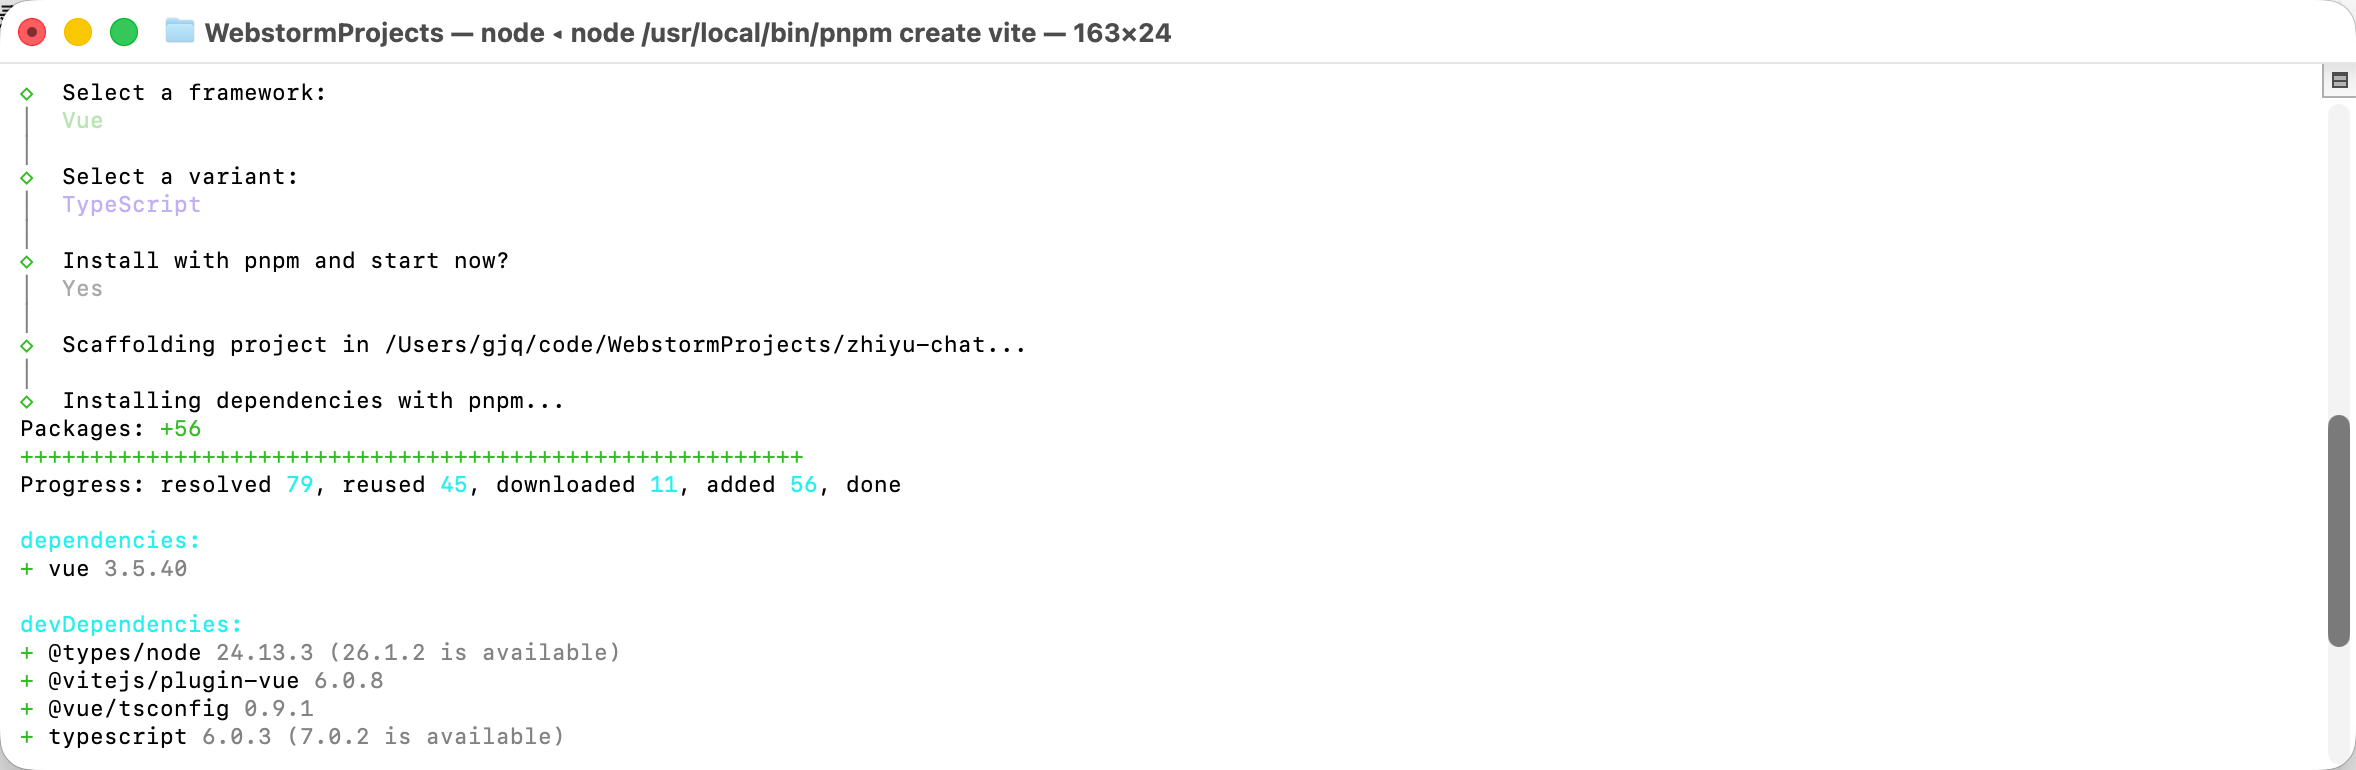
  1. 如图所示 在你们的项目存放路径下 输入命令 pnpm create vite
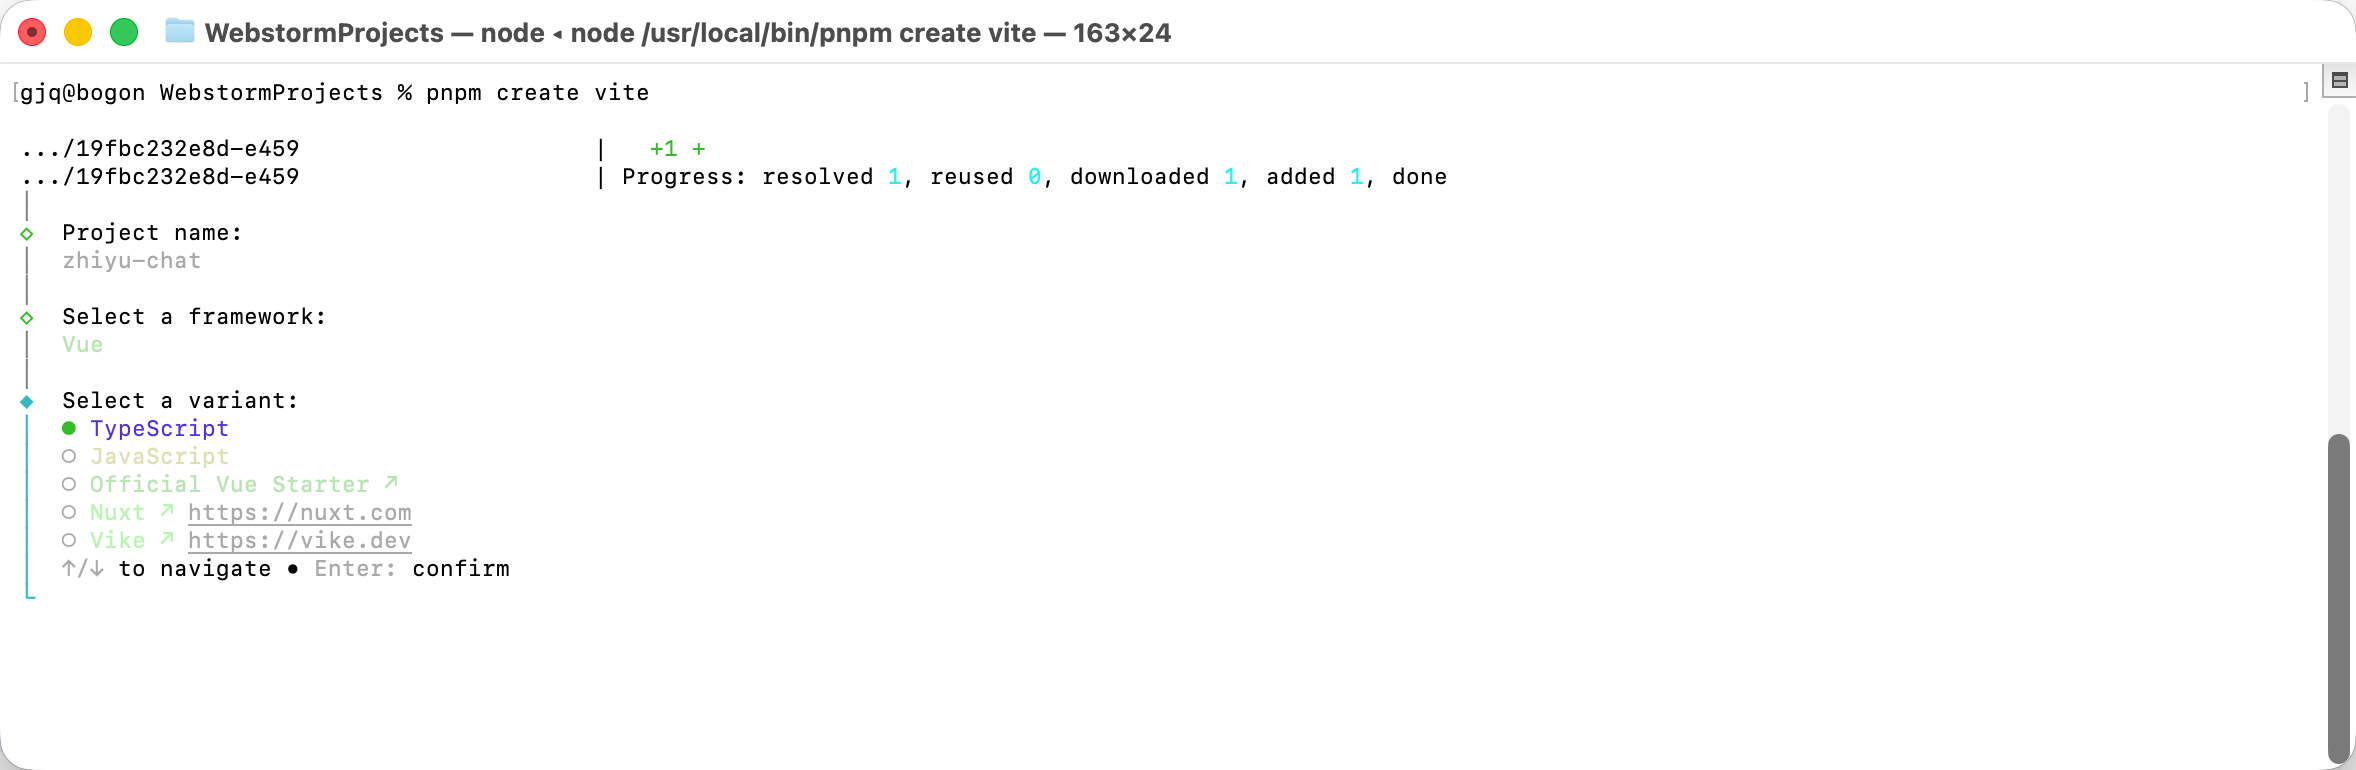
  2. 然后设置项目名称 选择vue项目 选择ts 如图2
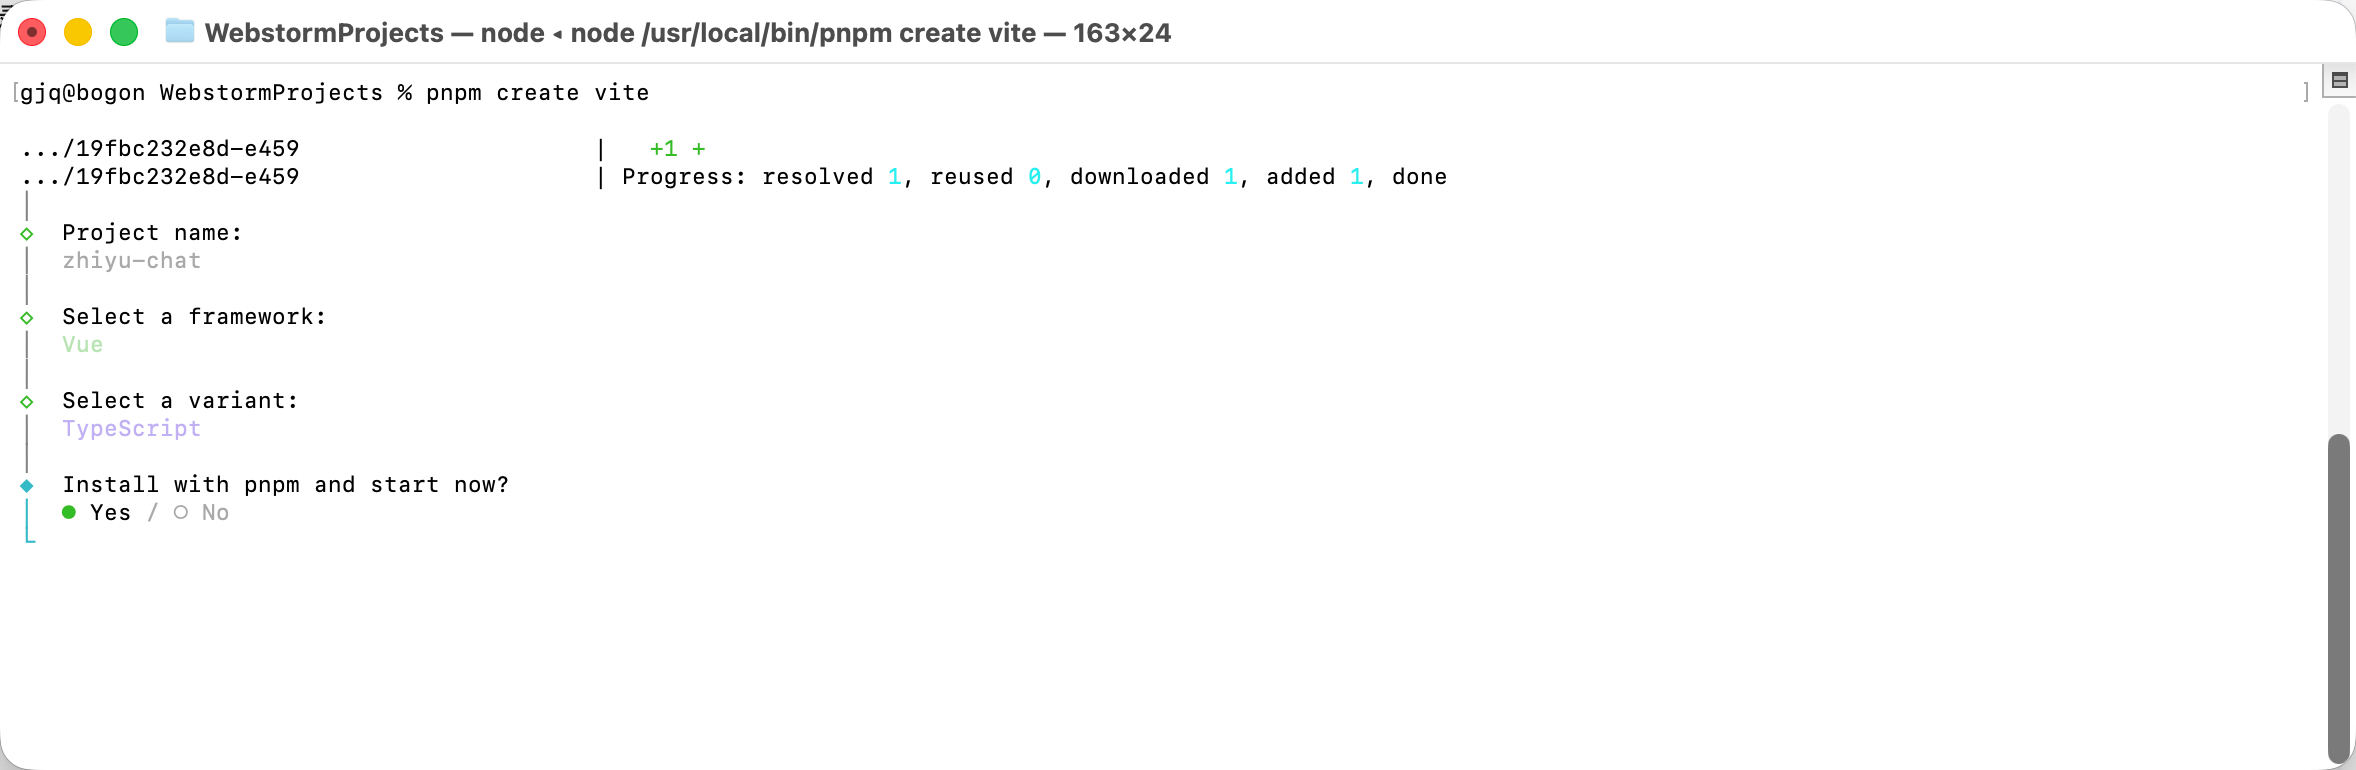
  3. 然后pnpm 运行并启动 如图3 图4
3

vite 配置

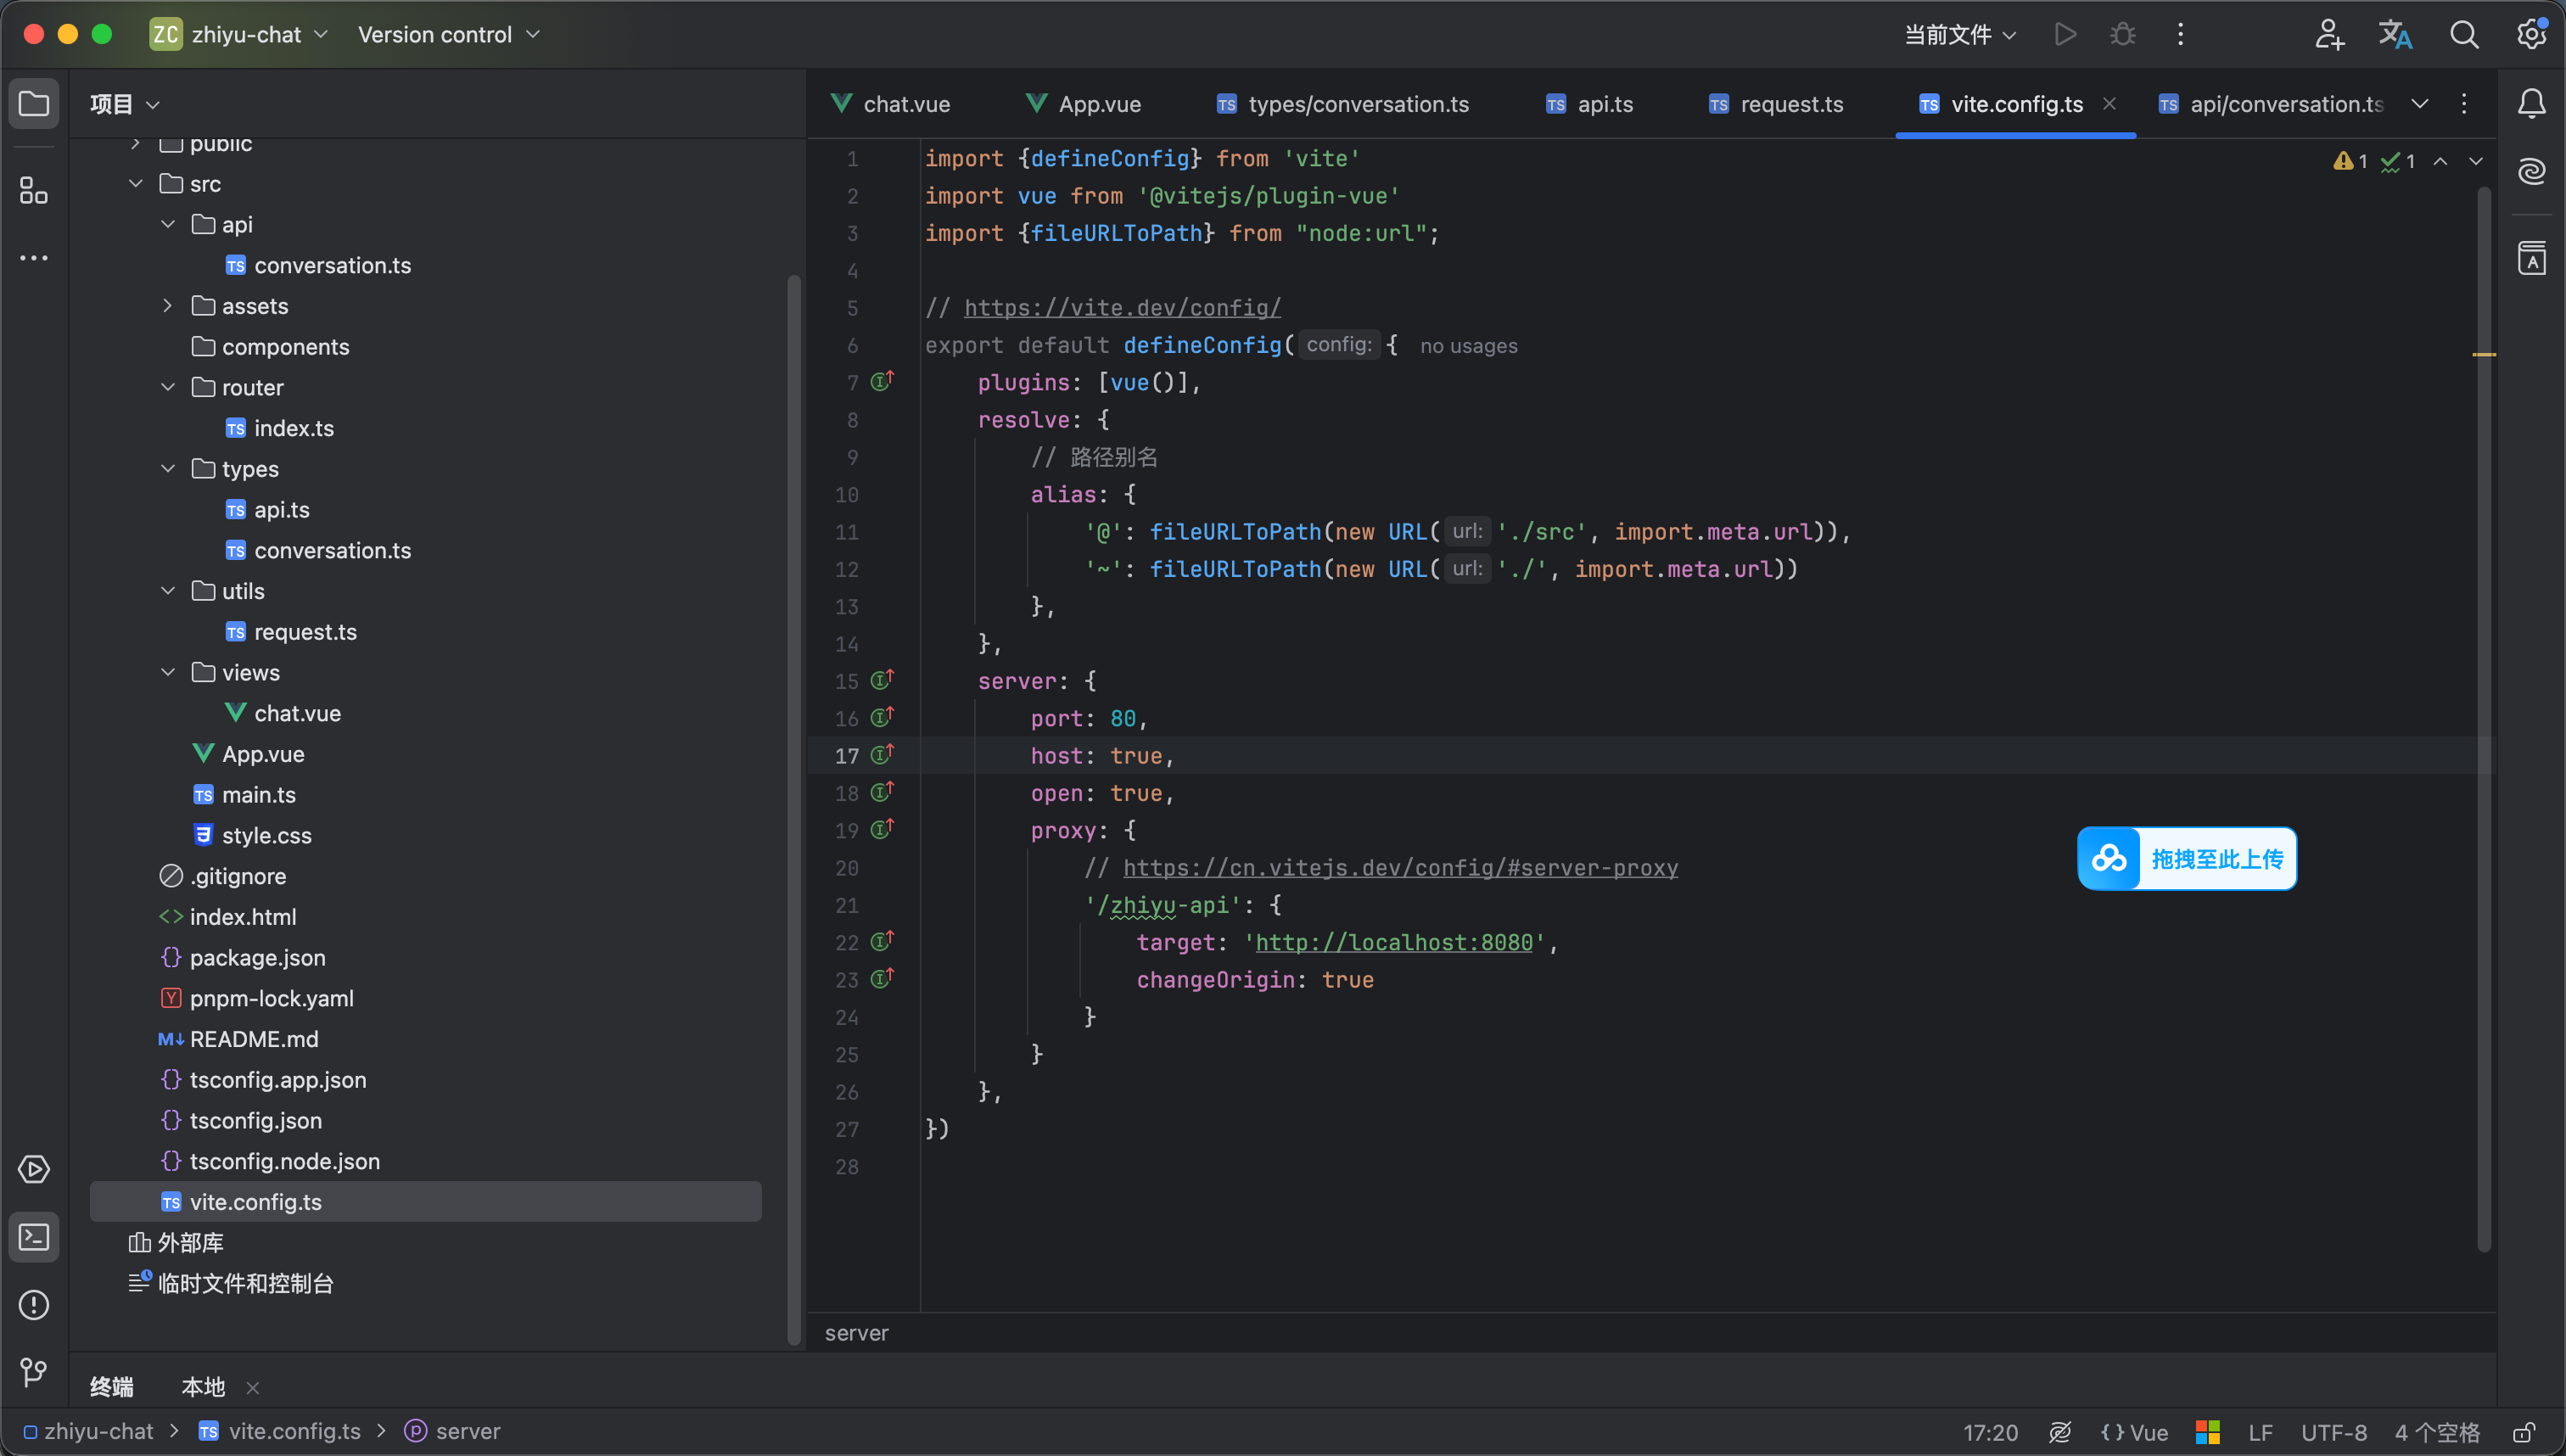
修改 vite.config.ts 代码如下 这个配置里面也没用加什么其他代码 加了一个@别名 加了一个代理 如图1

import {defineConfig} from 'vite'
import vue from '@vitejs/plugin-vue'
import {fileURLToPath} from "node:url";

// https://vite.dev/config/
export default defineConfig({
plugins: [vue()],
resolve: {
// 路径别名
alias: {
'@': fileURLToPath(new URL('./src', import.meta.url)),
'~': fileURLToPath(new URL('./', import.meta.url))
},
},
server: {
port: 80,
host: true,
open: true,
proxy: {
// https://cn.vitejs.dev/config/#server-proxy
'/zhiyu-api': {
target: 'http://localhost:8080',
changeOrigin: true
}
}
},
})


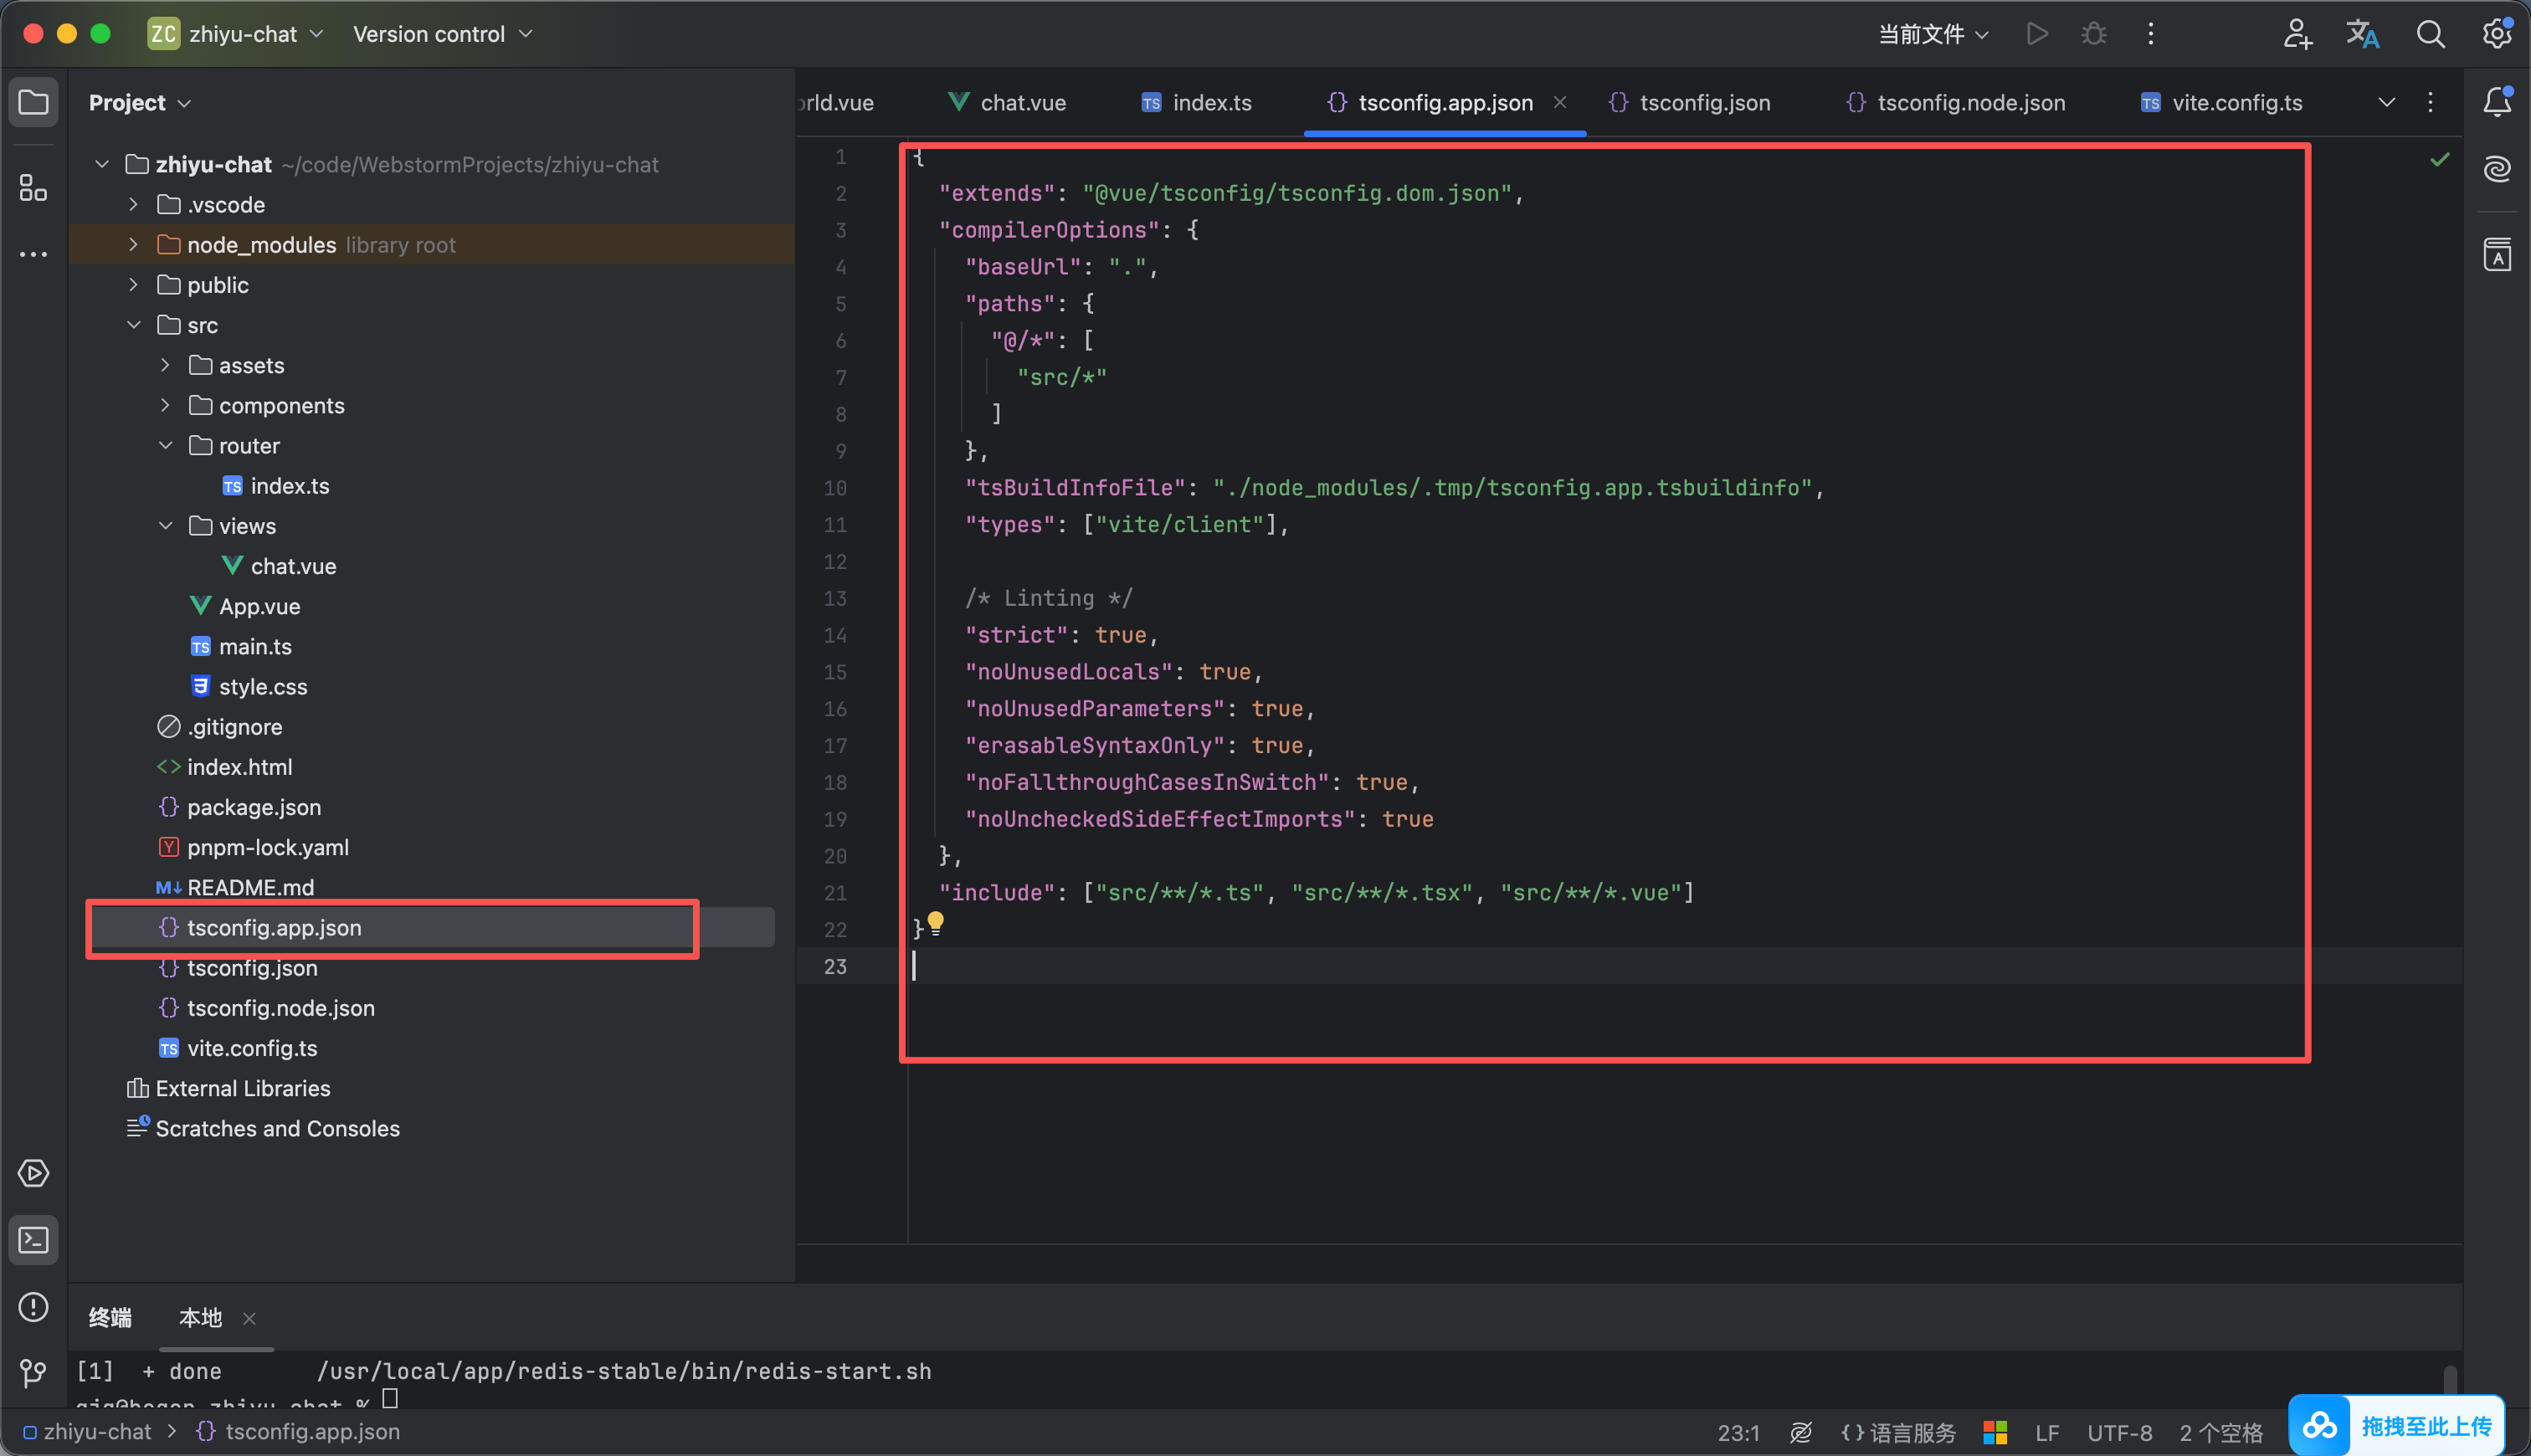
修改tsconfig.app.json 配置如下 这里面对比原本就叫一个paths 也是别名 是为了让ts识别@ 如图2所示

{
"extends": "@vue/tsconfig/tsconfig.dom.json",
"compilerOptions": {
"baseUrl": ".",
"paths": {
"@/*": [
"src/*"
]
},
"tsBuildInfoFile": "./node_modules/.tmp/tsconfig.app.tsbuildinfo",
"types": ["vite/client"],

/* Linting */
"strict": true,
"noUnusedLocals": true,
"noUnusedParameters": true,
"erasableSyntaxOnly": true,
"noFallthroughCasesInSwitch": true,
"noUncheckedSideEffectImports": true
},
"include": ["src/**/*.ts", "src/**/*.tsx", "src/**/*.vue"]
}


4

前端路由配置

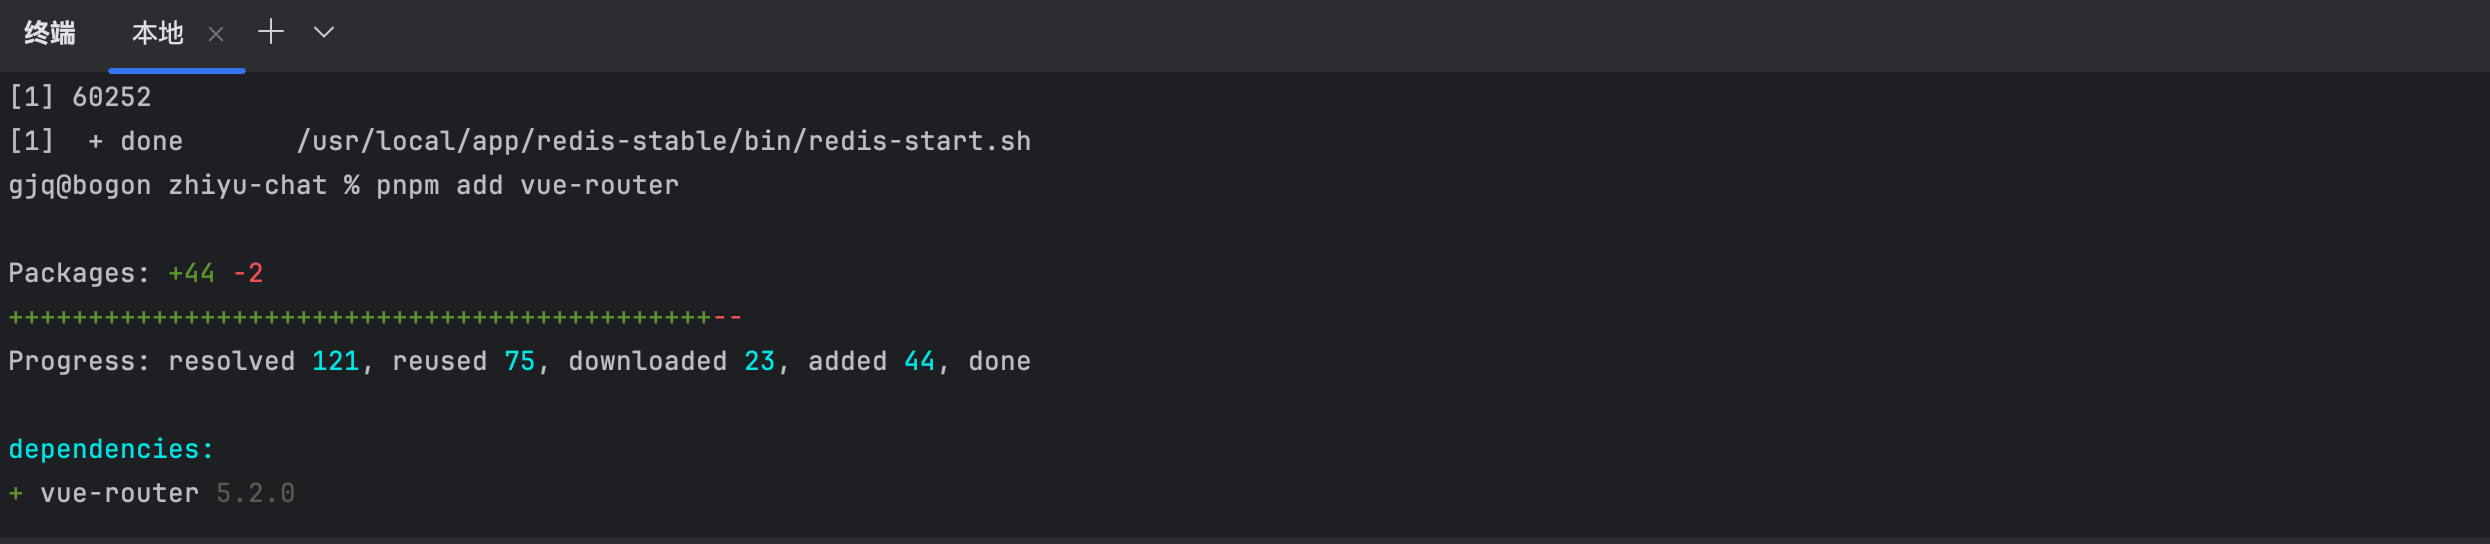
  1. 输入命令 pnpm add router
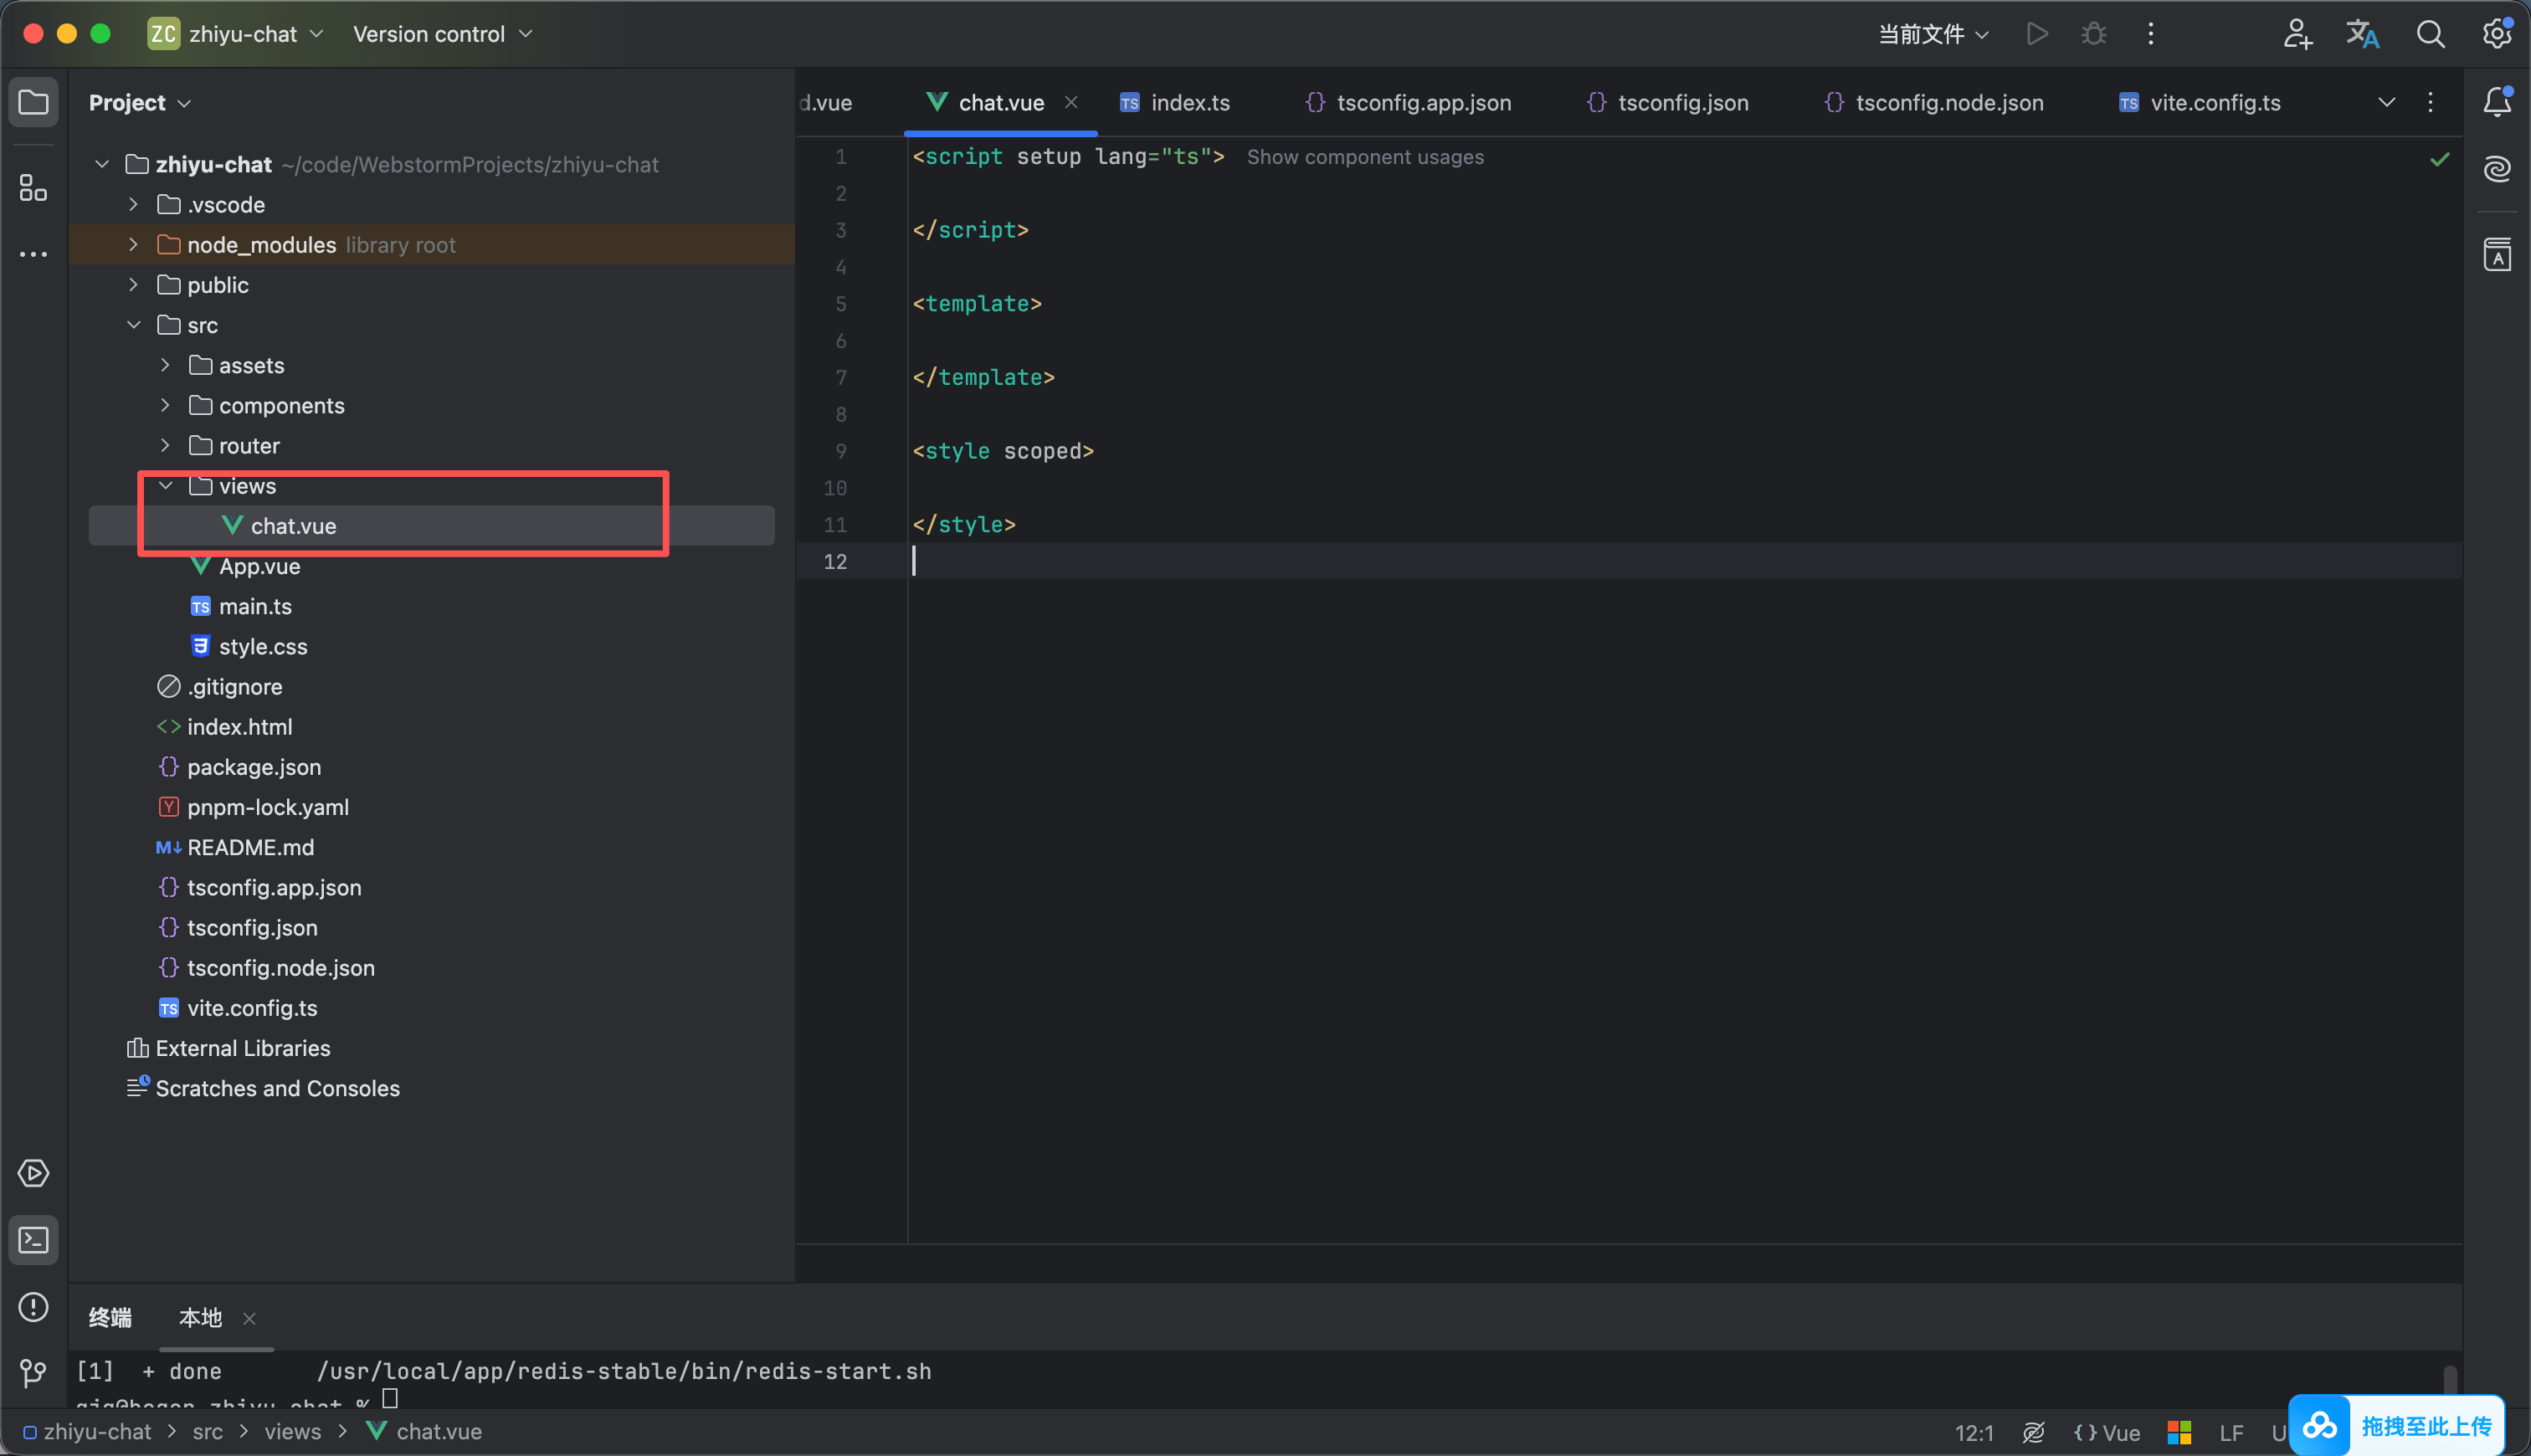
  2. 创建一个包views 这个包下创建一个vue文件chat.vue 这个就是我们的具体聊天页面了如图2
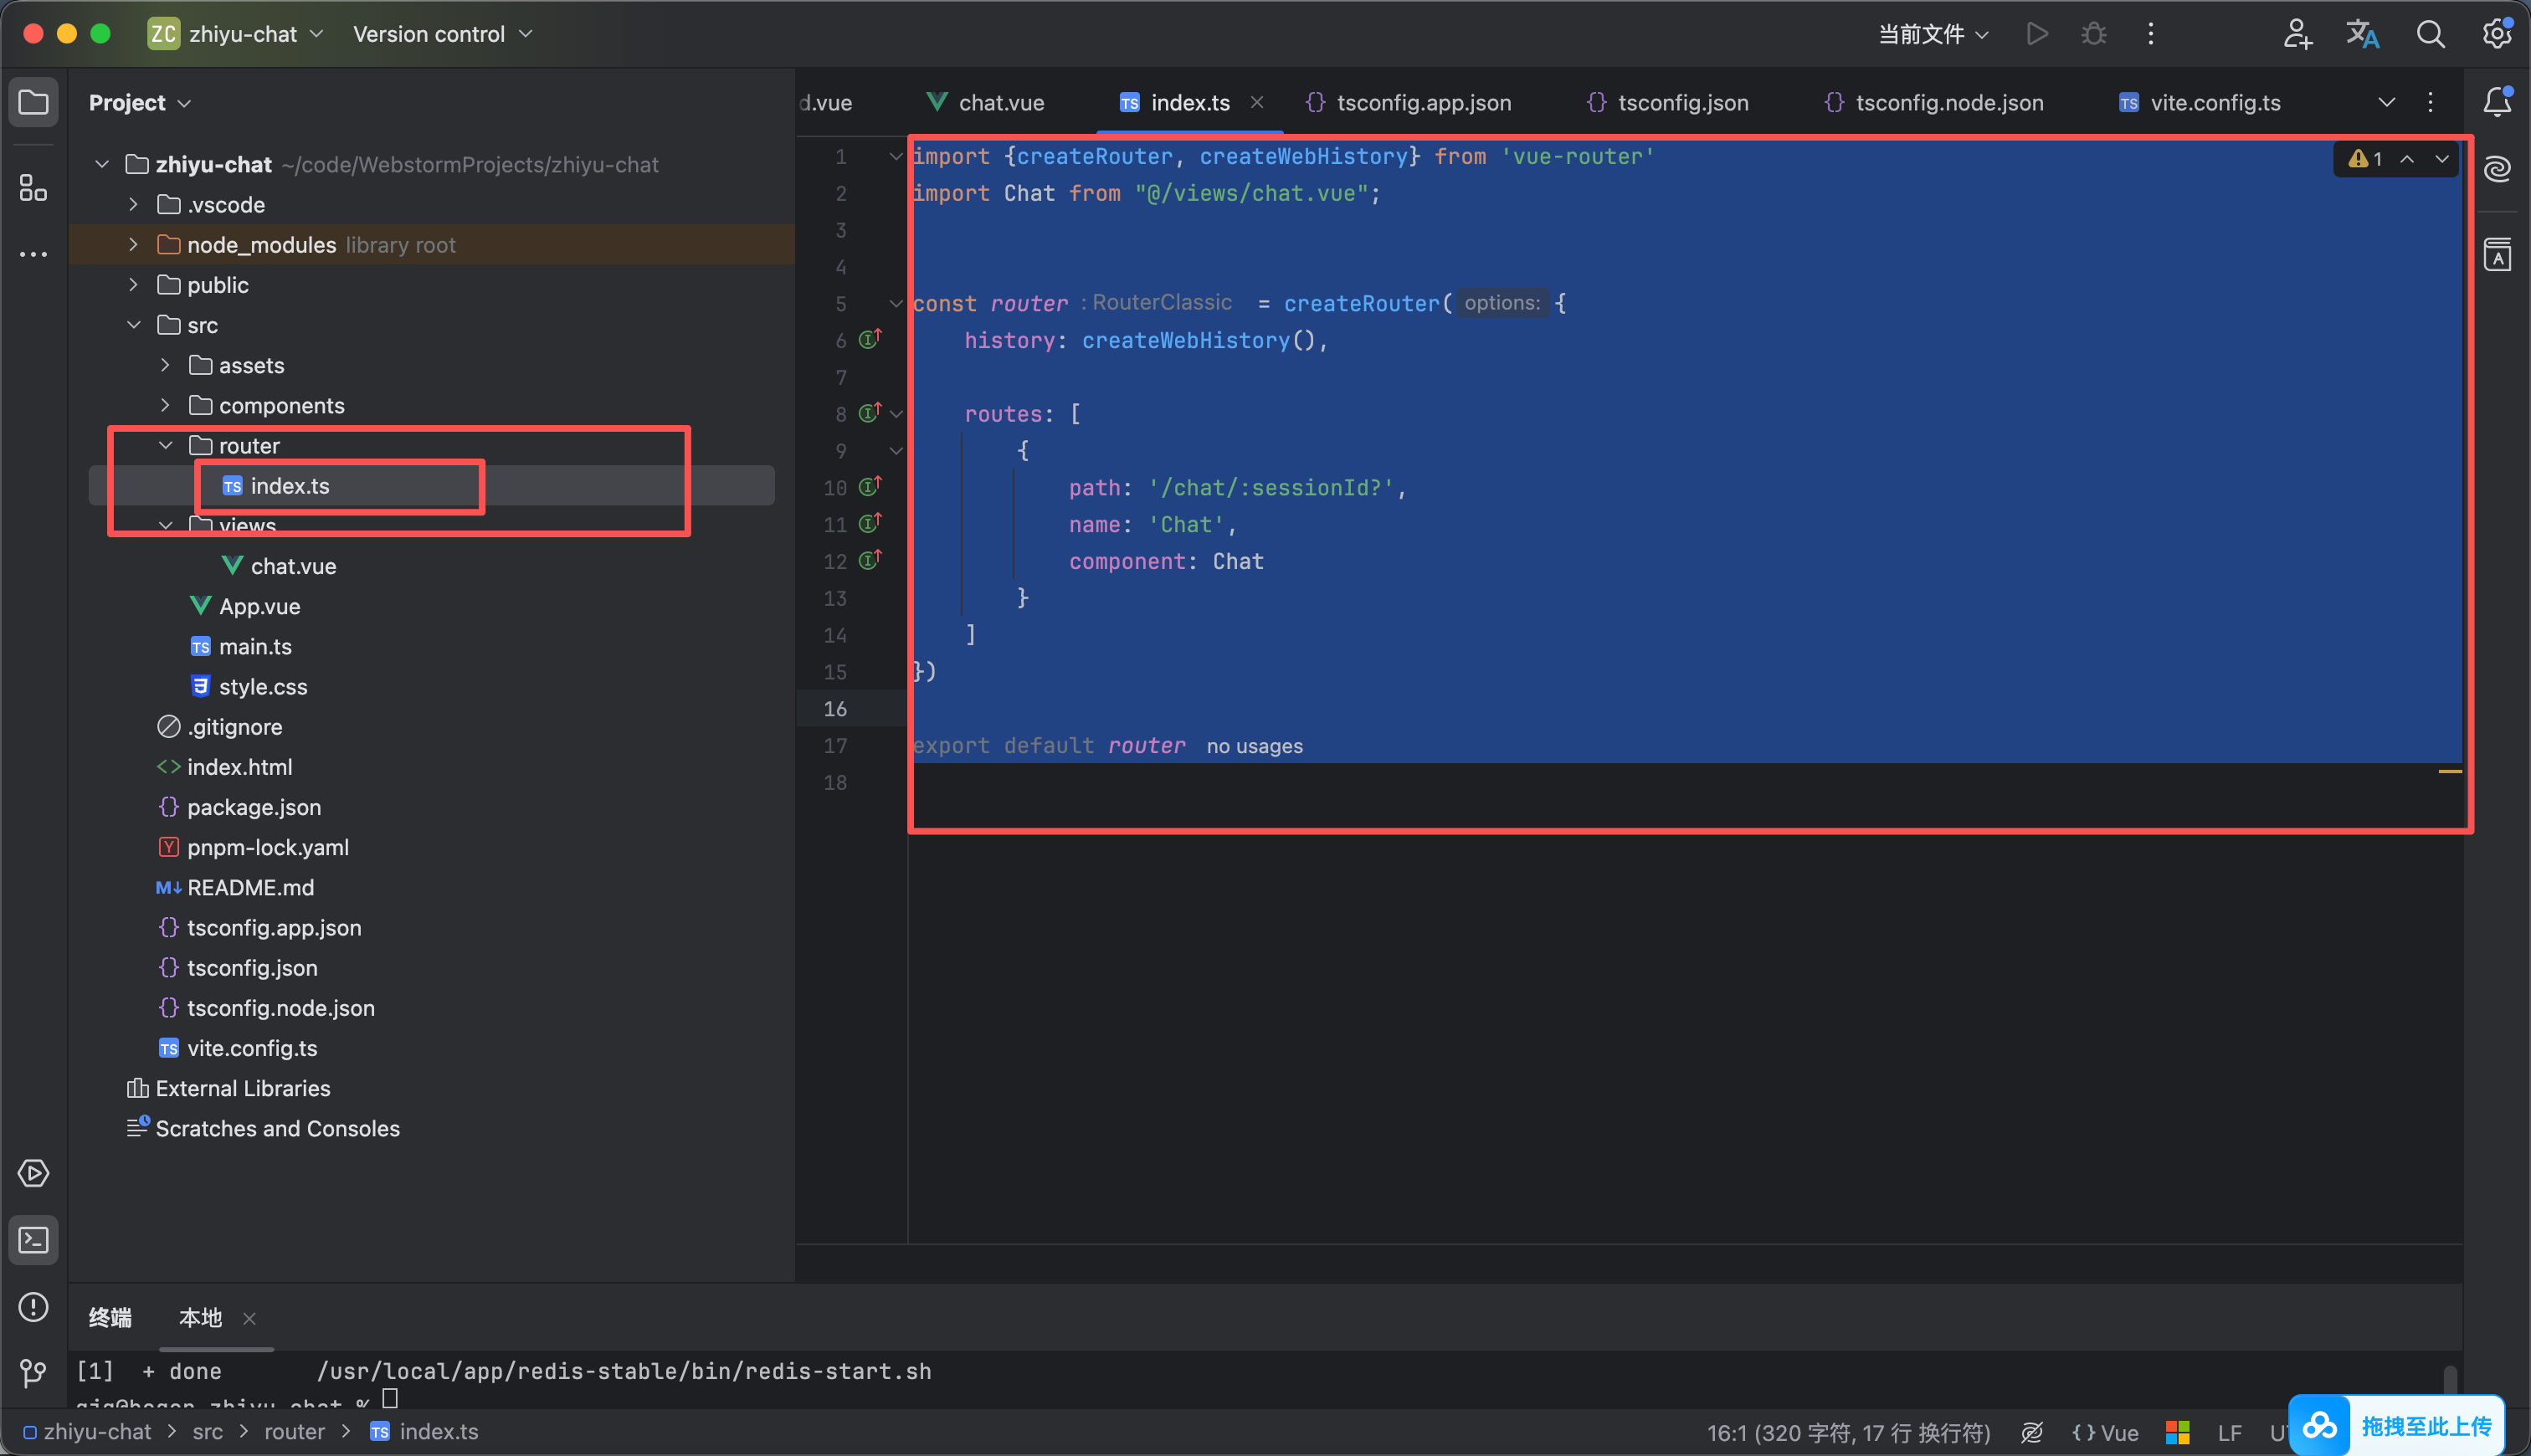
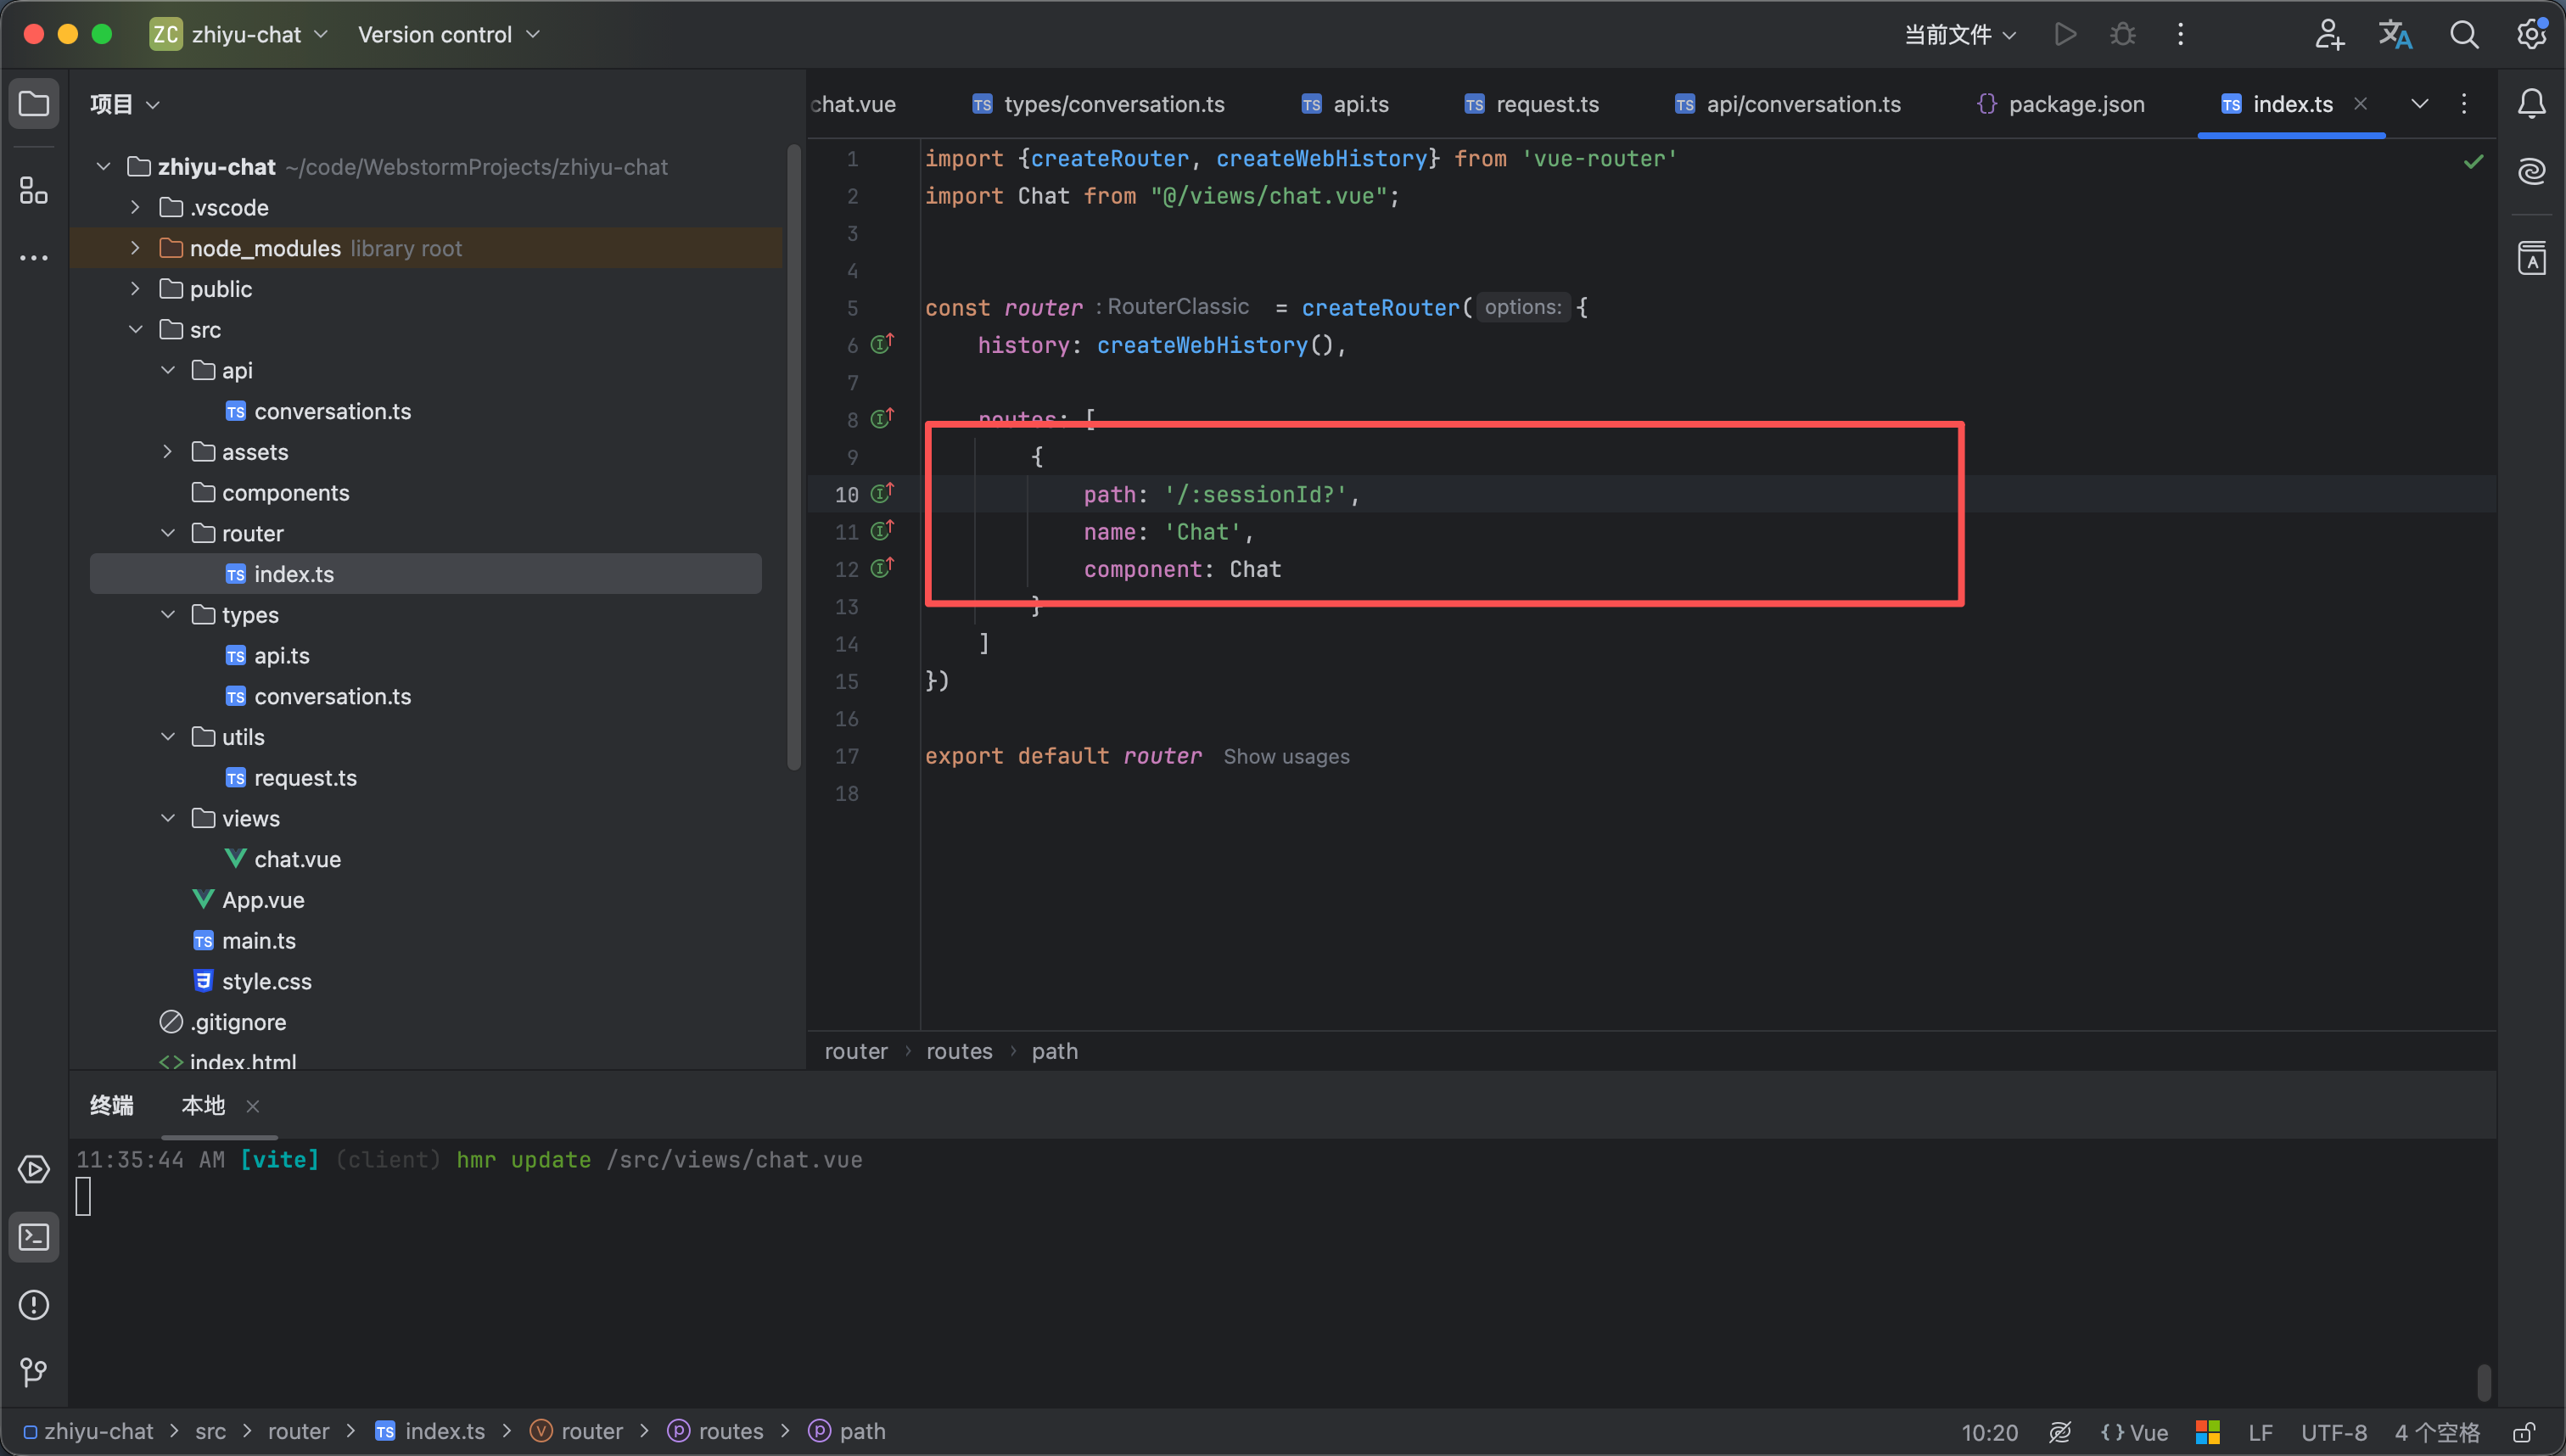
  3. 在src目录下创建一个包 名为router 里面创建一个index 文件 内容如下 如图3
import {createRouter, createWebHistory} from 'vue-router'
import Chat from "@/views/chat.vue";


const router = createRouter({
history: createWebHistory(),

routes: [
{
path: '/chat/:sessionId?',
name: 'Chat',
component: Chat
}
]
})

export default router
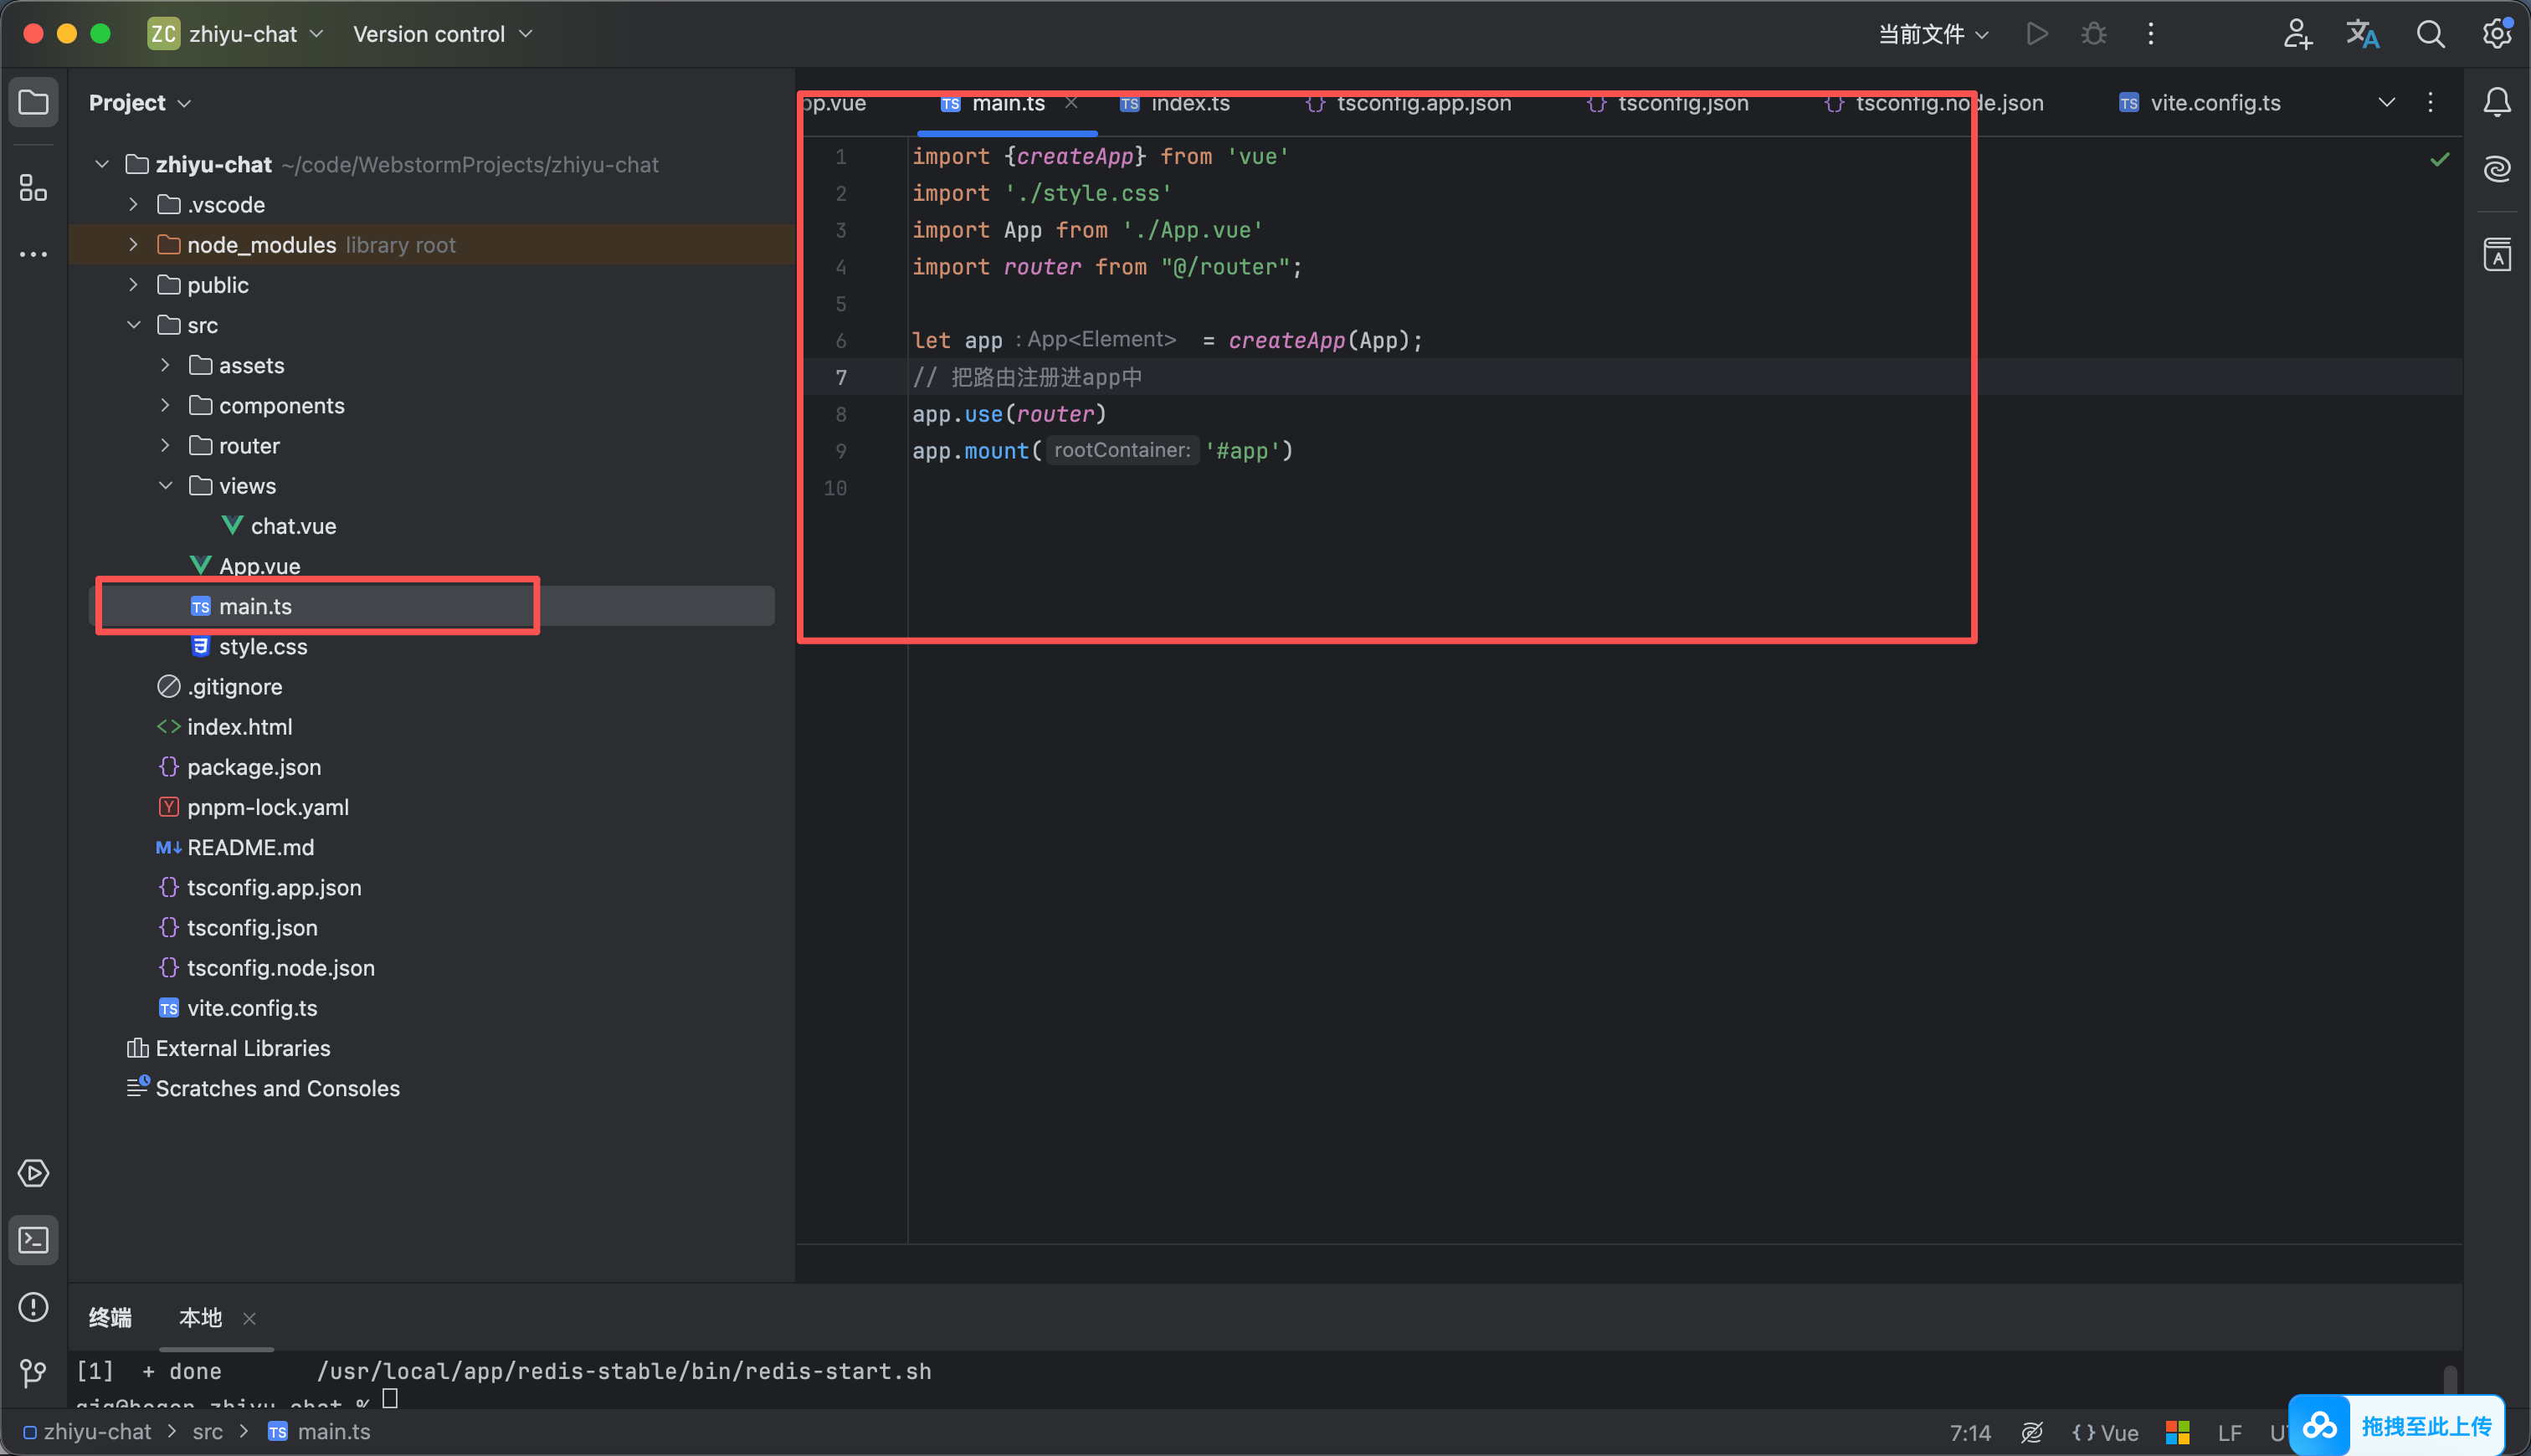
  1. 然后修改main.ts main.ts 是我们程序的入口 我们把路由应用进app中 如图4
import {createApp} from 'vue'
import './style.css'
import App from './App.vue'
import router from "@/router";

let app = createApp(App);
// 把路由注册进app中
app.use(router)
app.mount('#app')
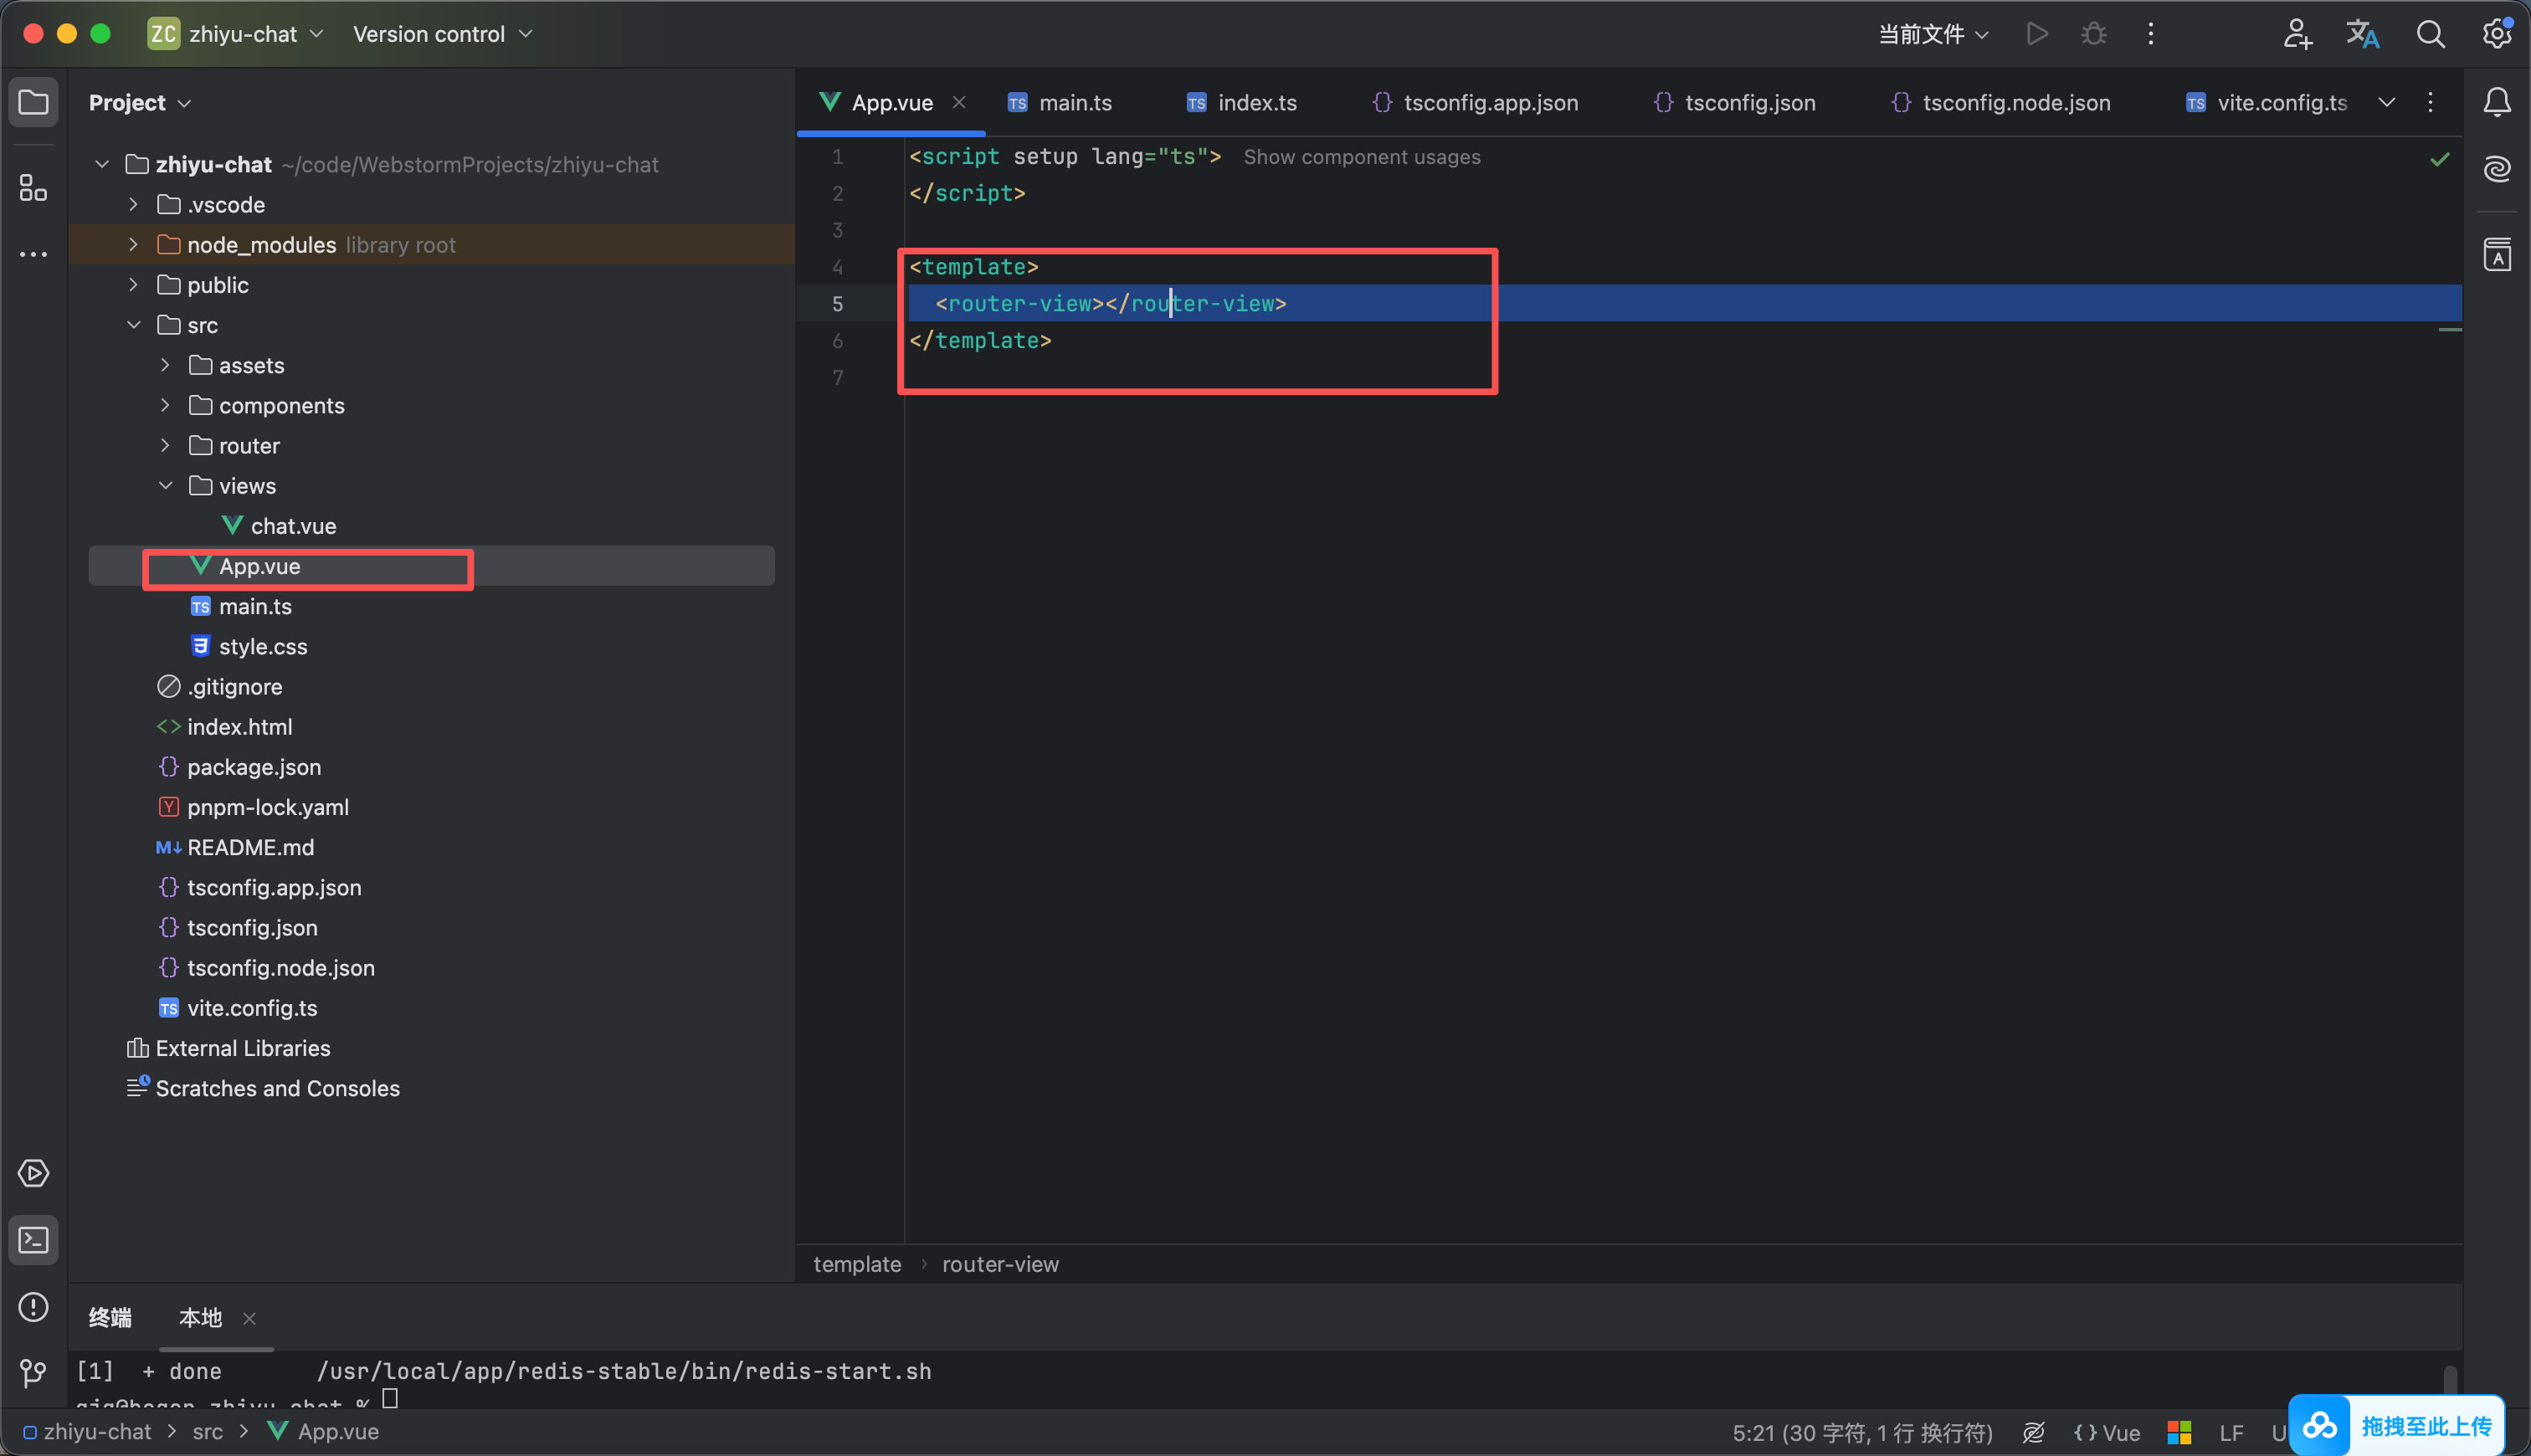
  1. 如图5所示把app.vue 的模版设置为路由的调用
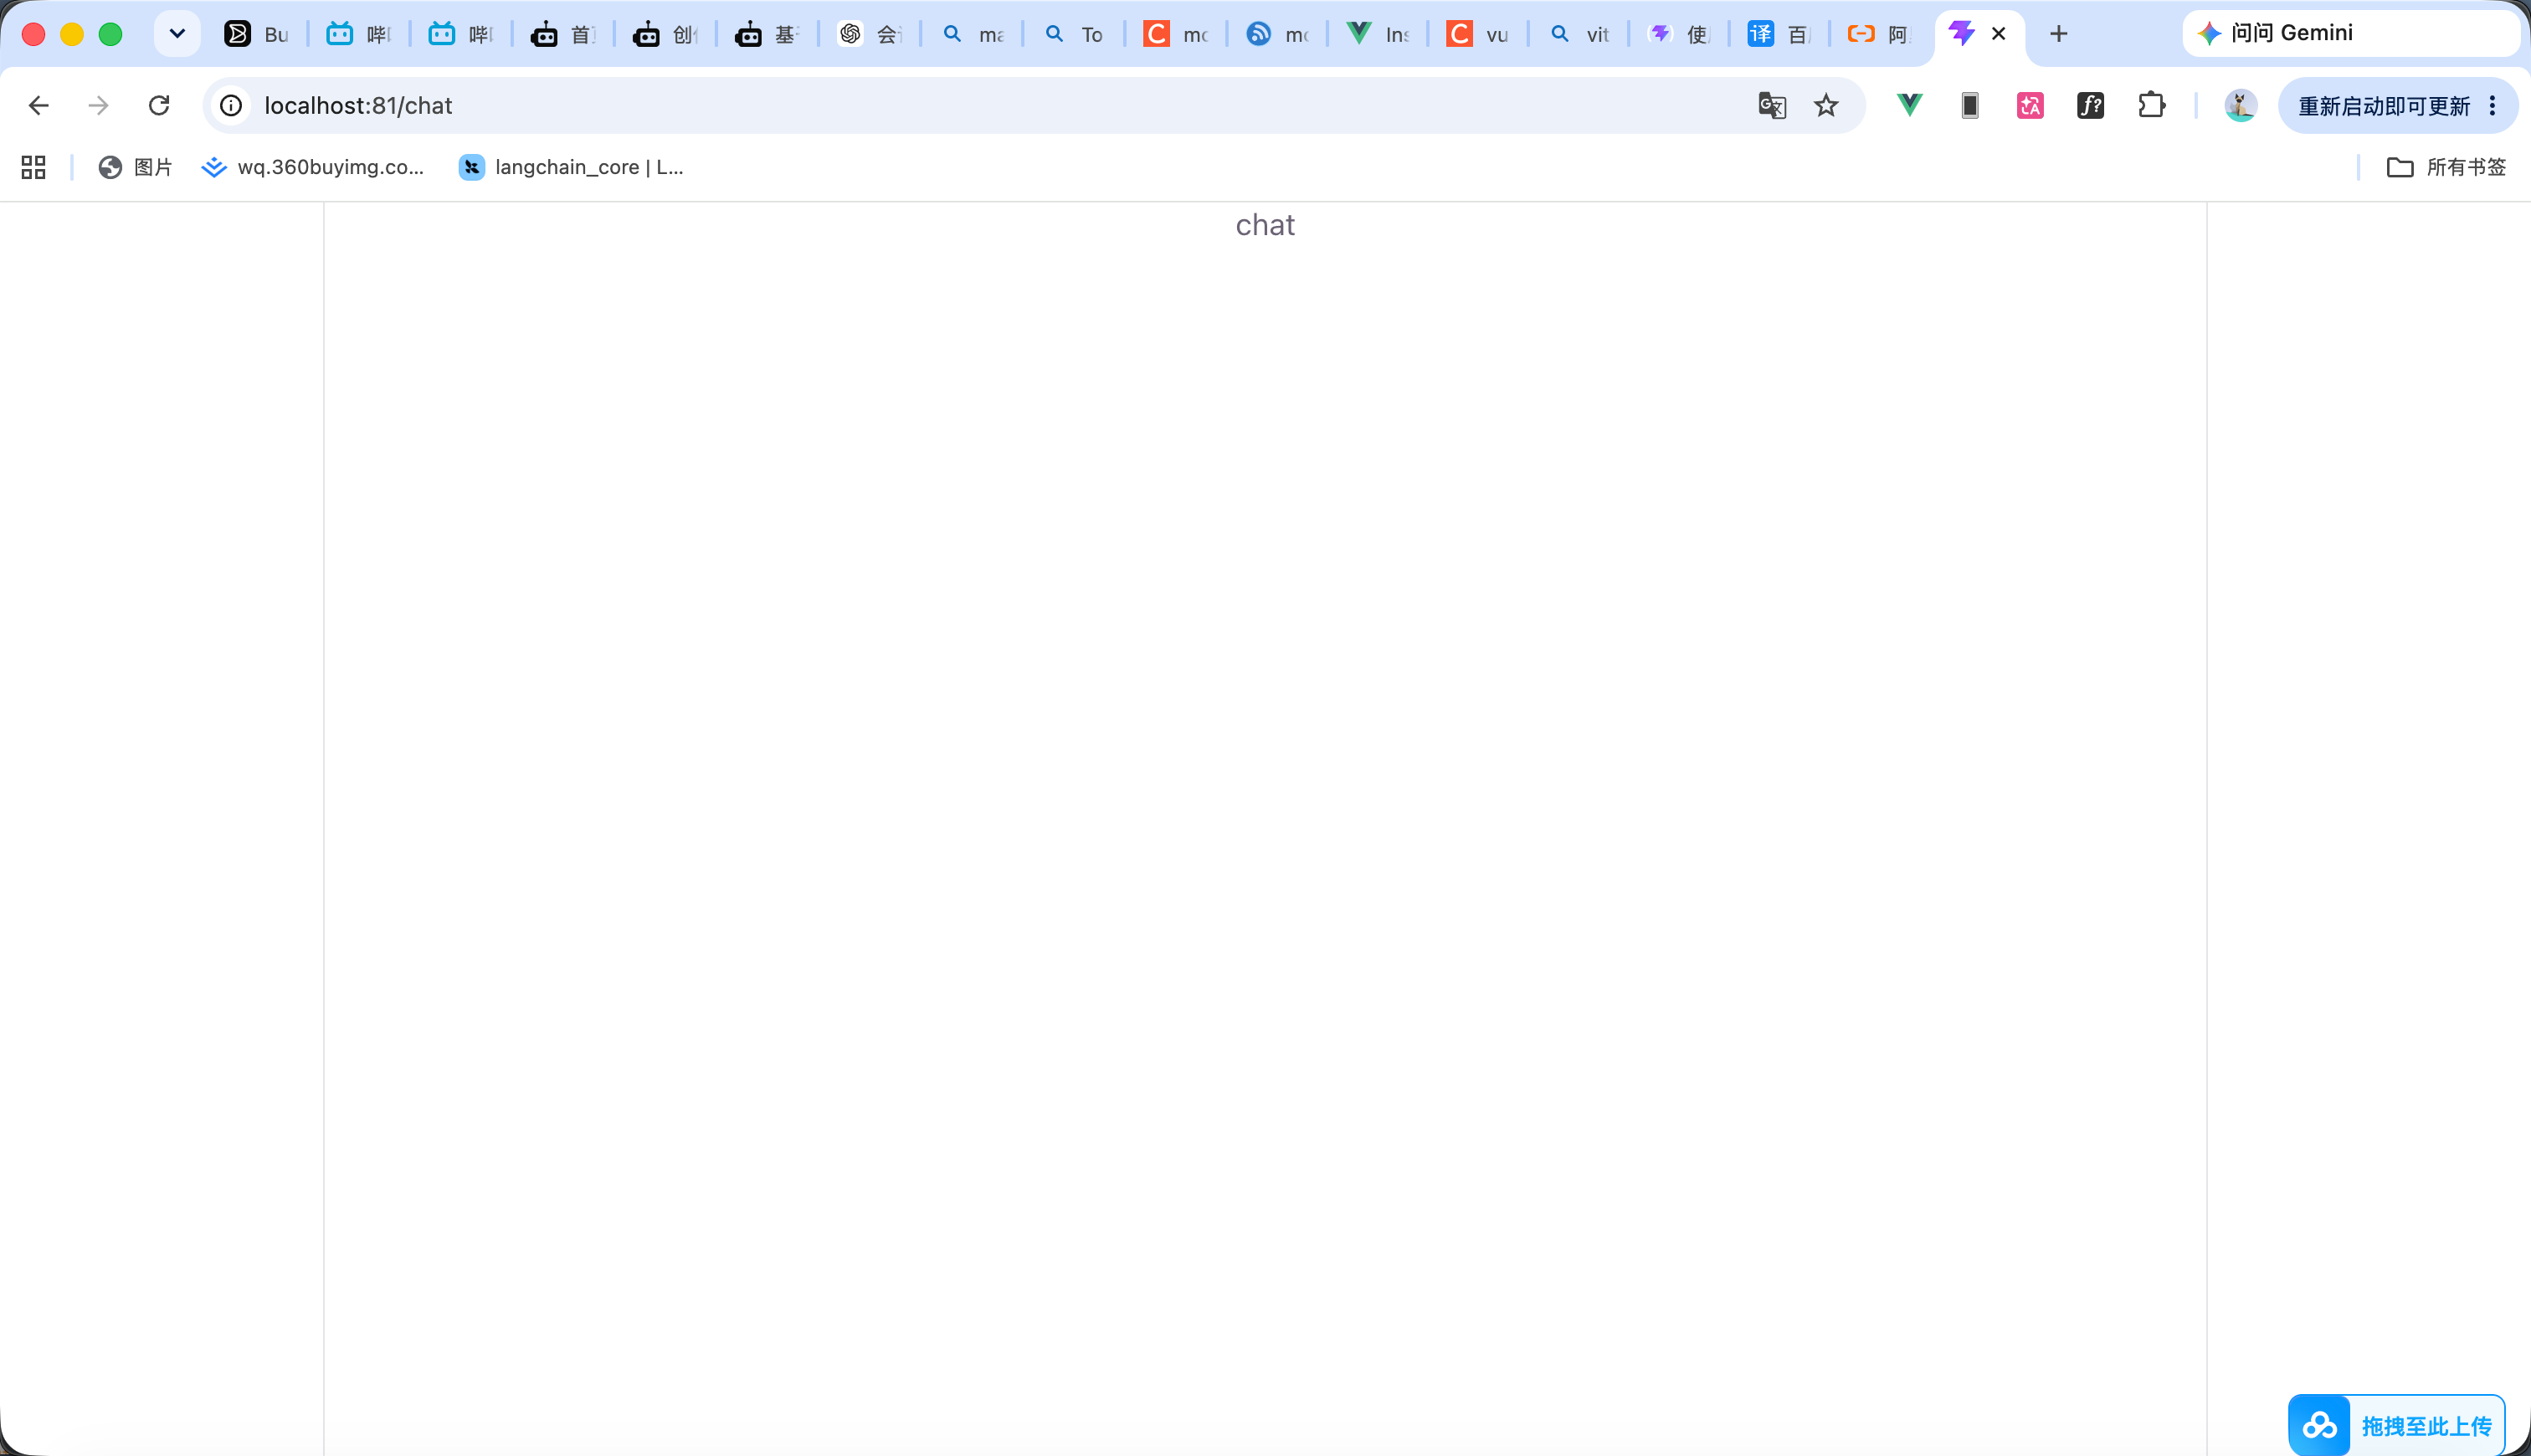
  2. 运行项目进入chat目录效果就如图6
  3. 也可以设置为根目录 就行如图7
5

静态页面编写

在 views下面的chat.vue 里面编写以下代码

图片资源再附件里


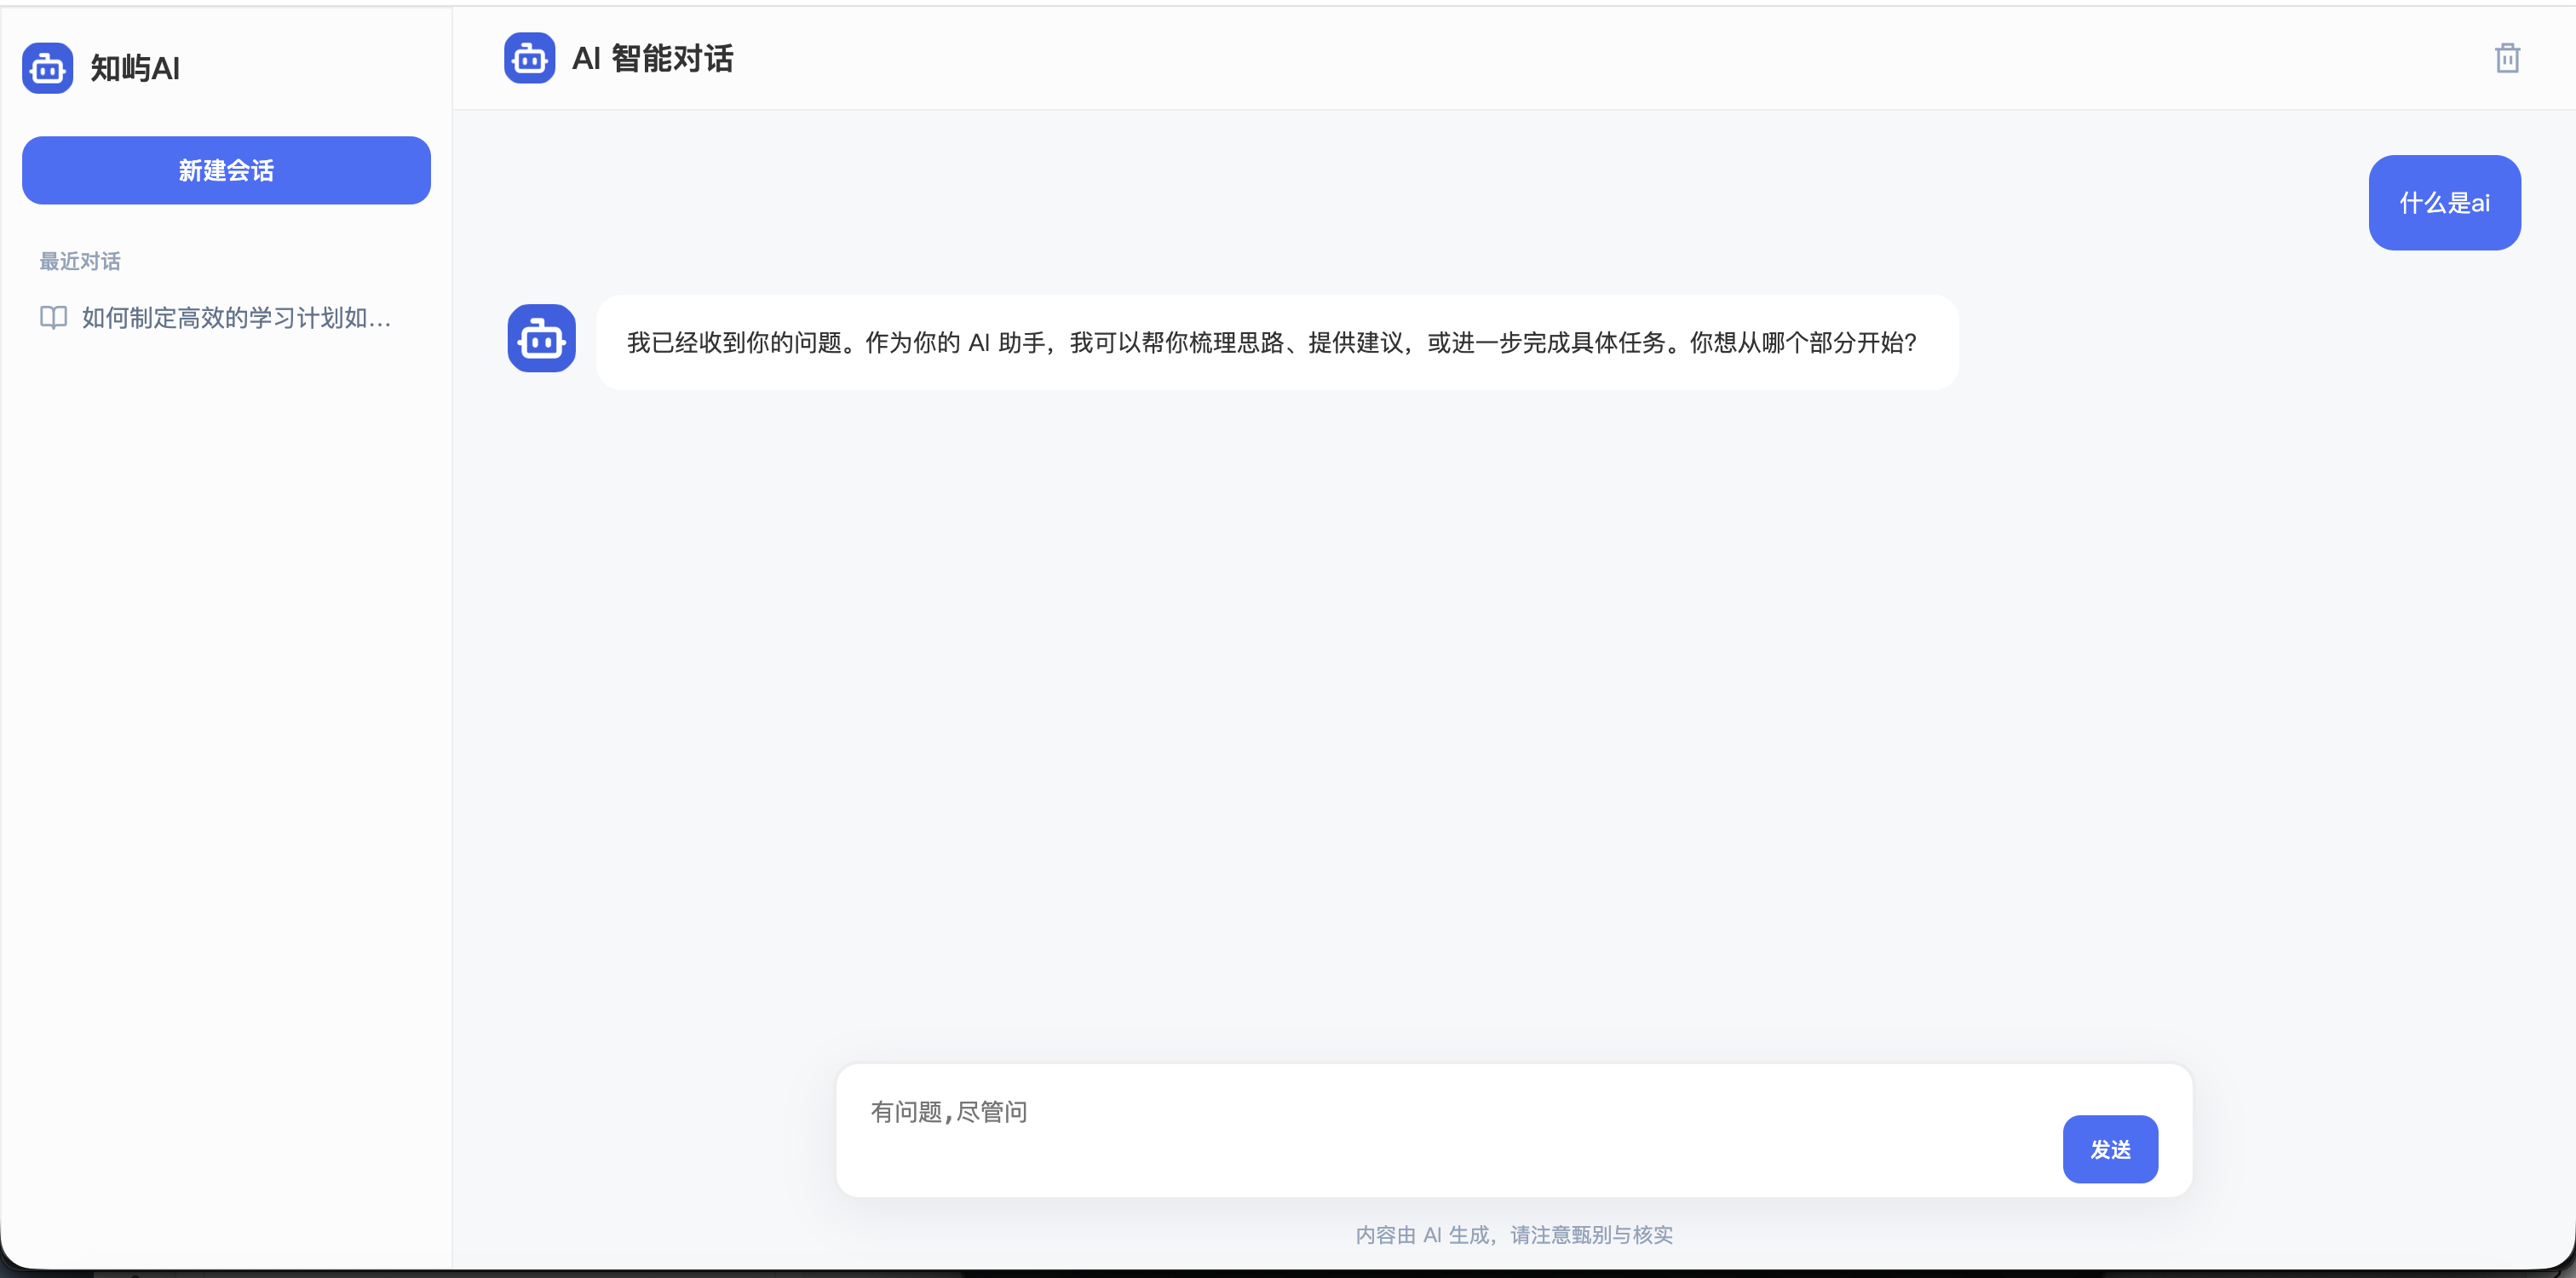
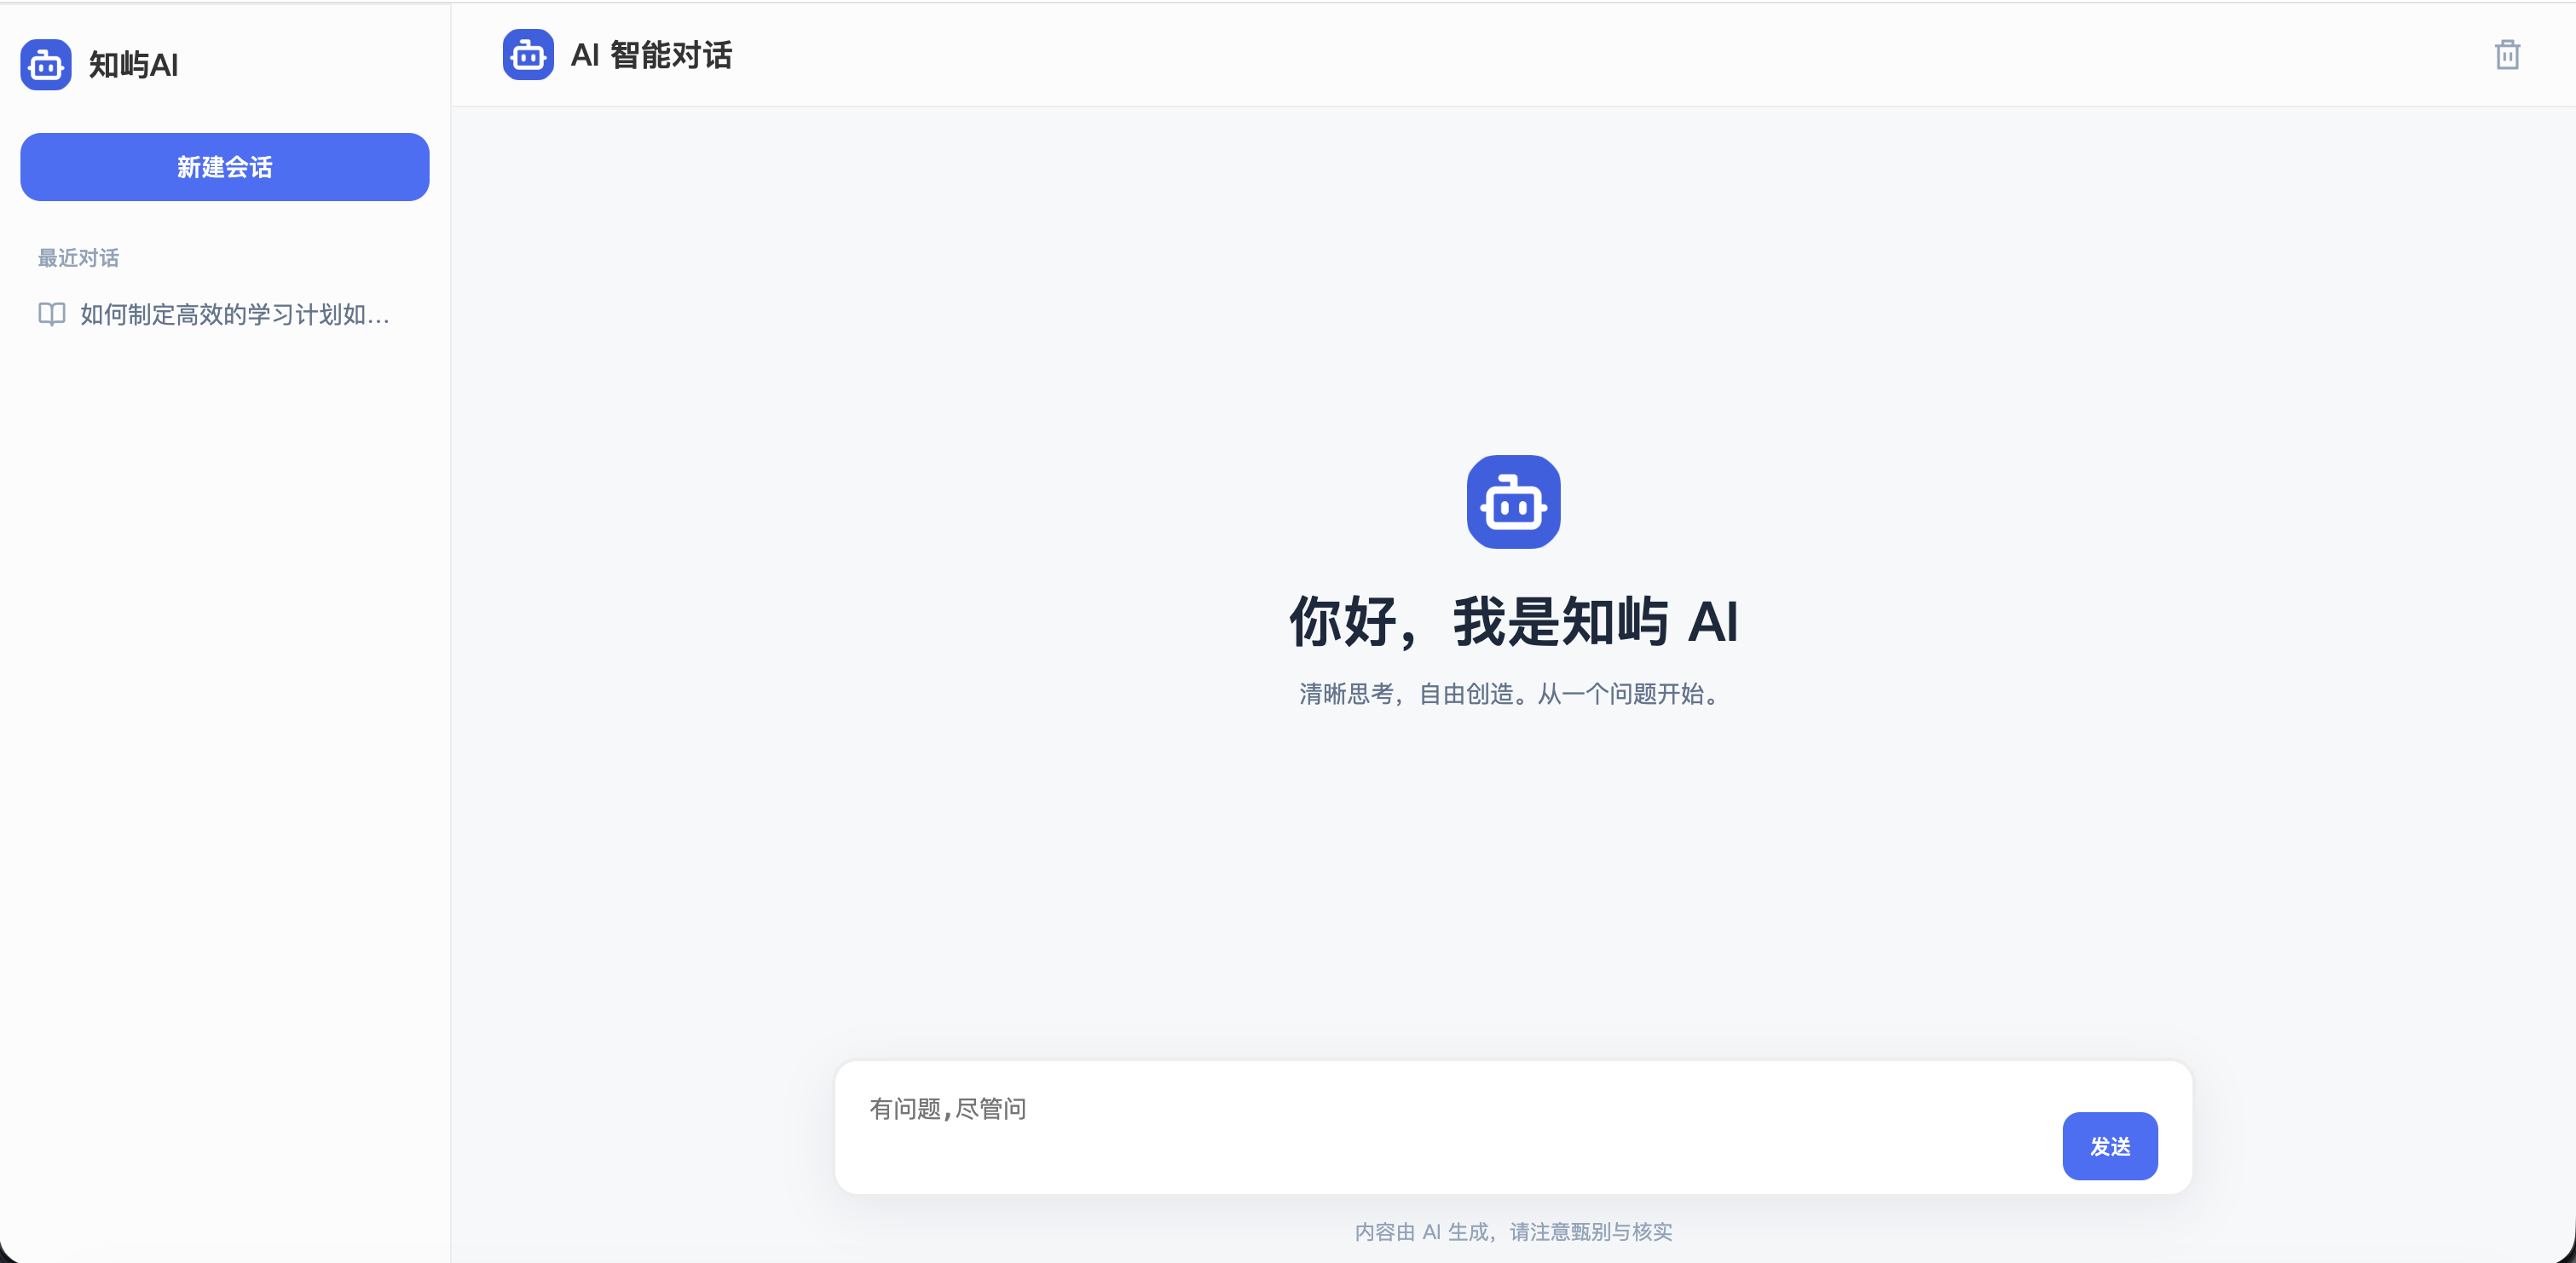
大家可以通过改变 isExistsChat 的样式来设置有内容时候的样式和无内容时候的样式 效果如图

代码如下

<script setup lang="ts">

import {ref} from "vue";

// 是否存在聊天
const isExistsChat = ref<boolean>(true)

const textareaRef = ref<HTMLTextAreaElement | null>(null)

// 最大高度限制 (px)
const maxHeight = window.innerHeight * 0.5

// 动态调整高度
const adjustHeight = () => {
const el = textareaRef.value
if (!el) return

// 先重置高度
el.style.height = 'auto'

// 根据滚动高度动态计算
if (el.scrollHeight > maxHeight) {
el.style.height = `${maxHeight}px`
el.style.overflowY = 'auto'
} else {
el.style.height = `${el.scrollHeight}px`
el.style.overflowY = 'hidden'
}
}

</script>

<template>
<div class="chat__container">
<aside class="chat__aside">
<div class="aside__header">
<img src="@/assets/logo.png" class="chat__logo" alt="logo"/>
<span>知屿AI</span>
</div>
<button class="aside__add-session">新建会话</button>
<!-- 会话列表 -->
<div class="aside__session-section">
<span class="aside__session-title">最近对话</span>
<div class="aside__session-list">
<div class="aside__session-item">
<img src="@/assets/book.png" width="17">
<span class="aside__session-text">如何制定高效的学习计划如何制定高效的学何制定高效的学习计划</span>
</div>
</div>
</div>
</aside>

<!-- 主体内容部分 -->
<main class="chat__main">
<header class="chat__header">
<div class="chat__header__title">
<img src="@/assets/logo.png" class="chat__logo" alt="logo"/>
<span>AI 智能对话</span>
</div>

<img src="@/assets/remove.png" class="chat__header__remove" alt="删除">
</header>

<div class="chat__main__wrapper">
<div class="chat__content">
<div class="chat__content-list" v-if="isExistsChat">
<div class="chat__content-item chat__content--user">
<div class="chat__content__text">
什么是ai
</div>
</div>
<div class="chat__content-item chat__content--assistant">
<div class="chat__content__avatar">
<img src="@/assets/logo.png" width="100%" alt="logo"/>
</div>
<div class="chat__content__text">
我已经收到你的问题。作为你的 AI 助手,我可以帮你梳理思路、提供建议,或进一步完成具体任务。你想从哪个部分开始?
</div>
</div>


</div>
<!-- 为空的样式 -->
<div class="chat__content-empty" v-else>
<img src="@/assets/logo.png" class="chat__content-empty__img" alt="logo"/>
<span class="chat__content-empty__title">你好,我是知屿 AI</span>
<span class="chat__content-empty__desc">清晰思考,自由创造。从一个问题开始。</span>
</div>
</div>

<div class="chat__input-container">
<textarea class="chat__input-wrapper" @input="adjustHeight" ref="textareaRef" placeholder="有问题,尽管问"/>
<button class="chat-send-btn">发送</button>
</div>

<div class="chat__main__footer">
内容由 AI 生成,请注意甄别与核实
</div>
</div>

</main>
</div>
</template>

<style lang="scss" scoped>
// 页面整体
.chat__container {
height: 100vh;
display: flex;
}

// 侧边栏部分
.chat__aside {
display: flex;
flex-direction: column;
gap: 25px;
padding: 20px 12px 12px;
background-color: #fcfcfc;
width: 240px;
border: 1px solid #eeeeee;
}

// 侧边栏标题
.aside__header {
display: flex;
align-items: center;
flex-shrink: 0;
gap: 10px;
font-size: 18px;
color: #333333;
font-weight: 600;
}

// logo
.chat__logo {
width: 30px;
}

// 新建会话按钮
.aside__add-session {
font-weight: 500;
display: flex;
align-items: center;
justify-content: center;
height: 40px;
background-color: #4e6ef2;
border-radius: 12px;
color: white;
font-size: 14px;
border: none;
cursor: pointer;

&:hover {
background-color: #405fdc;
}
}

// 侧边栏的会话记录部分
.aside__session-section {
min-height: 0;
flex: 1;
display: flex;
flex-direction: column;
gap: 5px;
}

// 侧边栏的会话记录小标题
.aside__session-title {
padding-left: 10px;
color: #94a3b8;
font-size: 12px;
font-weight: 500;
}

// 侧边栏会话列表
.aside__session-list {
overflow-y: auto;
flex: 1;
display: flex;
flex-direction: column;

}

// 侧边栏会话项
.aside__session-item {
display: flex;
align-items: center;
gap: 8px;
font-size: 14px;
color: #64748b;
padding: 10px;
border-radius: 12px;

flex-shrink: 0;
}

// 侧边栏会话项文本
.aside__session-text {
white-space: nowrap;
overflow: hidden;
text-overflow: ellipsis;
flex: 1;
}

// 主体内容部分样式
.chat__main {
display: flex;
flex-direction: column;
flex: 1;
background-color: #f8f8f8;
}

// 头部
.chat__header {
display: flex;
align-items: center;
flex-shrink: 0;
justify-content: space-between;
padding: 0 30px;
height: 60px;
background-color: #fcfcfc;
border-bottom: 1px solid #eeeeee;
}

// 头部标题
.chat__header__title {
display: flex;
align-items: center;
justify-content: center;
gap: 10px;
font-size: 18px;
color: #333333;
font-weight: 600;
}

// 头部删除按钮
.chat__header__remove {
cursor: pointer;
width: 20px;
}

// 对话内容主部分
.chat__main__wrapper {
background-color: #f7f8fa;
flex: 1;
display: flex;
flex-direction: column;
align-items: center;
}

// 对话内容部分
.chat__content {
width: 100%;
padding: 26px 32px;
display: flex;
justify-content: center;
flex: 1;
}

// 聊天内容列表
.chat__content-list {
width: 100%;
display: flex;
flex-direction: column;
gap: 26px;
}

// 聊天的每一项
.chat__content-item {
align-items: flex-start;
display: flex;
width: 100%;
gap: 12px;
}

// 聊天文本部分样式
.chat__content__text {
max-width: 80%;
font-size: 14px;
border-radius: 15px;
padding: 14px 18px;
line-height: 28px;
}

// ai的内容样式
.chat__content--assistant {
justify-content: flex-start;

// 头像部分
.chat__content__avatar {
height: 40px;
width: 40px;
line-height: 80px;
}

// 文本部分
.chat__content__text {
color: #333333;
background-color: white;
}
}

// 用户的内容样式
.chat__content--user {
justify-content: flex-end;

// 文本部分
.chat__content__text {
color: white;
background-color: #4e6ef2;
}
}

// 对话空内容外层容器
.chat__content-empty {
display: flex;
flex-direction: column;
align-items: center;
justify-content: center;
}

// 对话空内容的图片
.chat__content-empty__img {
width: 55px;
margin-bottom: 20px;
}

// 空内容提示标题
.chat__content-empty__title {
font-size: 32px;
color: #1e293b;
font-weight: 600;
margin-bottom: 10px;
}

// 空内容提示描述
.chat__content-empty__desc {
font-size: 14px;
color: #64748b;
}

// 对话底部
.chat__main__footer {
padding: 12px;
text-align: center;
font-size: 12px;
color: #94a3b8;
}

// 输入部分的容器
.chat__input-container {
display: flex;
align-items: flex-end;
gap: 10px;
padding: 8px 20px;
background-color: white;
border: 2px solid #eeeeee;
border-radius: 15px;
box-shadow: 0 8px 30px rgba(29, 39, 64, 0.08);
width: 90%;
max-width: 800px;
}

// 输入里部分
.chat__input-wrapper {
width: 100%;
flex: 1;
outline: none;
border: none;
resize: none;
box-sizing: border-box;
padding: 10px 0;
line-height: 1.5;
min-height: 50px;
font-size: 14px;
color: #333333;
}


// 发送按钮
.chat-send-btn {
height: 40px;
font-size: 12px;
padding: 8px 16px;
border-radius: 10px;
color: white;
background-color: #4e6ef2;
font-weight: 500;
border: none;

&:hover {
background-color: #405fdc;
}
}
</style>


ZIP
assets.zip
16.11KB
6

vue axios requset

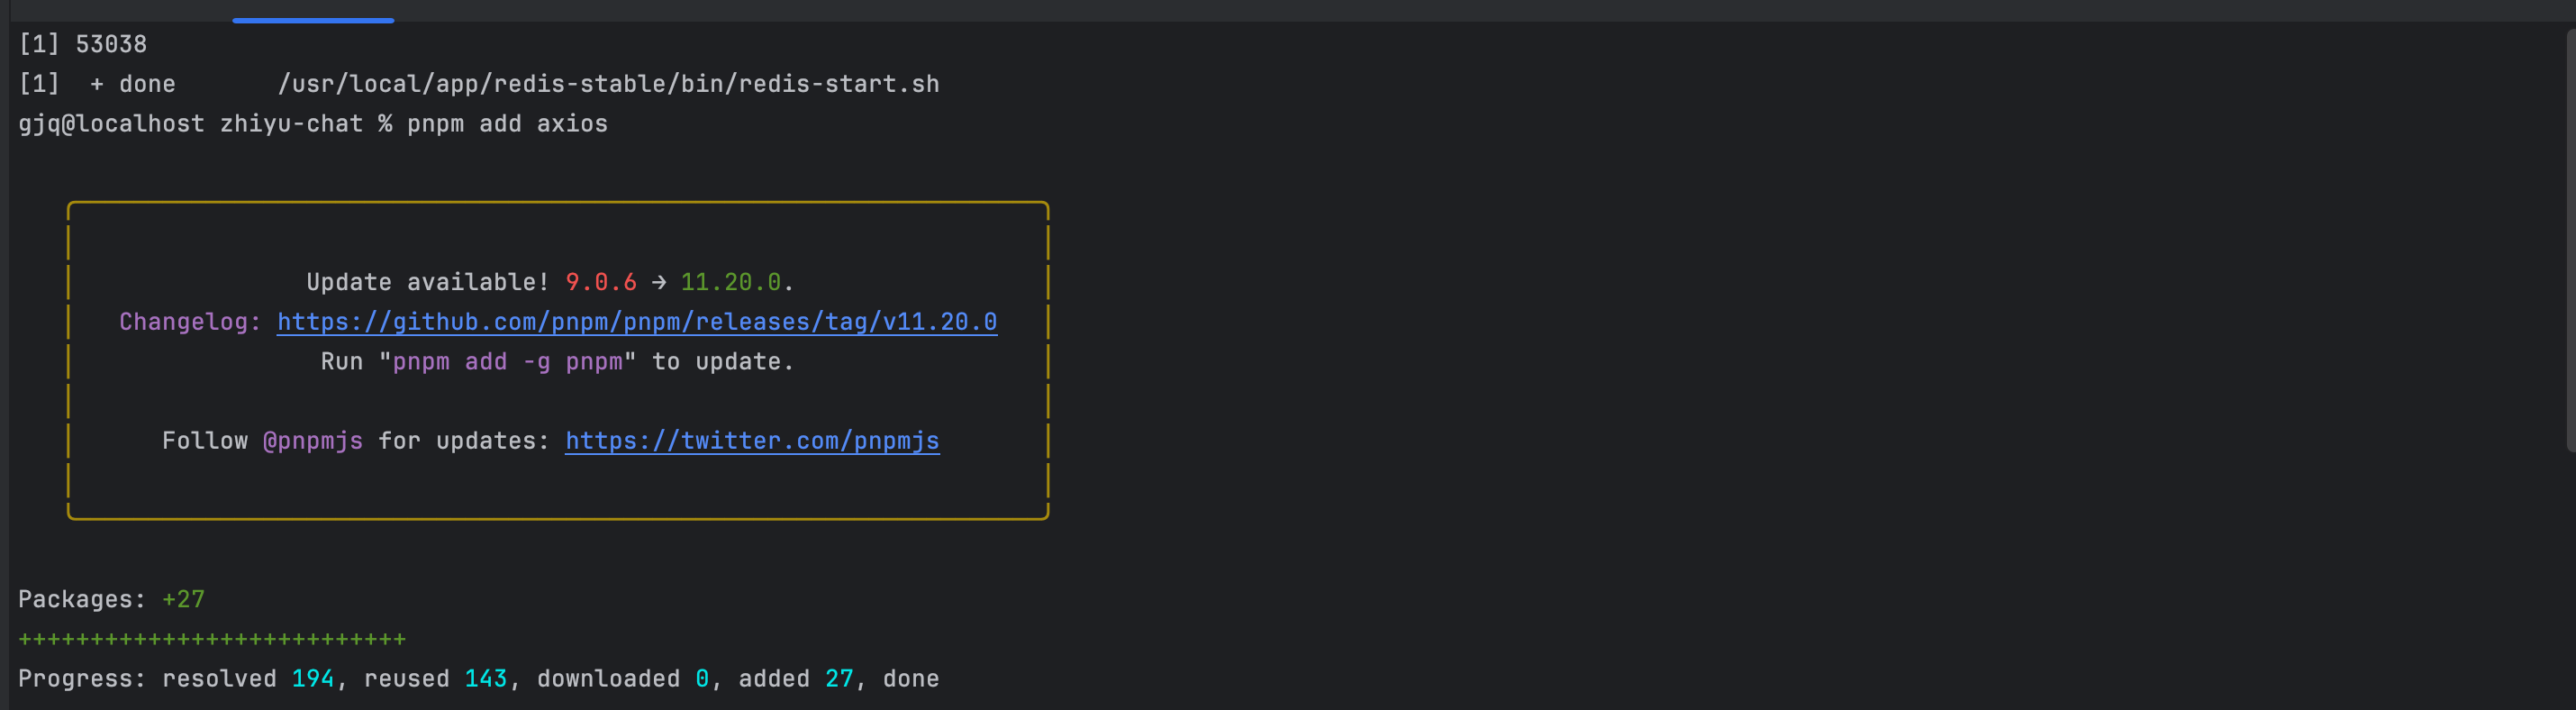
首先输入命令 pnpm add axios 安装axios 如图1

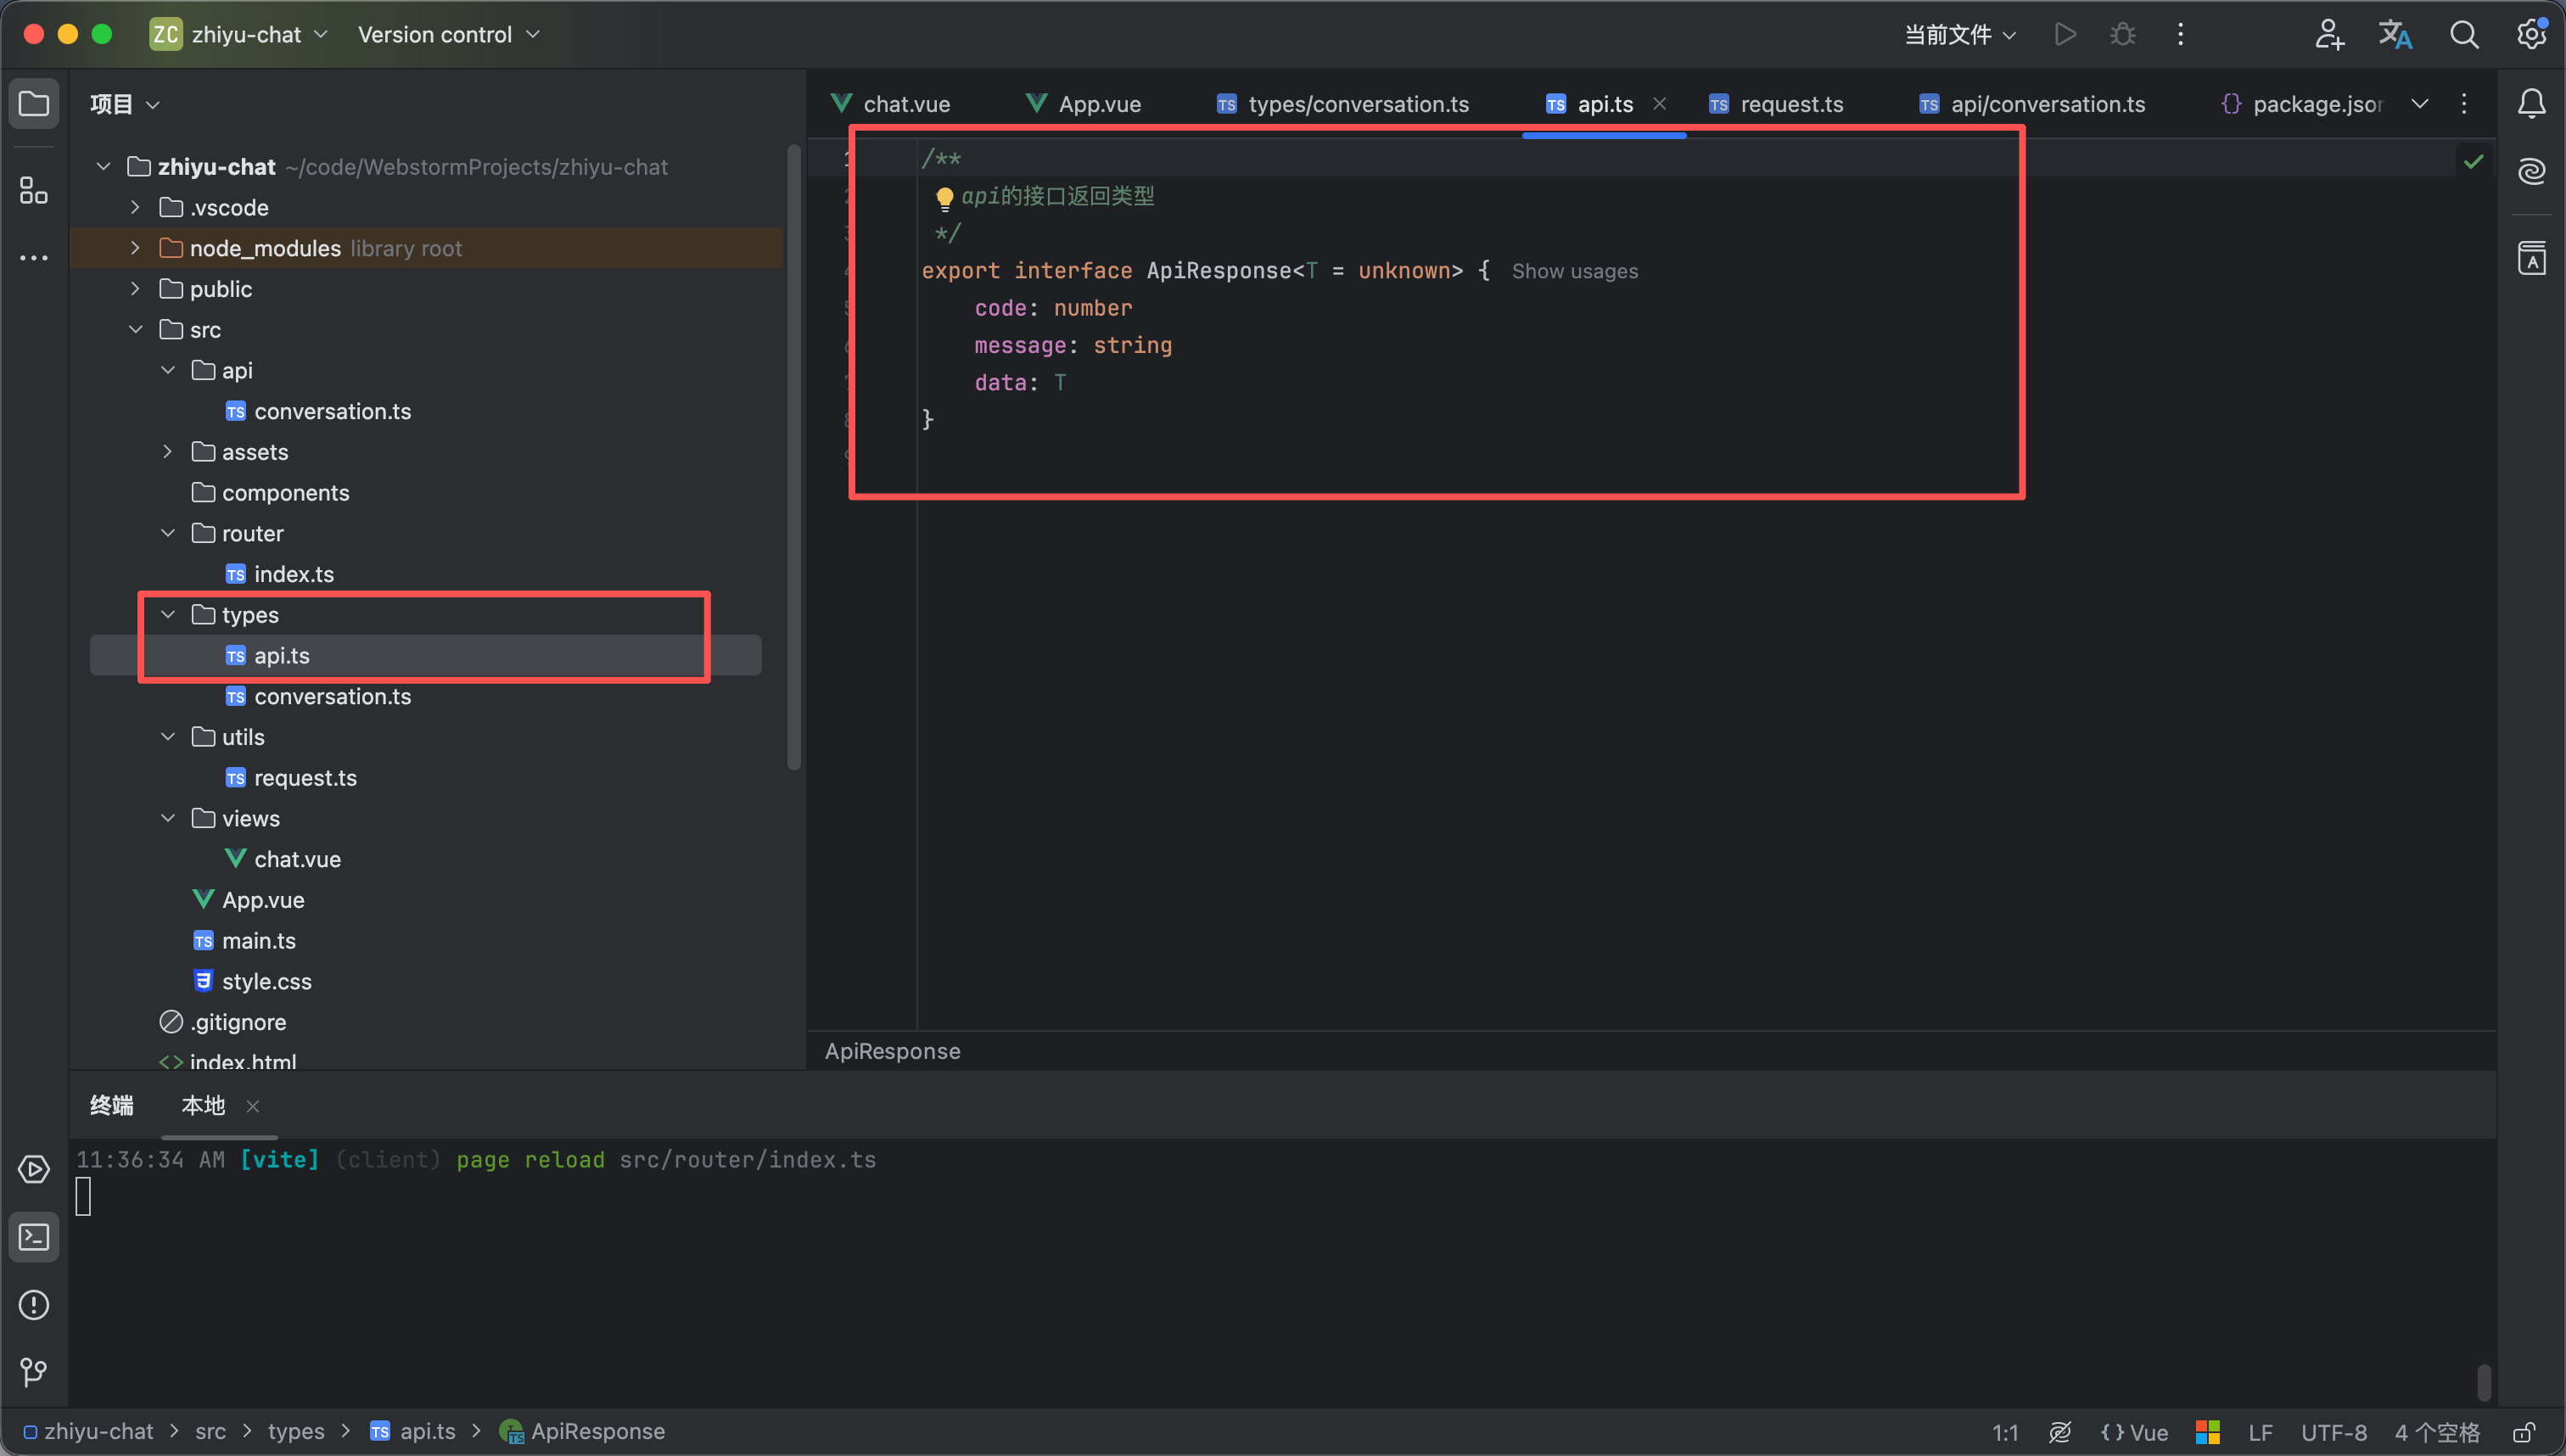
然后在src/types目录下创建一个接收响应的实体类 api.ts 代码如下 如图2

/**
* api的接口返回类型
*/
export interface ApiResponse<T = unknown> {
code: number
message: string
data: T
}


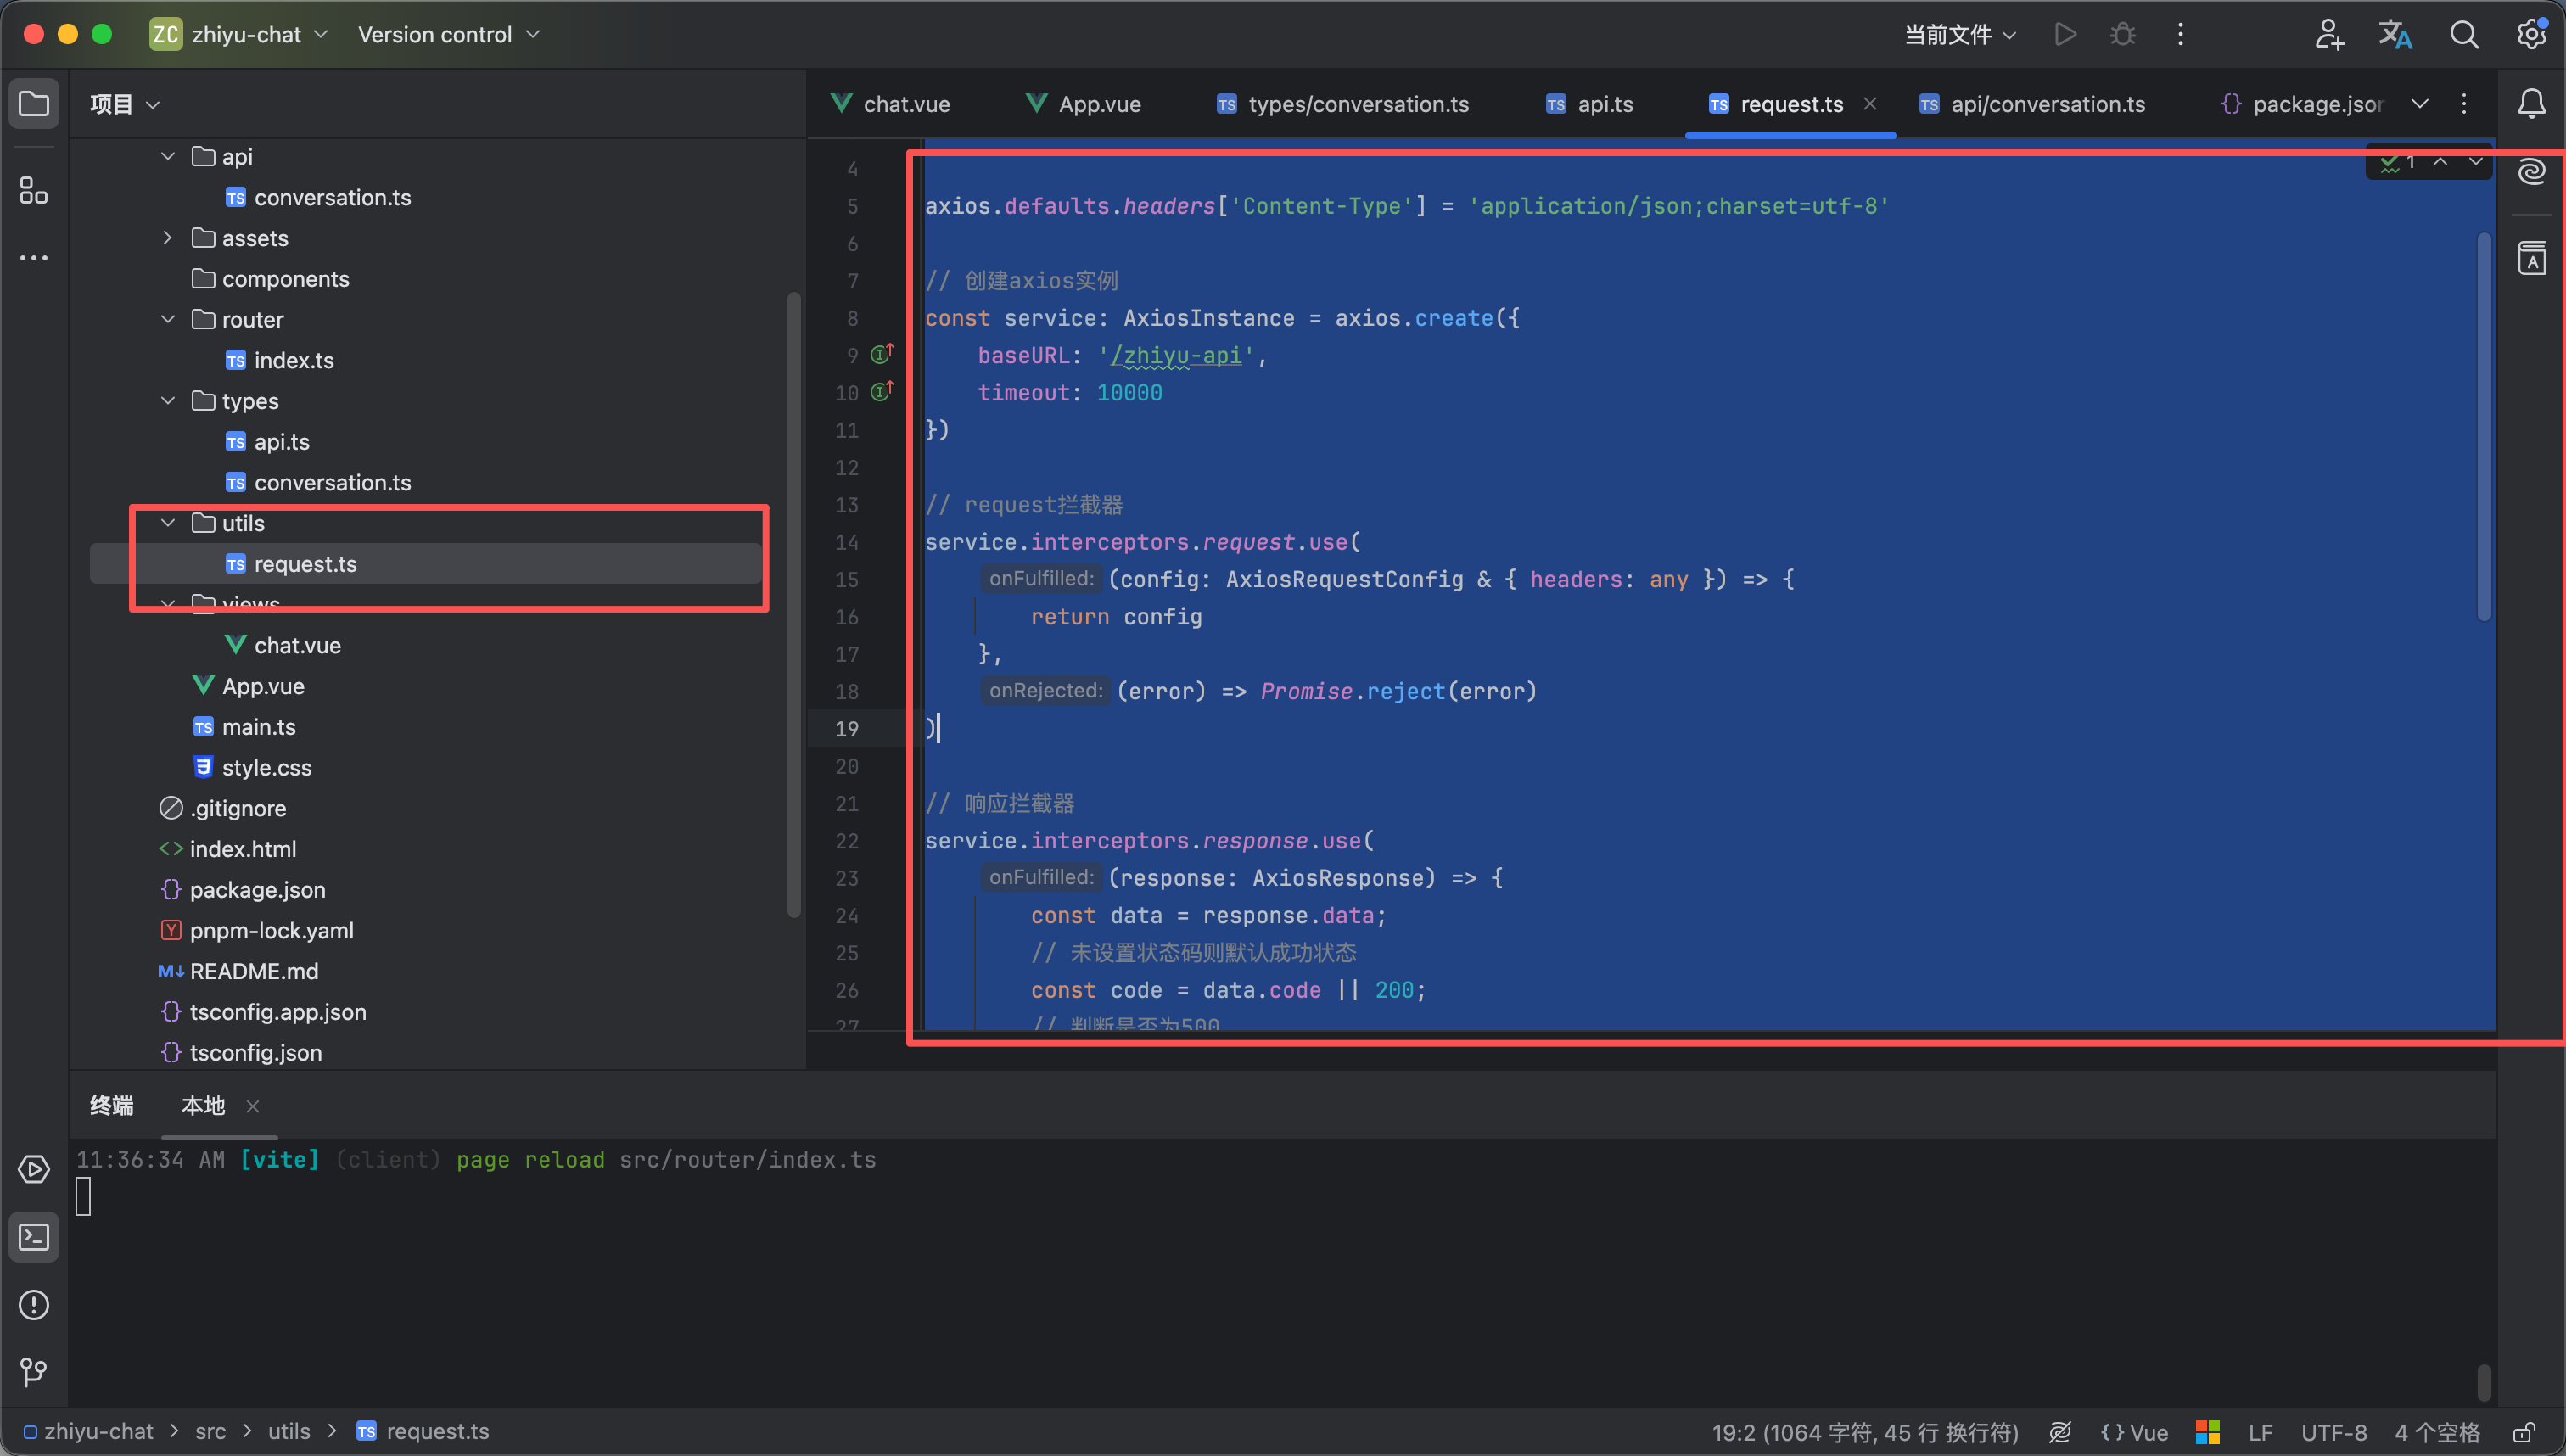
然后创建一个utils 文件夹 这个文件夹里面负责放一些工具类 request.ts就是我们的请求工具类 内容如下


import axios, {type AxiosInstance, type AxiosRequestConfig, type AxiosResponse} from 'axios'
import type {ApiResponse} from "../types/api.ts";


axios.defaults.headers['Content-Type'] = 'application/json;charset=utf-8'

// 创建axios实例
const service: AxiosInstance = axios.create({
baseURL: '/zhiyu-api',
timeout: 10000
})

// request拦截器
service.interceptors.request.use(
(config: AxiosRequestConfig & { headers: any }) => {
return config
},
(error) => Promise.reject(error)
)

// 响应拦截器
service.interceptors.response.use(
(response: AxiosResponse) => {
const data = response.data;
// 未设置状态码则默认成功状态
const code = data.code || 200;
// 判断是否为500
if (code == 500) {
// 异常提示
console.log({title: "错误提示", message: data.message});
}

return data
},
(error) => {
return Promise.reject(error)
}
)

// 封装请求
const request = <T = any>(config: AxiosRequestConfig): Promise<ApiResponse<T>> => {
return service.request<any, ApiResponse<T>>(config)
}


export default request


7

创建java项目

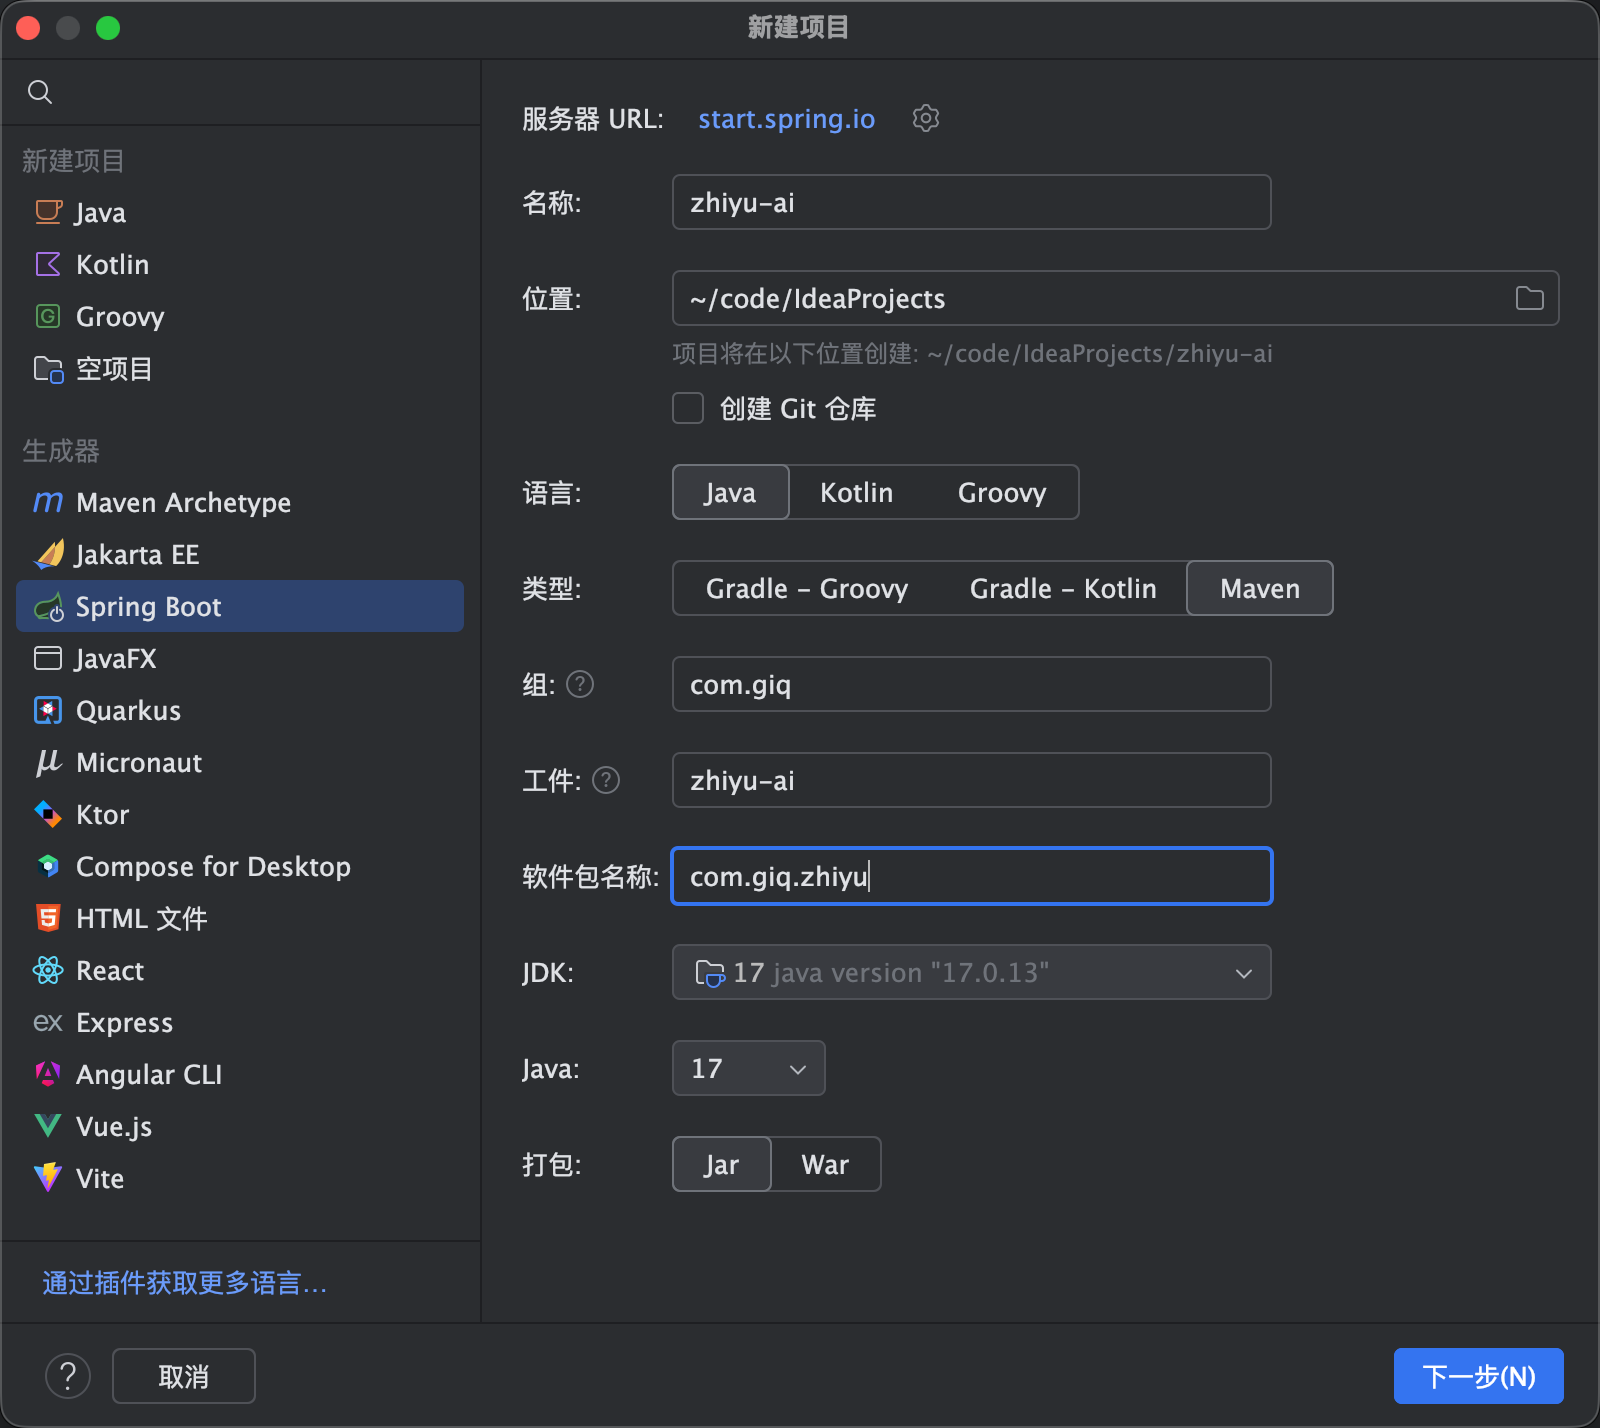
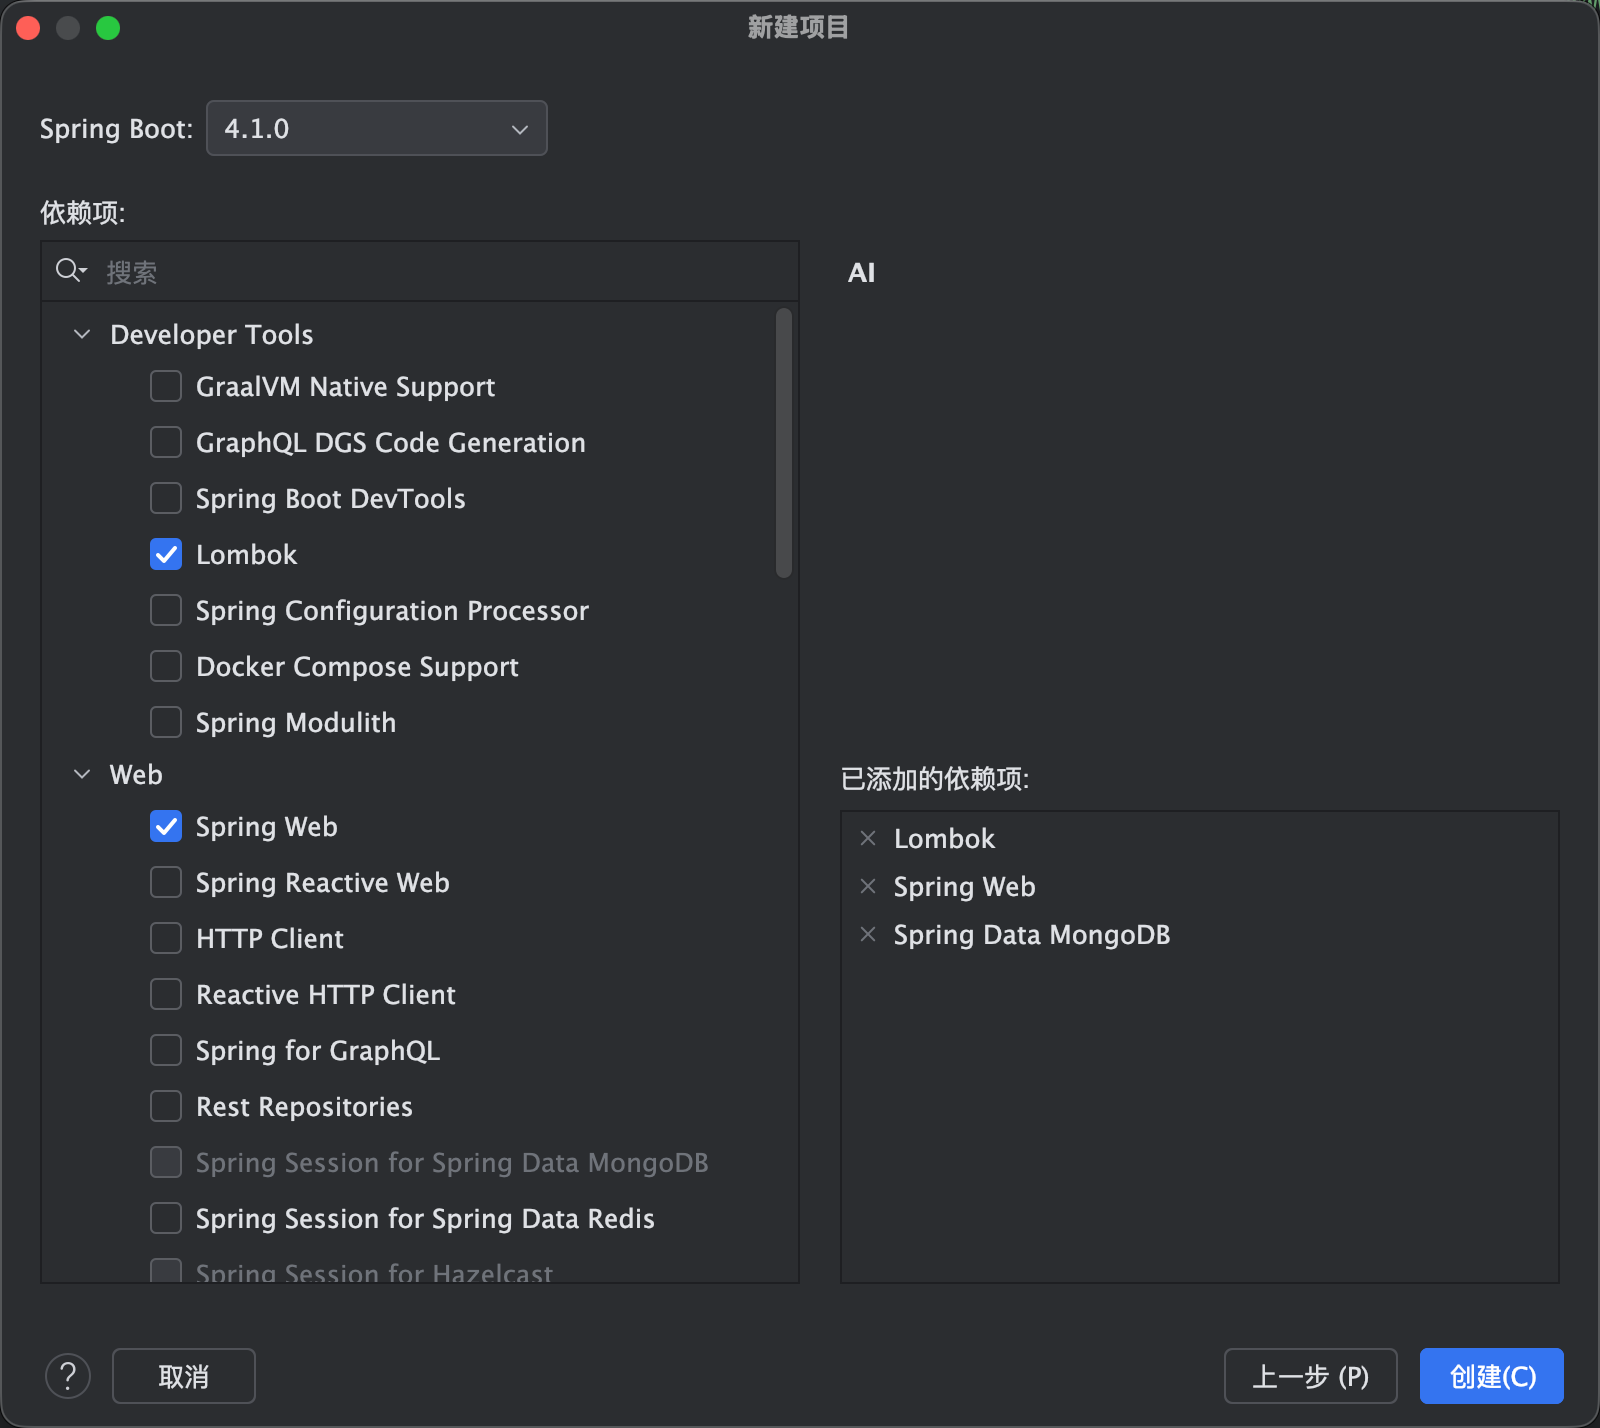
  1. 如图1所示创建一个sprigboot项目 maven
  2. 然后这里选不选都行 反正我们进去之后还得导入如图2 然后点击创建即可
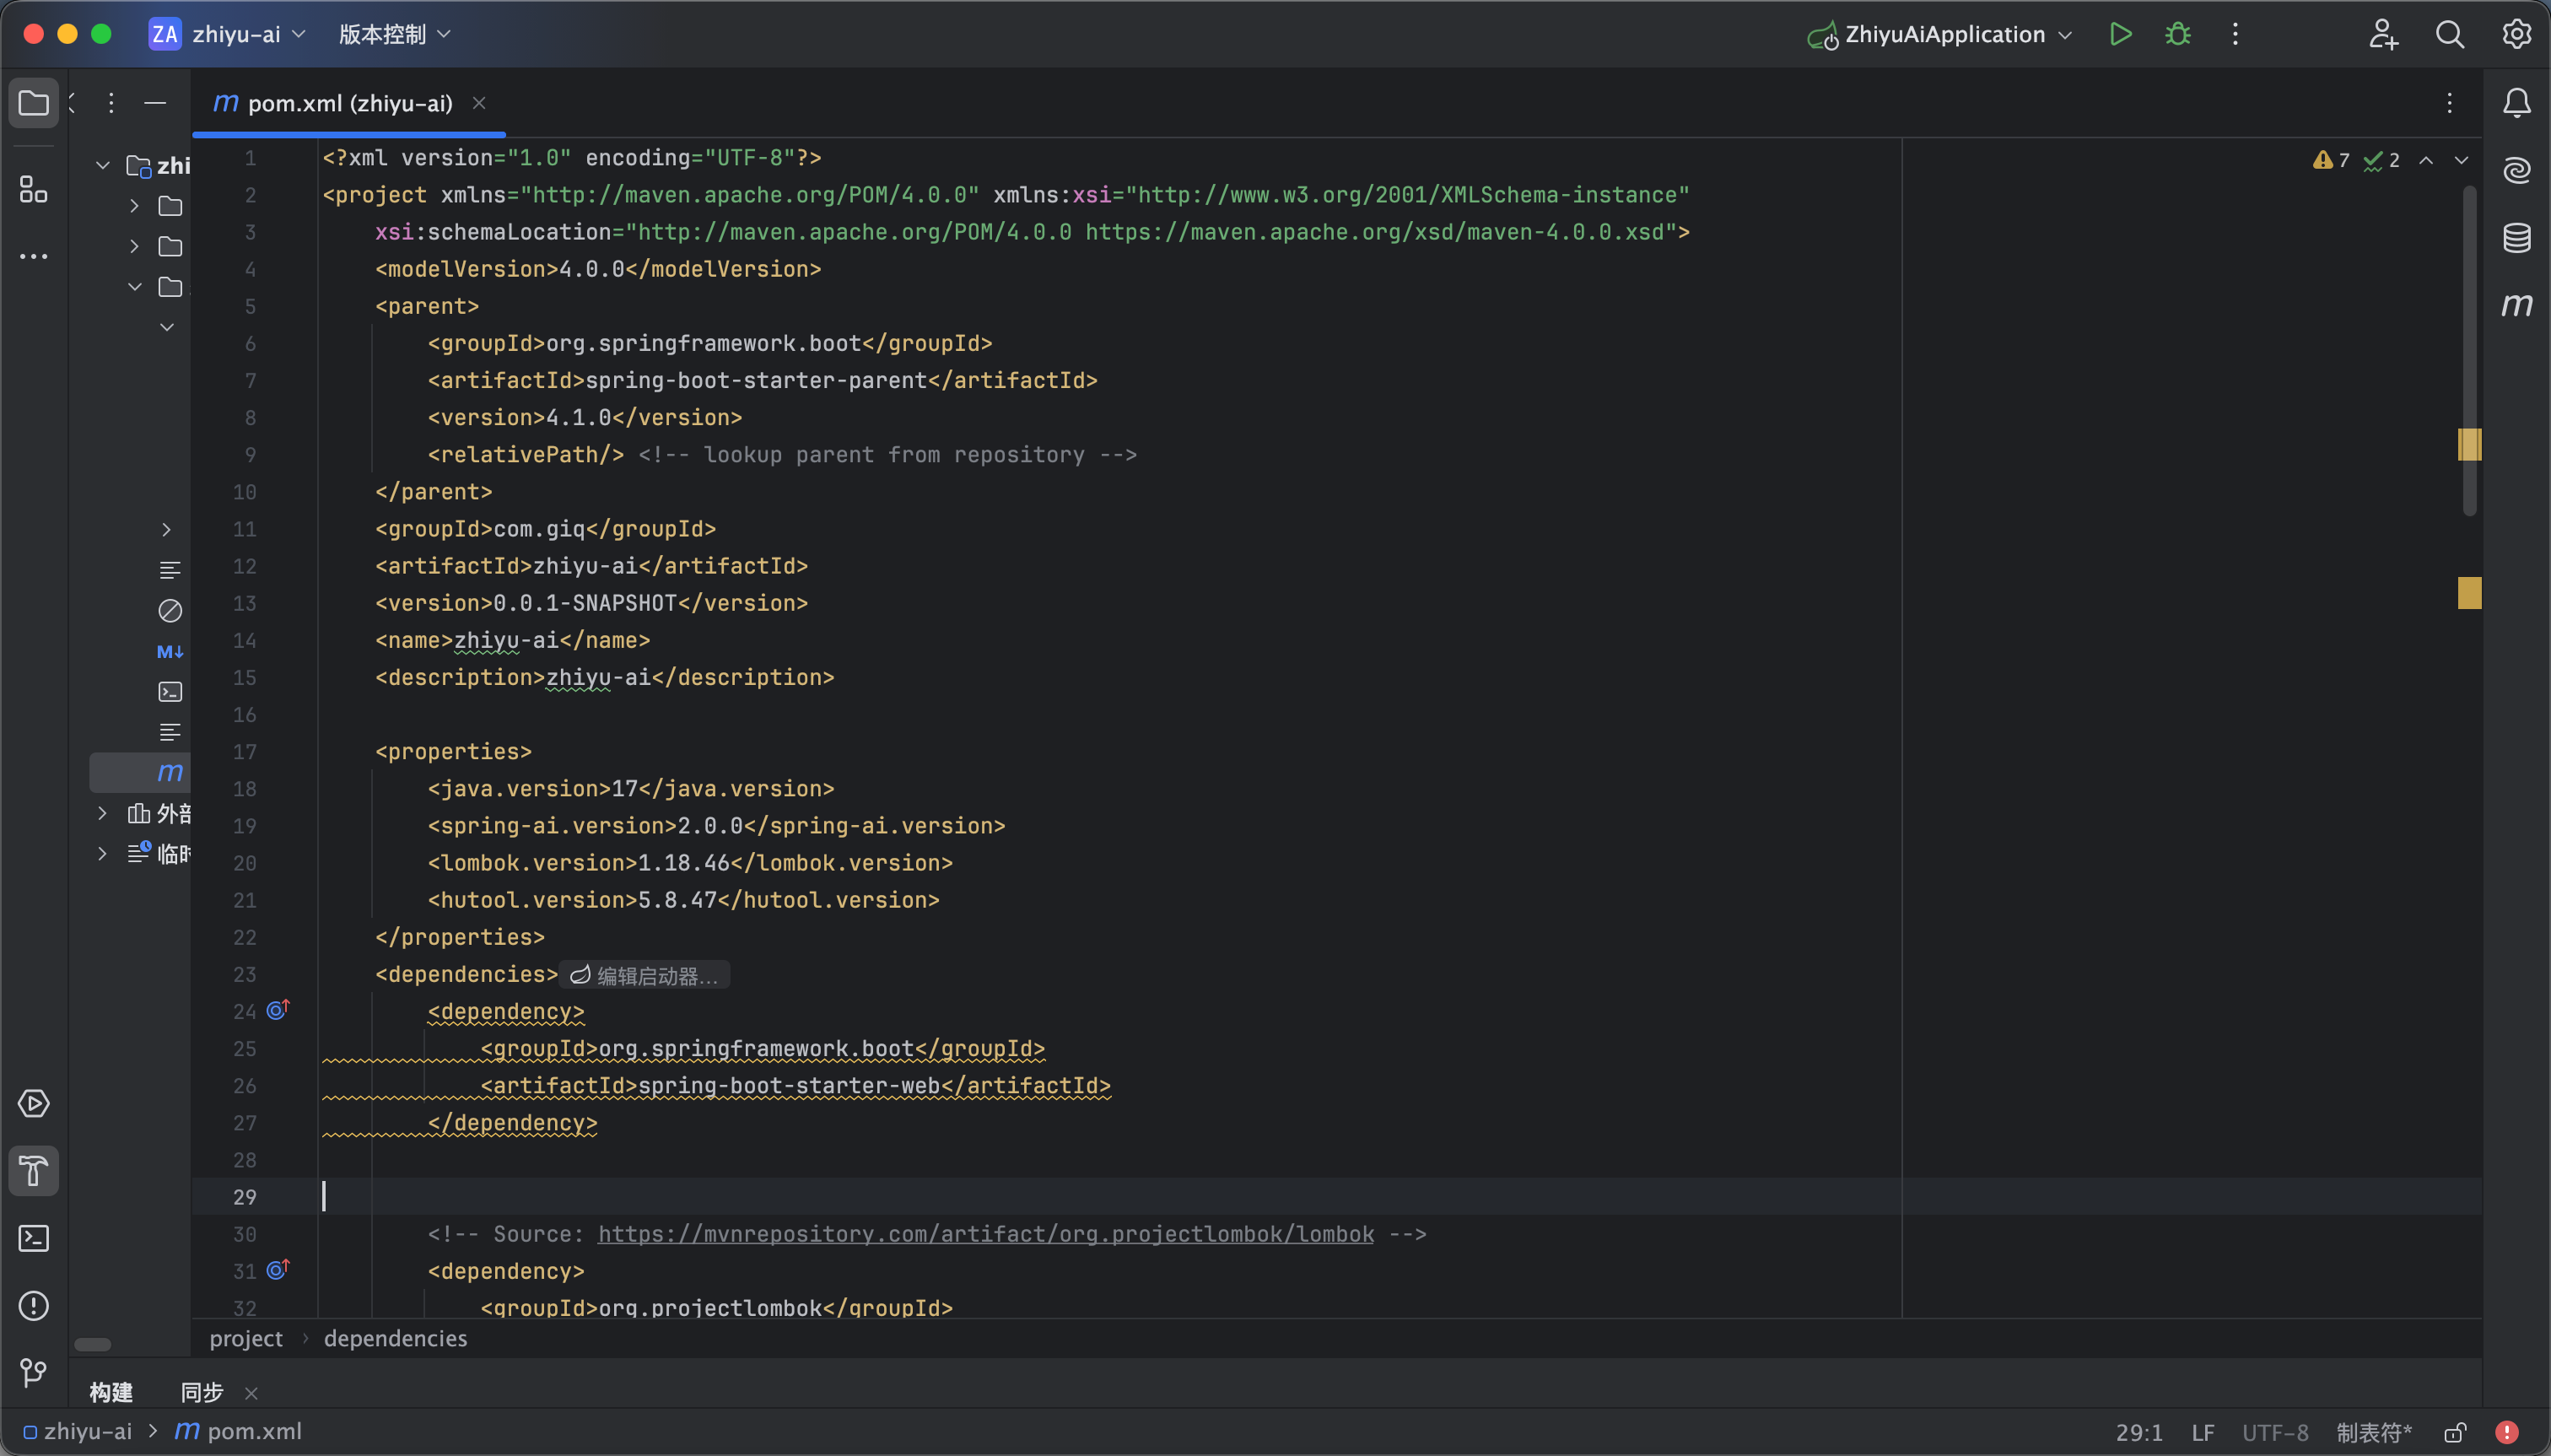
  3. 进入之后先导入maven 如下
<?xml version="1.0" encoding="UTF-8"?>
<project xmlns="http://maven.apache.org/POM/4.0.0" xmlns:xsi="http://www.w3.org/2001/XMLSchema-instance"
xsi:schemaLocation="http://maven.apache.org/POM/4.0.0 https://maven.apache.org/xsd/maven-4.0.0.xsd">
<modelVersion>4.0.0</modelVersion>
<parent>
<groupId>org.springframework.boot</groupId>
<artifactId>spring-boot-starter-parent</artifactId>
<version>4.1.0</version>
<relativePath/> <!-- lookup parent from repository -->
</parent>
<groupId>com.giq</groupId>
<artifactId>zhiyu-ai</artifactId>
<version>0.0.1-SNAPSHOT</version>
<name>zhiyu-ai</name>
<description>zhiyu-ai</description>

<properties>
<java.version>17</java.version>
<spring-ai.version>2.0.0</spring-ai.version>
<lombok.version>1.18.46</lombok.version>
<hutool.version>5.8.47</hutool.version>
</properties>
<dependencies>
<dependency>
<groupId>org.springframework.boot</groupId>
<artifactId>spring-boot-starter-web</artifactId>
</dependency>


<!-- Source: https://mvnrepository.com/artifact/org.projectlombok/lombok -->
<dependency>
<groupId>org.projectlombok</groupId>
<artifactId>lombok</artifactId>
<version>${lombok.version}</version>
<scope>compile</scope>
</dependency>

<dependency>
<groupId>org.springframework.ai</groupId>
<artifactId>spring-ai-starter-model-openai</artifactId>
</dependency>

<!-- Spring AI MongoDB 记忆存储模块 -->
<!-- 提供了 MongoChatMemoryRepository 实现 -->
<dependency>
<groupId>org.springframework.ai</groupId>
<artifactId>spring-ai-starter-model-chat-memory-repository-mongodb</artifactId>
</dependency>

<!-- Spring Boot Data MongoDB -->
<!-- 提供了 MongoDB 的基础连接能力 -->
<dependency>
<groupId>org.springframework.boot</groupId>
<artifactId>spring-boot-starter-data-mongodb</artifactId>
</dependency>

<dependency>
<groupId>com.hankcs</groupId>
<artifactId>hanlp</artifactId>
<version>portable-1.8.4</version>
</dependency>

<!-- Source: https://mvnrepository.com/artifact/cn.hutool/hutool-all -->
<dependency>
<groupId>cn.hutool</groupId>
<artifactId>hutool-all</artifactId>
<version>${hutool.version}</version>
<scope>compile</scope>
</dependency>

<dependency>
<groupId>org.springframework.boot</groupId>
<artifactId>spring-boot-starter-test</artifactId>
<scope>test</scope>
</dependency>
</dependencies>

<dependencyManagement>
<dependencies>
<dependency>
<groupId>org.springframework.ai</groupId>
<artifactId>spring-ai-bom</artifactId>
<version>${spring-ai.version}</version>
<type>pom</type>
<scope>import</scope>
</dependency>
</dependencies>
</dependencyManagement>

<build>
<plugins>
<plugin>
<groupId>org.springframework.boot</groupId>
<artifactId>spring-boot-maven-plugin</artifactId>
</plugin>
</plugins>
</build>


</project>
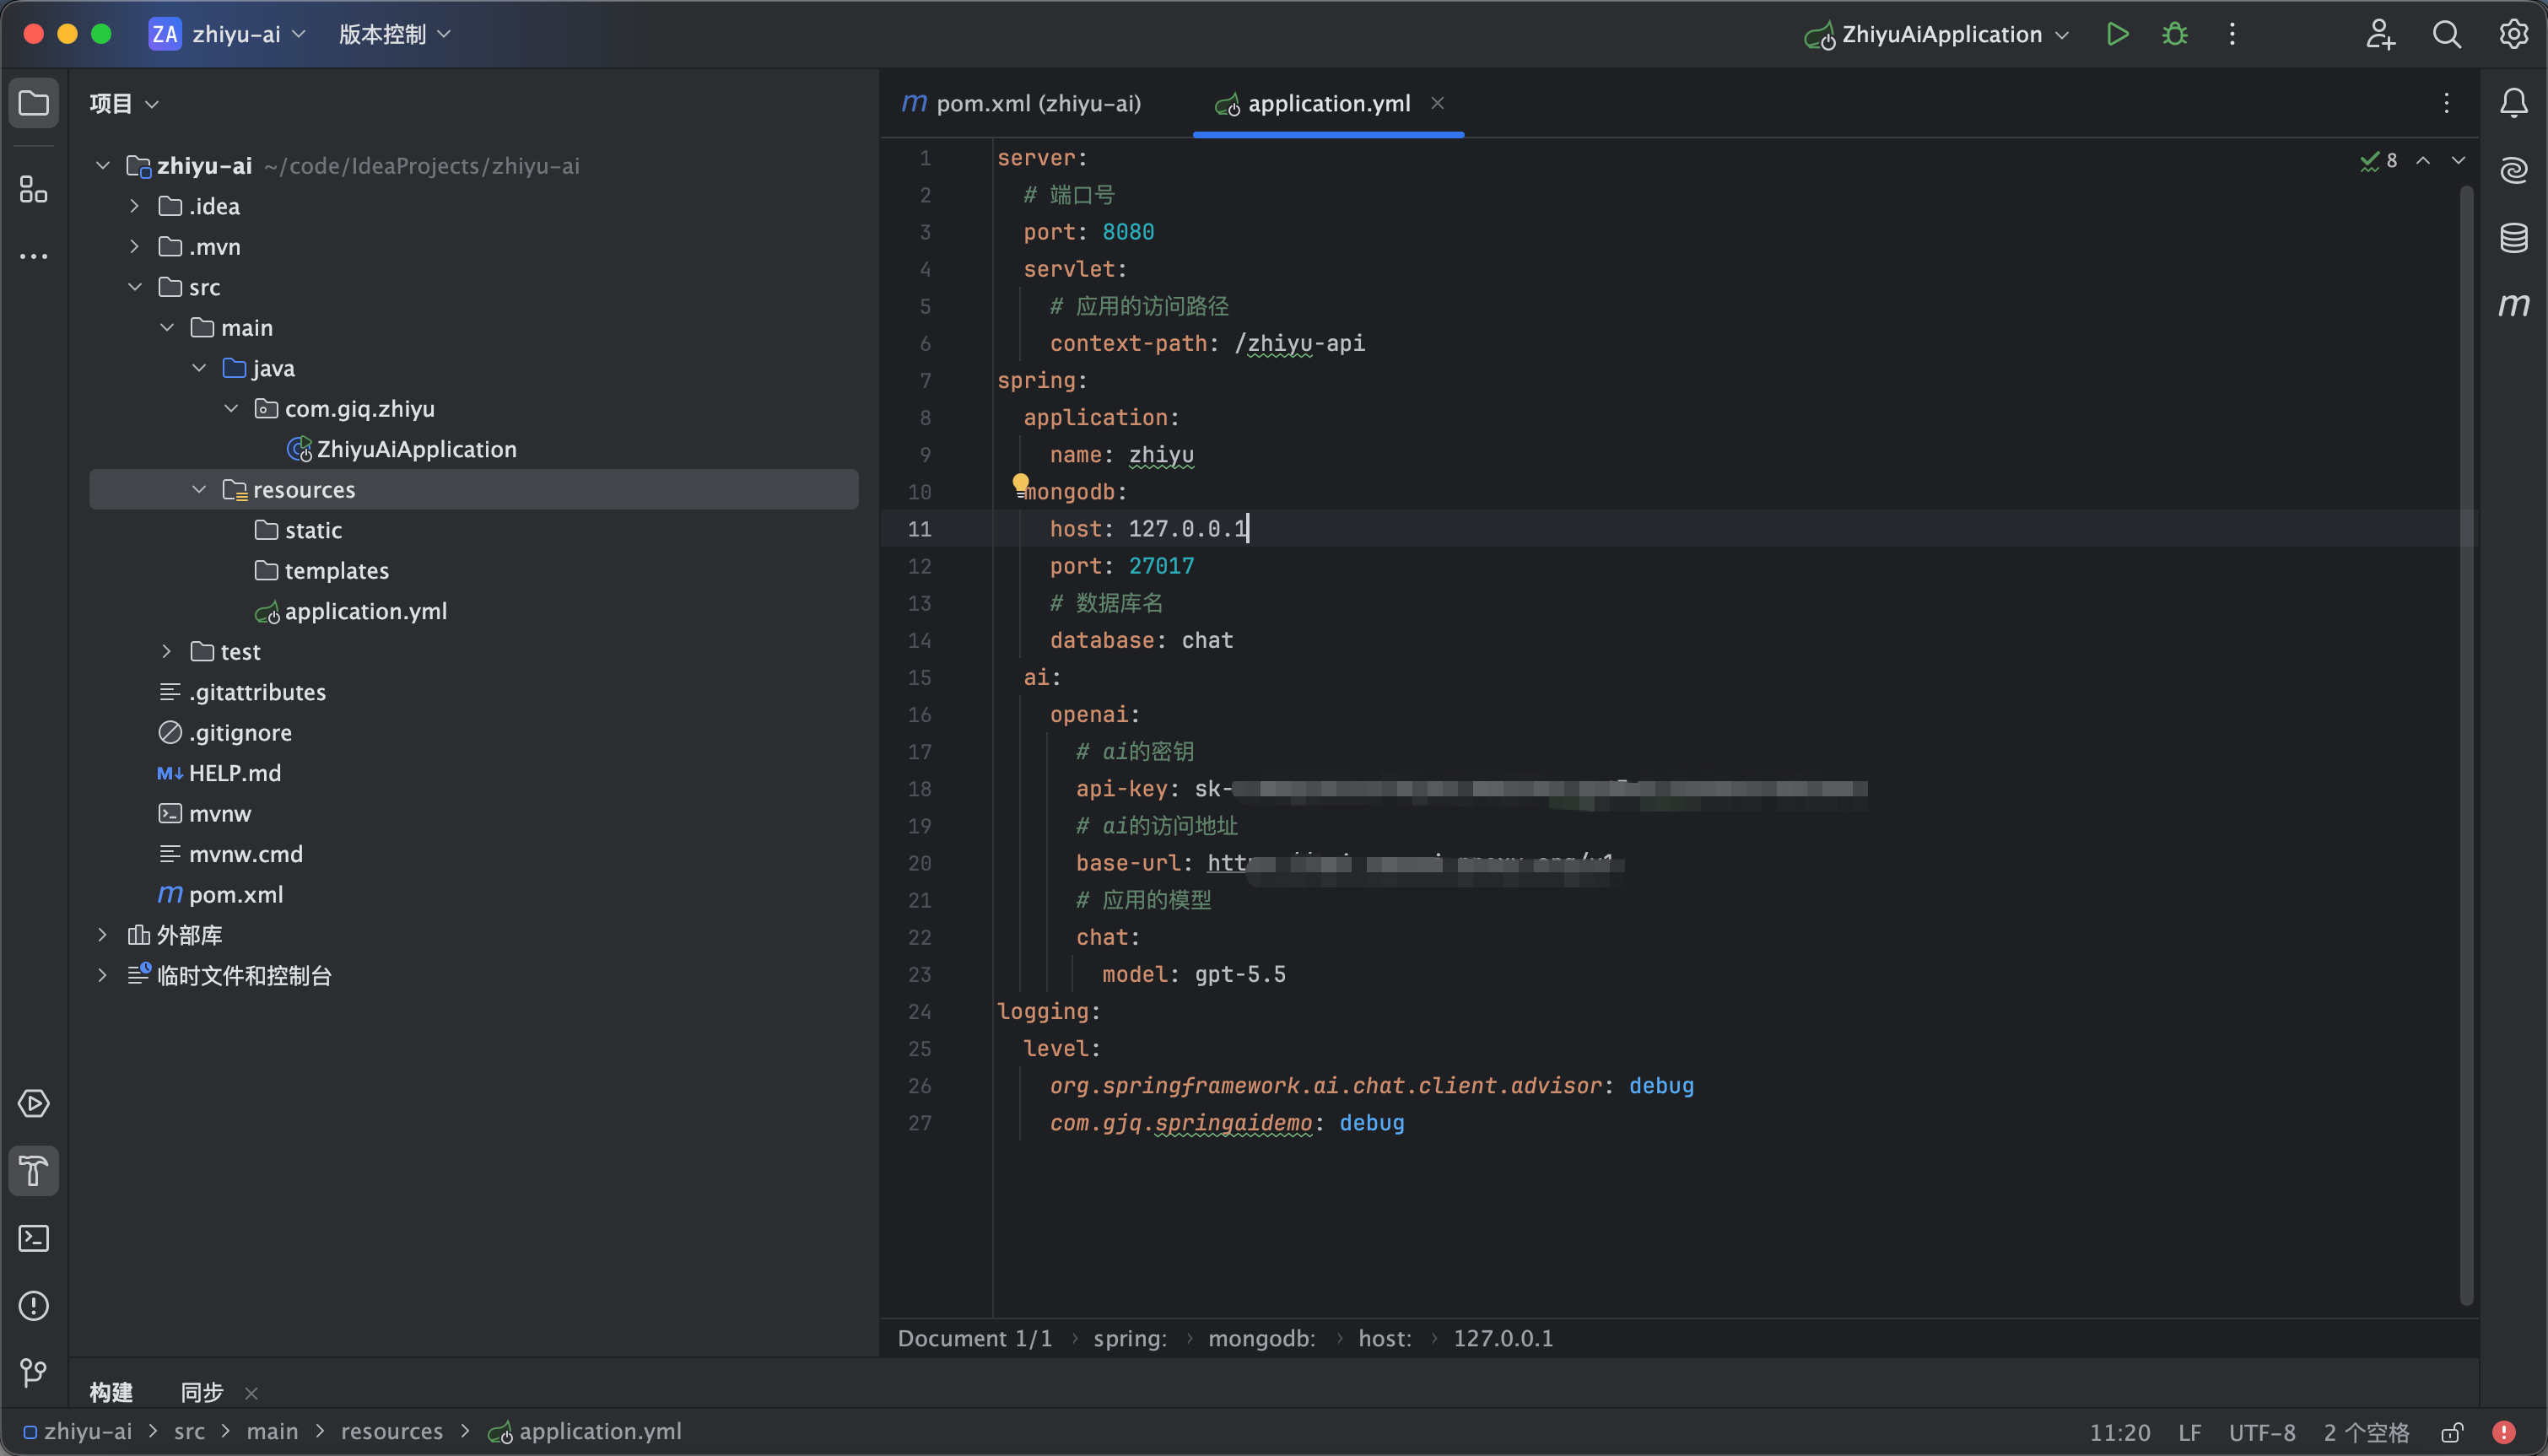
  1. 然后如图4所示配置yml ai的密钥访问地址大家自行修改 以及数据库的配置也是
server:
# 端口号
port: 8080
servlet:
# 应用的访问路径
context-path: /zhiyu-api
spring:
application:
name: zhiyu
mongodb:
host: 127.0.0.1
port: 27017
# 数据库名
database: chat
ai:
openai:
# ai的密钥
api-key:
# ai的访问地址
base-url:
# 应用的模型
chat:
model: gpt-5.5
logging:
level:
org.springframework.ai.chat.client.advisor: debug
com.gjq.springaidemo: debug
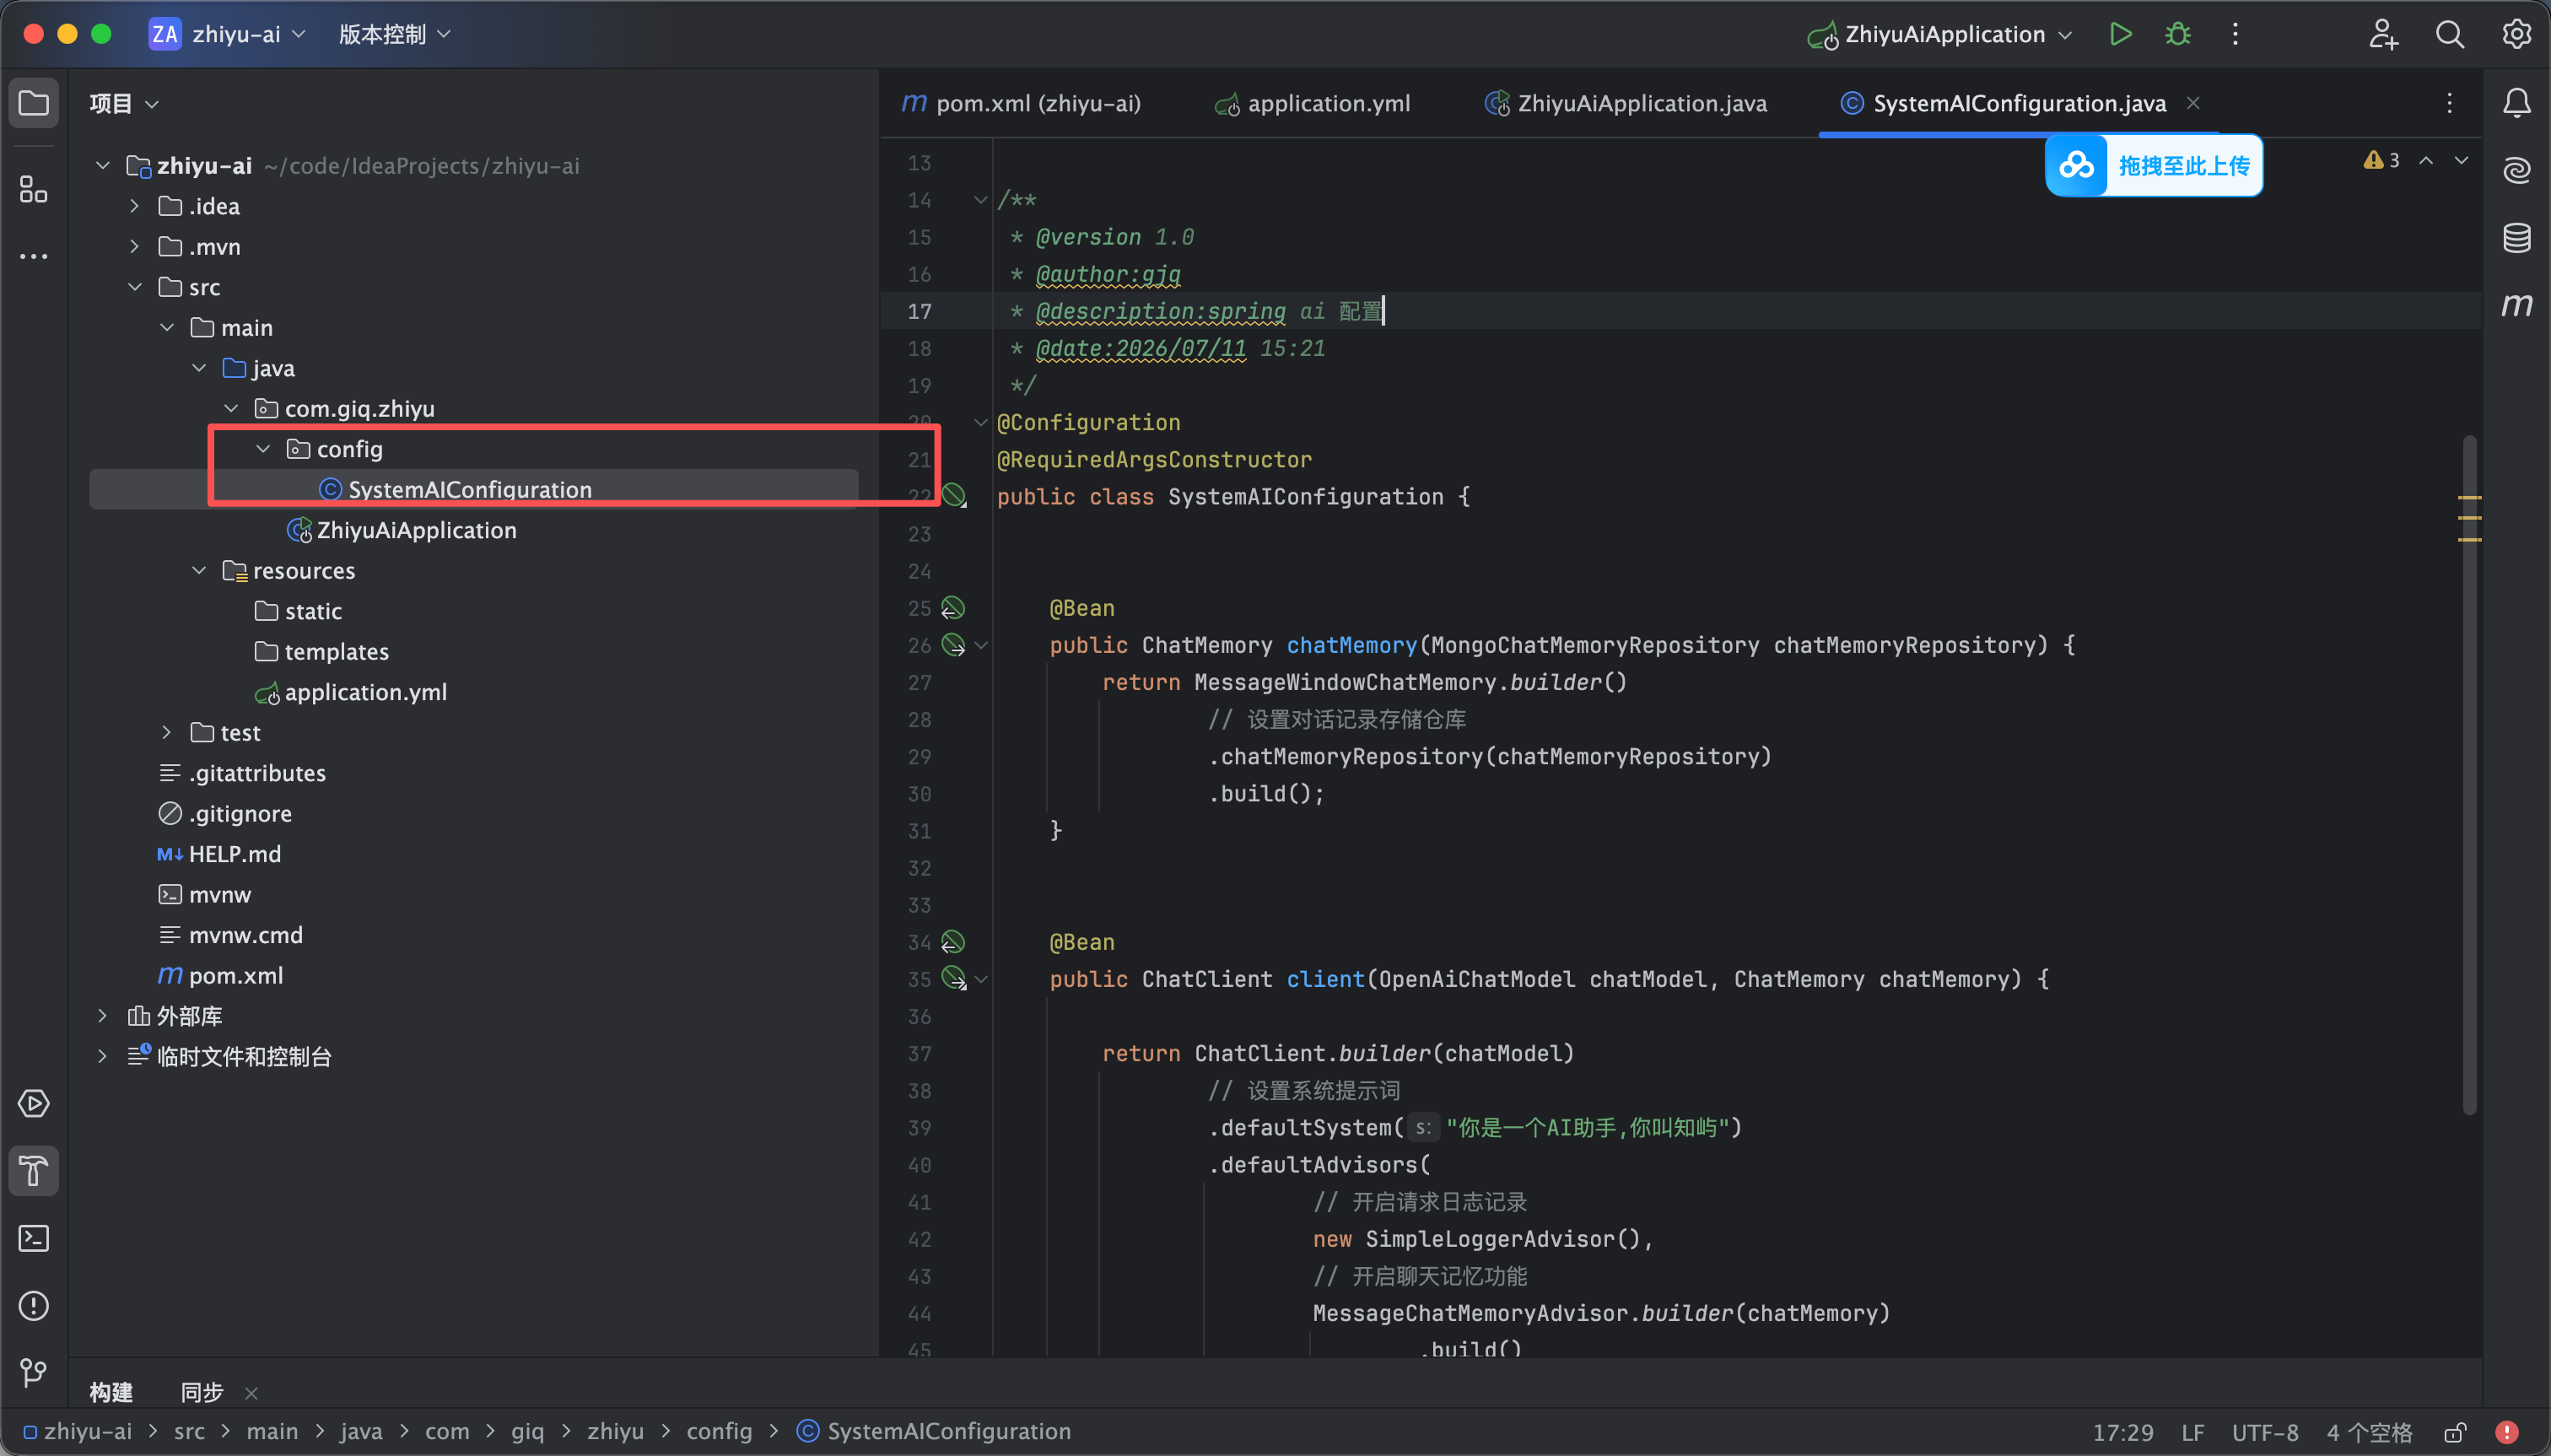
  1. 然后新建一个 config的包 在这个包里创建一个 SystemAIConfiguration配置类 如图5所示 配置如下
package com.giq.zhiyu.config;

import lombok.RequiredArgsConstructor;
import org.springframework.ai.chat.client.ChatClient;
import org.springframework.ai.chat.client.advisor.MessageChatMemoryAdvisor;
import org.springframework.ai.chat.client.advisor.SimpleLoggerAdvisor;
import org.springframework.ai.chat.memory.ChatMemory;
import org.springframework.ai.chat.memory.MessageWindowChatMemory;
import org.springframework.ai.chat.memory.repository.mongo.MongoChatMemoryRepository;
import org.springframework.ai.openai.OpenAiChatModel;
import org.springframework.context.annotation.Bean;
import org.springframework.context.annotation.Configuration;

/**
* @version 1.0
* @author:gjq
* @description:spring ai 配置
* @date:2026/07/11 15:21
*/
@Configuration
@RequiredArgsConstructor
public class SystemAIConfiguration {


@Bean
public ChatMemory chatMemory(MongoChatMemoryRepository chatMemoryRepository) {
return MessageWindowChatMemory.builder()
// 设置对话记录存储仓库
.chatMemoryRepository(chatMemoryRepository)
.build();
}


@Bean
public ChatClient client(OpenAiChatModel chatModel, ChatMemory chatMemory) {

return ChatClient.builder(chatModel)
// 设置系统提示词
.defaultSystem("你是一个AI助手,你叫知屿")
.defaultAdvisors(
// 开启请求日志记录
new SimpleLoggerAdvisor(),
// 开启聊天记忆功能
MessageChatMemoryAdvisor.builder(chatMemory)
.build()
)
.build();
}

}
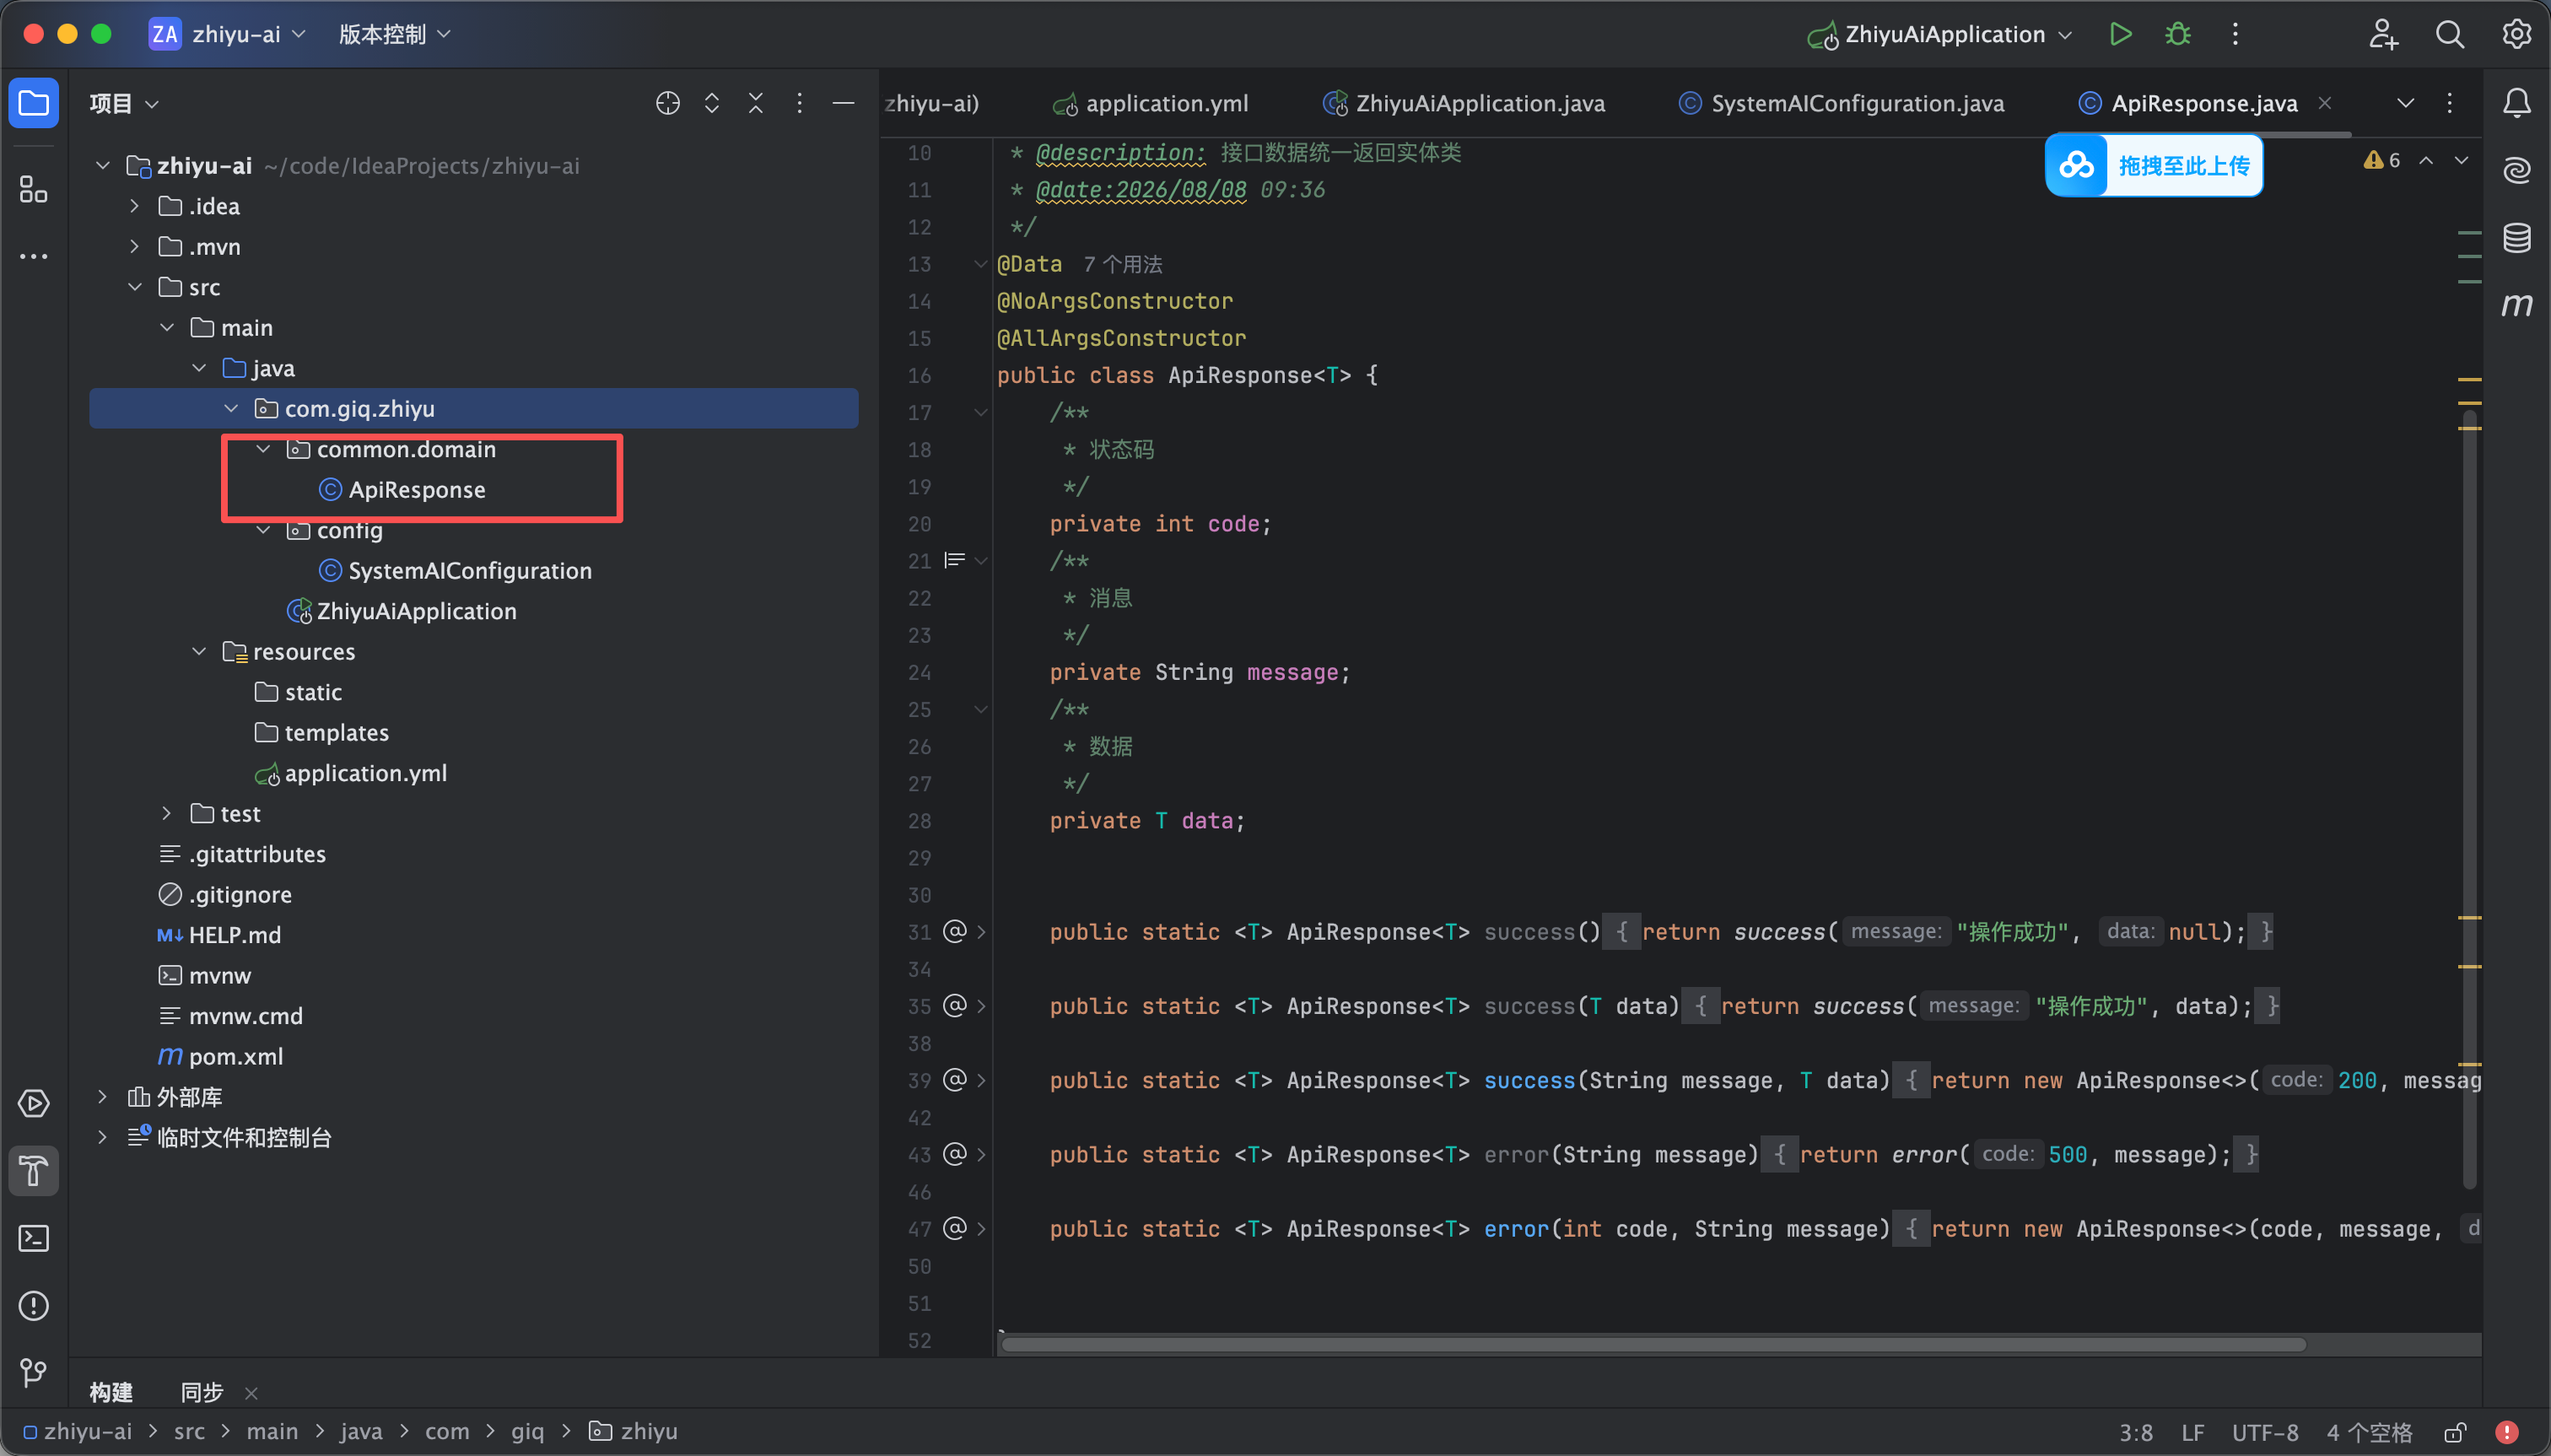
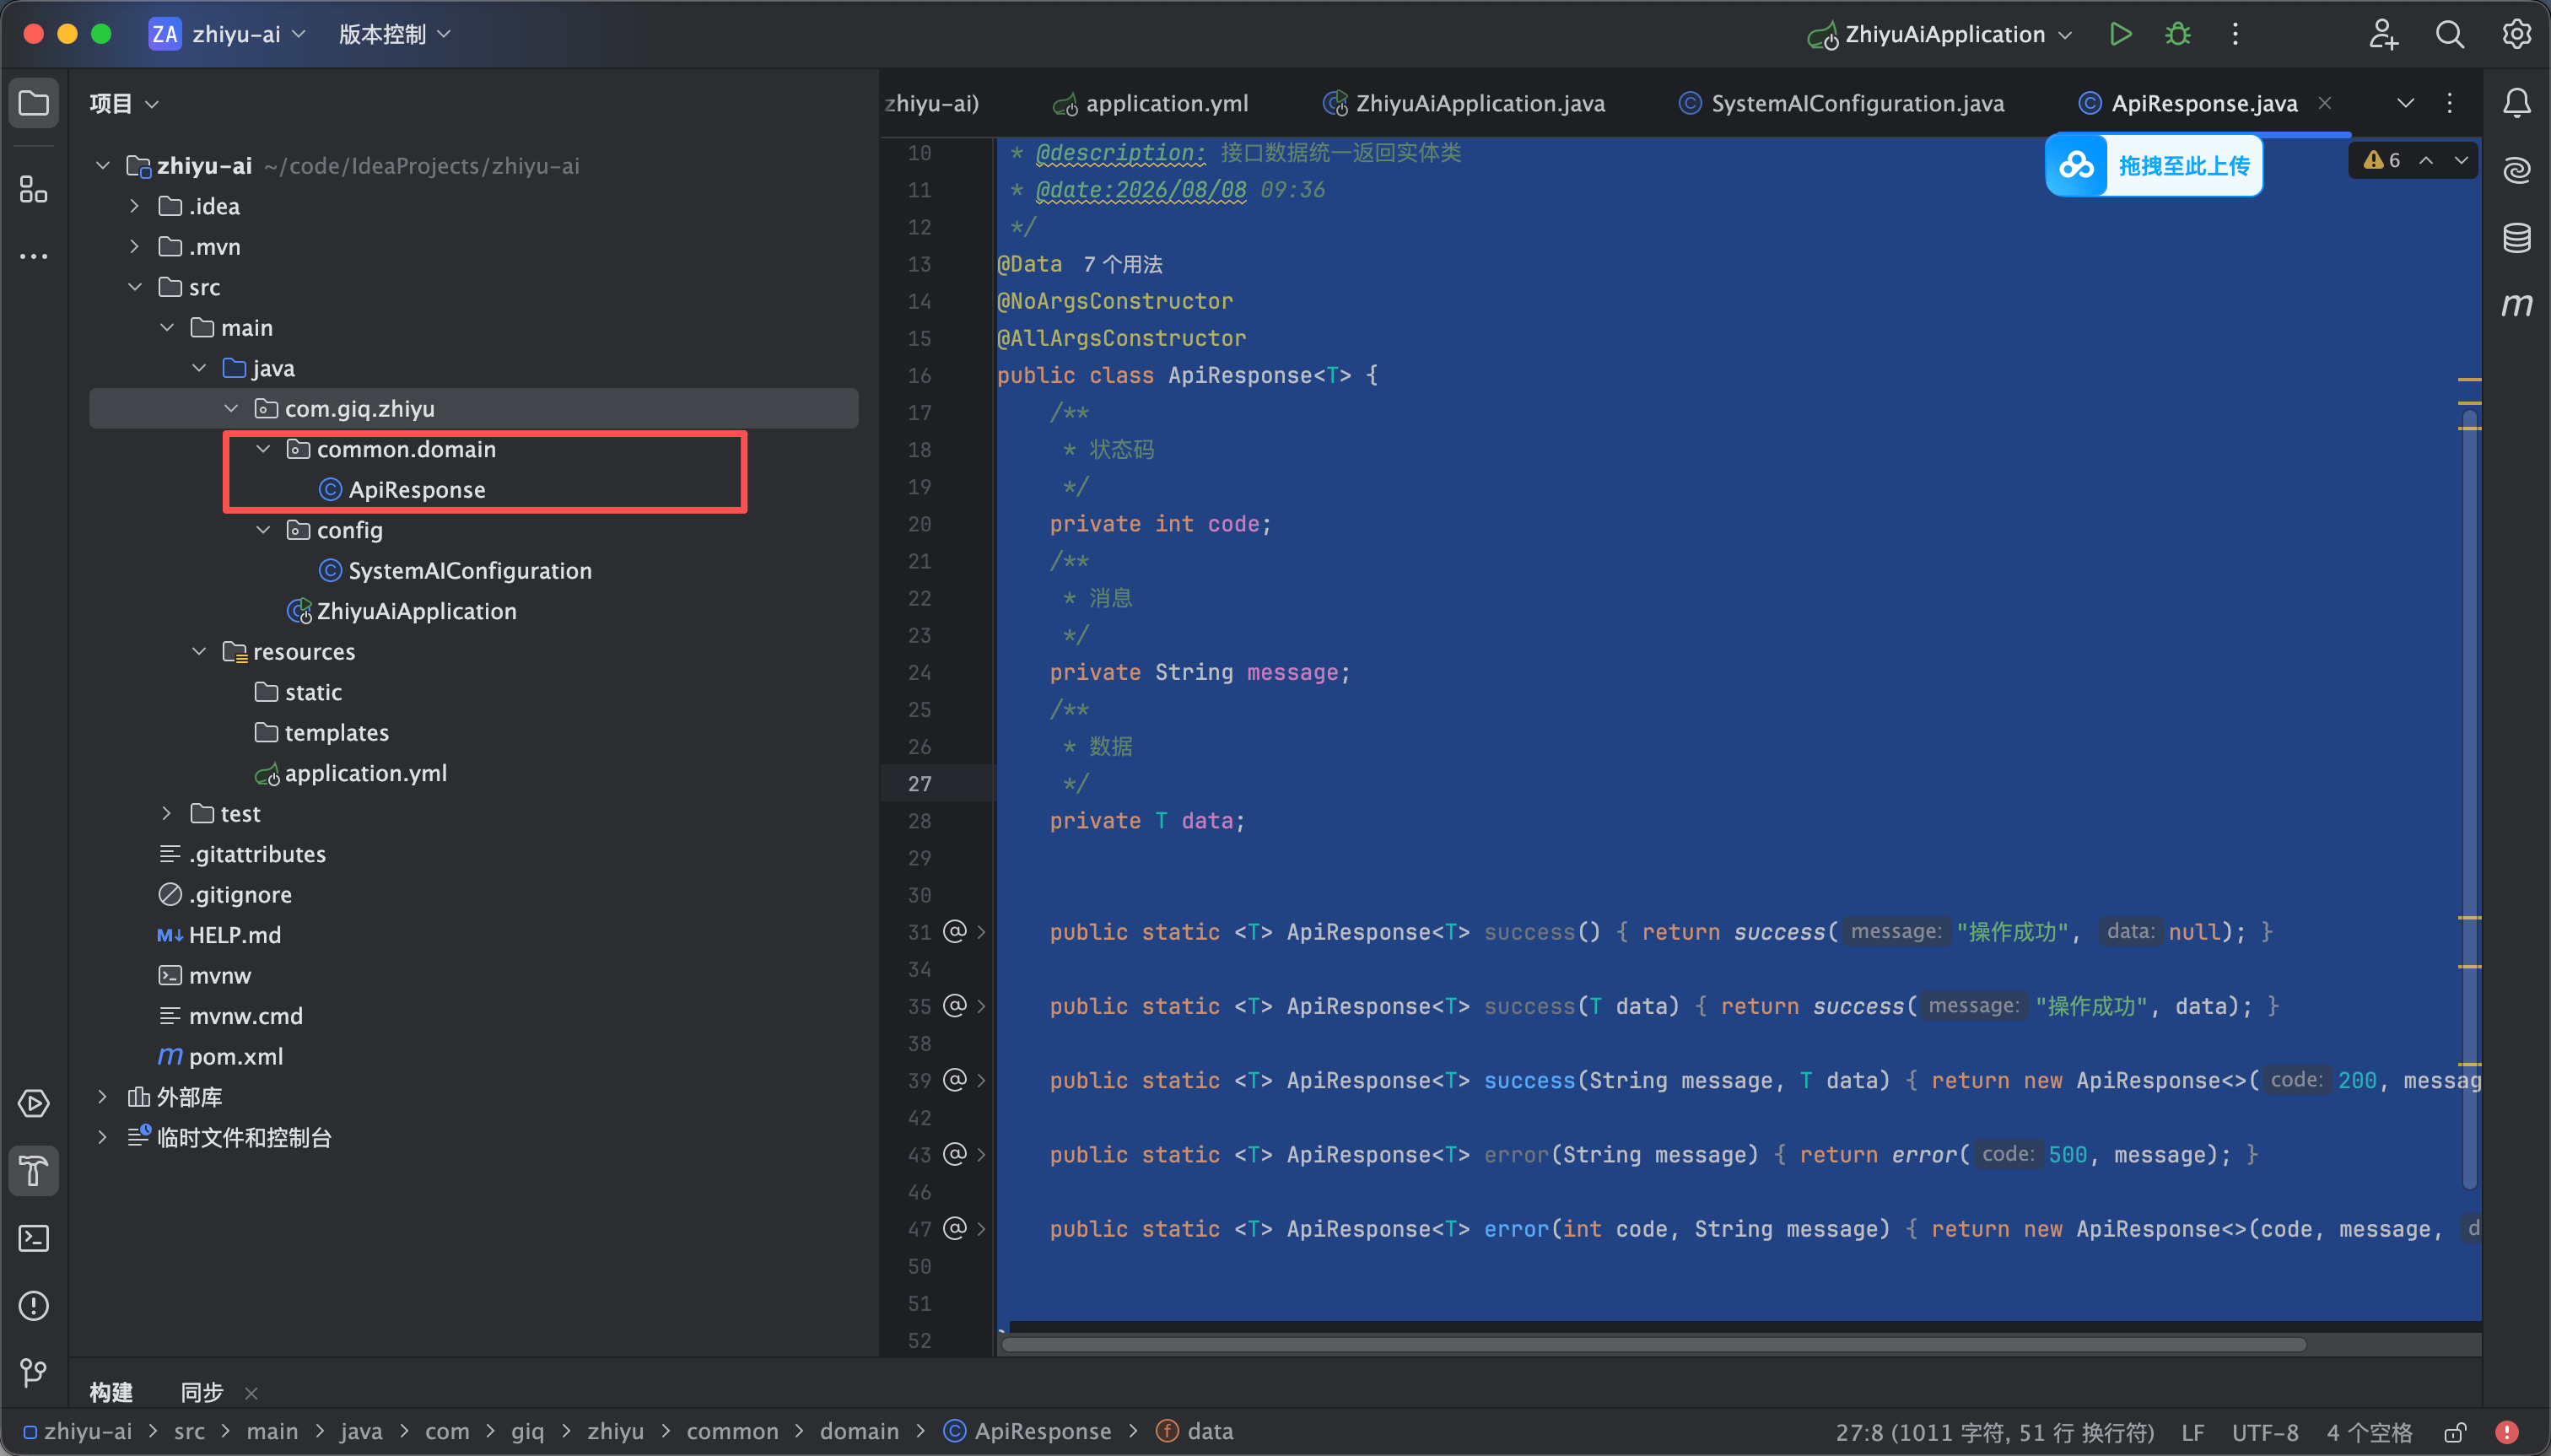
  1. 然后创建一个common/domain 包 里面创建ApiResponse 响应类用于统一返回查询数据 如图7
package com.giq.zhiyu.common.domain;

import lombok.AllArgsConstructor;
import lombok.Data;
import lombok.NoArgsConstructor;

/**
* @version 1.0
* @author:gjq
* @description: 接口数据统一返回实体类
* @date:2026/08/08 09:36
*/
@Data
@NoArgsConstructor
@AllArgsConstructor
public class ApiResponse<T> {
/**
* 状态码
*/
private int code;
/**
* 消息
*/
private String message;
/**
* 数据
*/
private T data;


public static <T> ApiResponse<T> success() {
return success("操作成功", null);
}

public static <T> ApiResponse<T> success(T data) {
return success("操作成功", data);
}

public static <T> ApiResponse<T> success(String message, T data) {
return new ApiResponse<>(200, message, data);
}

public static <T> ApiResponse<T> error(String message) {
return error(500, message);
}

public static <T> ApiResponse<T> error(int code, String message) {
return new ApiResponse<>(code, message, null);
}


}
8

新建对话

我们的会话一共有三个接口 分别是 查询会话列表 创建会话 以及删除会话


我们先写新建对话功能 流程应该是判断当前页面有没有 对话id 如果有的话就聊天 如果没有的话就新建对话后把对话id拿着 然后再聊天


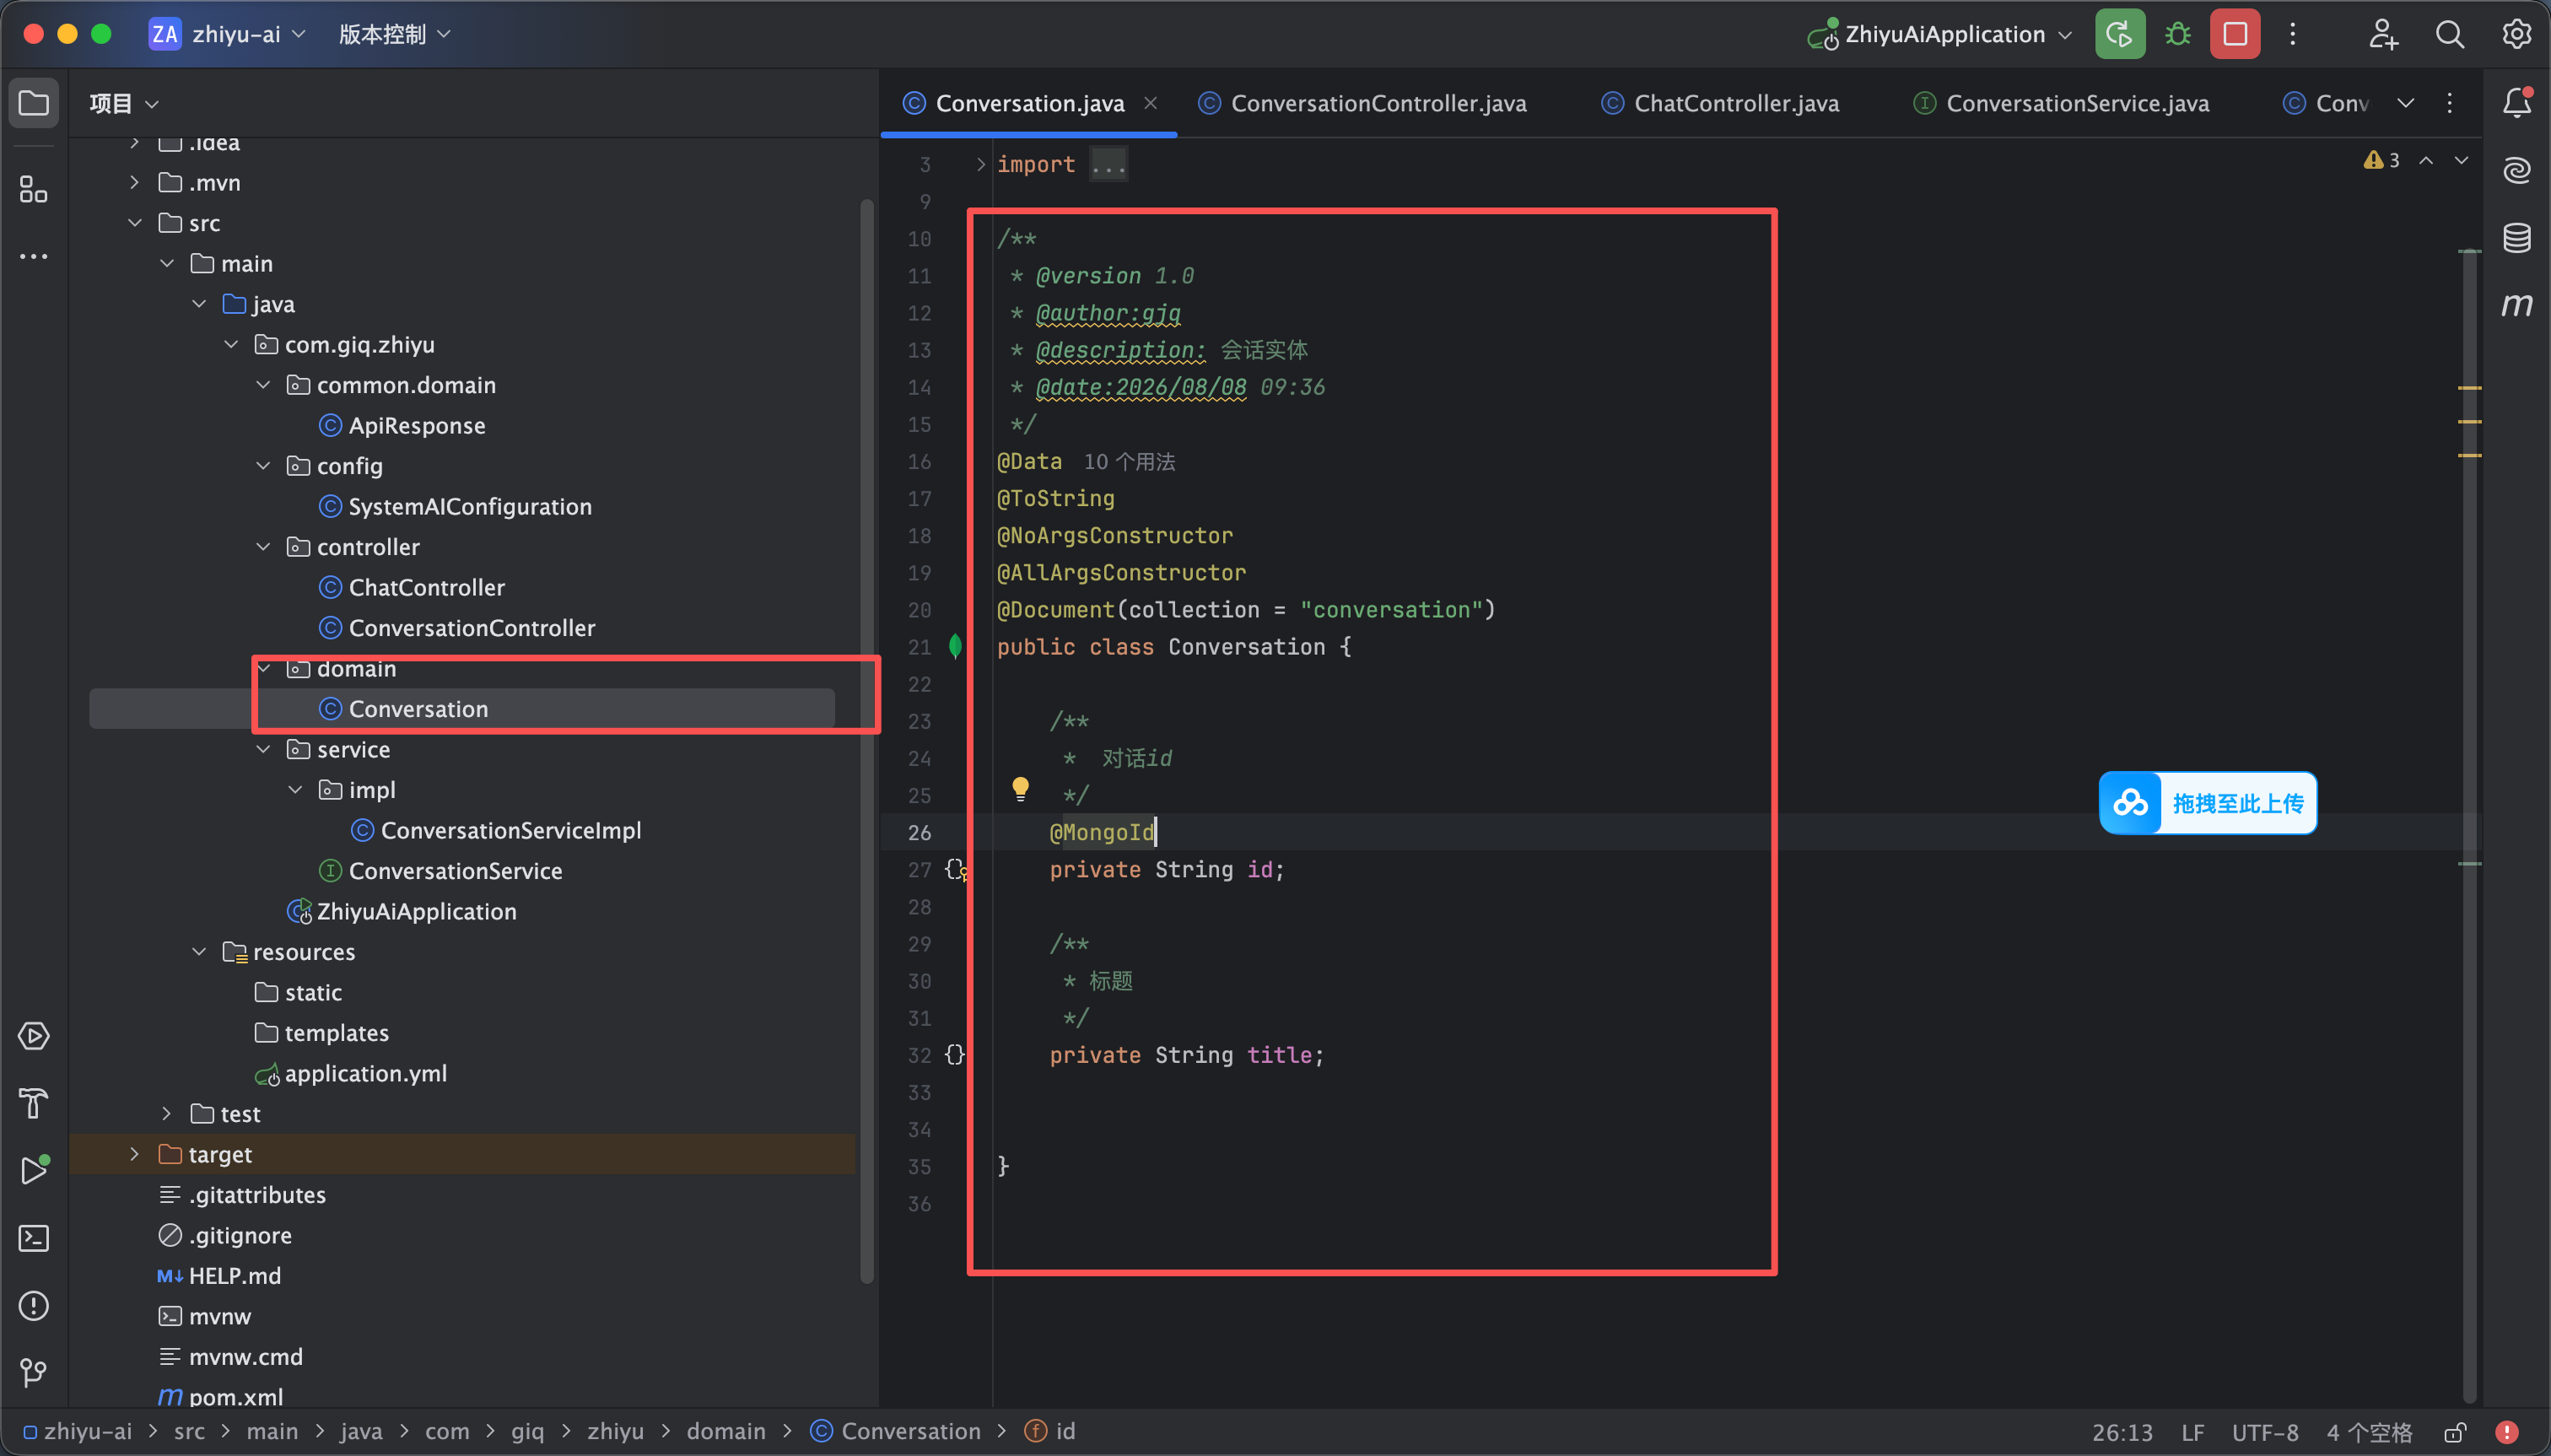
首先我们创建一个实体类 用于对应我们的mongodb 数据库的字段 我们创建一个domain 包 然后再这个包下创建一个 Conversation实体类

package com.giq.zhiyu.domain;

import lombok.AllArgsConstructor;
import lombok.Data;
import lombok.NoArgsConstructor;
import lombok.ToString;
import org.springframework.data.mongodb.core.mapping.Document;
import org.springframework.data.mongodb.core.mapping.MongoId;

/**
* @version 1.0
* @author:gjq
* @description: 会话实体
* @date:2026/08/08 09:36
*/
@Data
@ToString
@NoArgsConstructor
@AllArgsConstructor
@Document(collection = "conversation")
public class Conversation {

/**
* 对话id
*/
@MongoId
private String id;

/**
* 标题
*/
private String title;


}


然后我们创建一个 serivice ConversationService 以及他的实现类 ConversationServiceImpl

package com.giq.zhiyu.service;


import com.giq.zhiyu.domain.Conversation;

import java.util.List;

/**
* @version 1.0
* @author:gjq
* @description: 会话逻辑相关接口
* @date:2026/08/08 09:24
*/
public interface ConversationService {

/**
* 创建对话
*
* @param content 对话输入的内容
* @return 会话id
*/
public String insertConversation(String content);

}


实现代码如下

package com.giq.zhiyu.service.impl;

import cn.hutool.core.util.IdUtil;
import com.giq.zhiyu.domain.Conversation;
import com.giq.zhiyu.service.ConversationService;
import com.mongodb.client.result.DeleteResult;
import lombok.RequiredArgsConstructor;
import org.springframework.data.mongodb.core.MongoTemplate;
import org.springframework.data.mongodb.core.query.Criteria;
import org.springframework.data.mongodb.core.query.Query;
import org.springframework.stereotype.Service;

import java.util.List;

/**
* @version 1.0
* @author:gjq
* @description: 会话逻辑相关接口实现
* @date:2026/08/08 09:24
*/
@Service
@RequiredArgsConstructor
public class ConversationServiceImpl implements ConversationService {

private final MongoTemplate mongoTemplate;

/**
* 创建对话
*
* @param content 对话输入的内容
* @return 会话id
*/
@Override
public String insertConversation(String content) {
// 生成会话id
String id = IdUtil.getSnowflakeNextIdStr();
Conversation conversation = new Conversation(id, content);
// 新增数据
Conversation result = mongoTemplate.insert(conversation);
return result.getId();
}

}


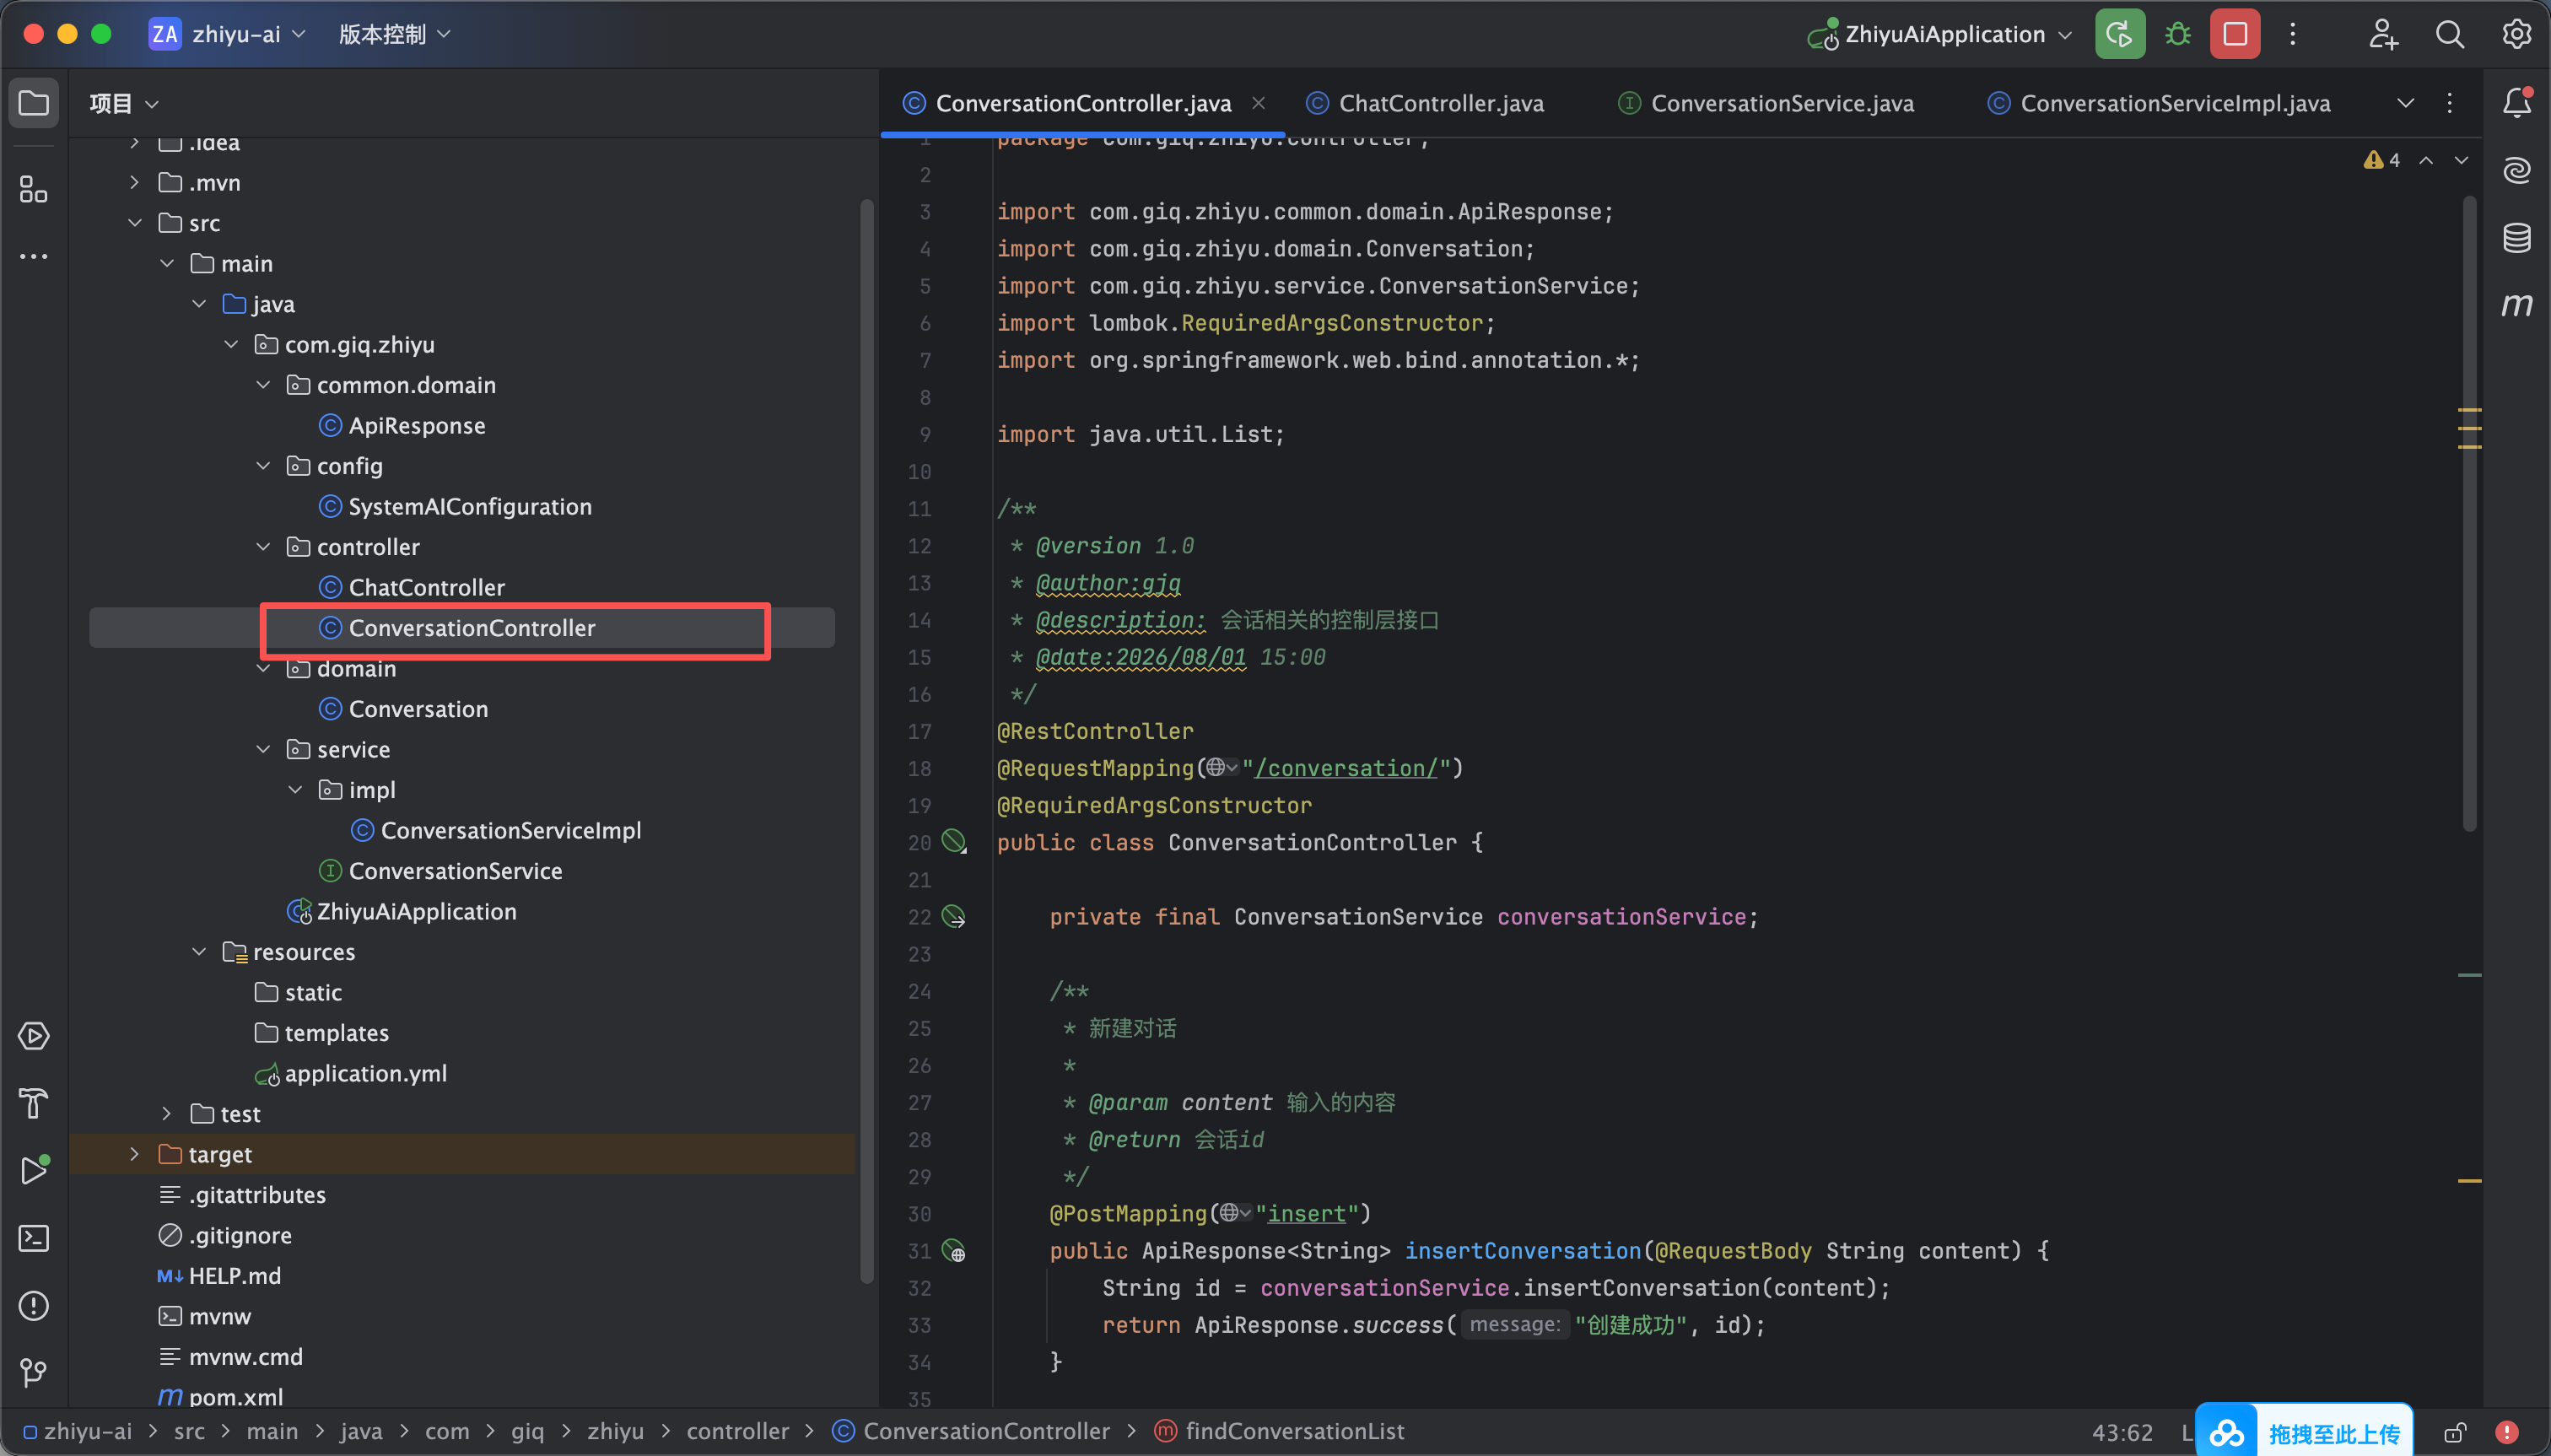
然后创建controller层 进行调用 代码如下

package com.giq.zhiyu.controller;

import com.giq.zhiyu.common.domain.ApiResponse;
import com.giq.zhiyu.domain.Conversation;
import com.giq.zhiyu.service.ConversationService;
import lombok.RequiredArgsConstructor;
import org.springframework.web.bind.annotation.*;

import java.util.List;

/**
* @version 1.0
* @author:gjq
* @description: 会话相关的控制层接口
* @date:2026/08/01 15:00
*/
@RestController
@RequestMapping("/conversation/")
@RequiredArgsConstructor
public class ConversationController {

private final ConversationService conversationService;

/**
* 新建对话
*
* @param content 输入的内容
* @return 会话id
*/
@PostMapping("insert")
public ApiResponse<String> insertConversation(@RequestBody String content) {
String id = conversationService.insertConversation(content);
return ApiResponse.success("创建成功", id);
}


}


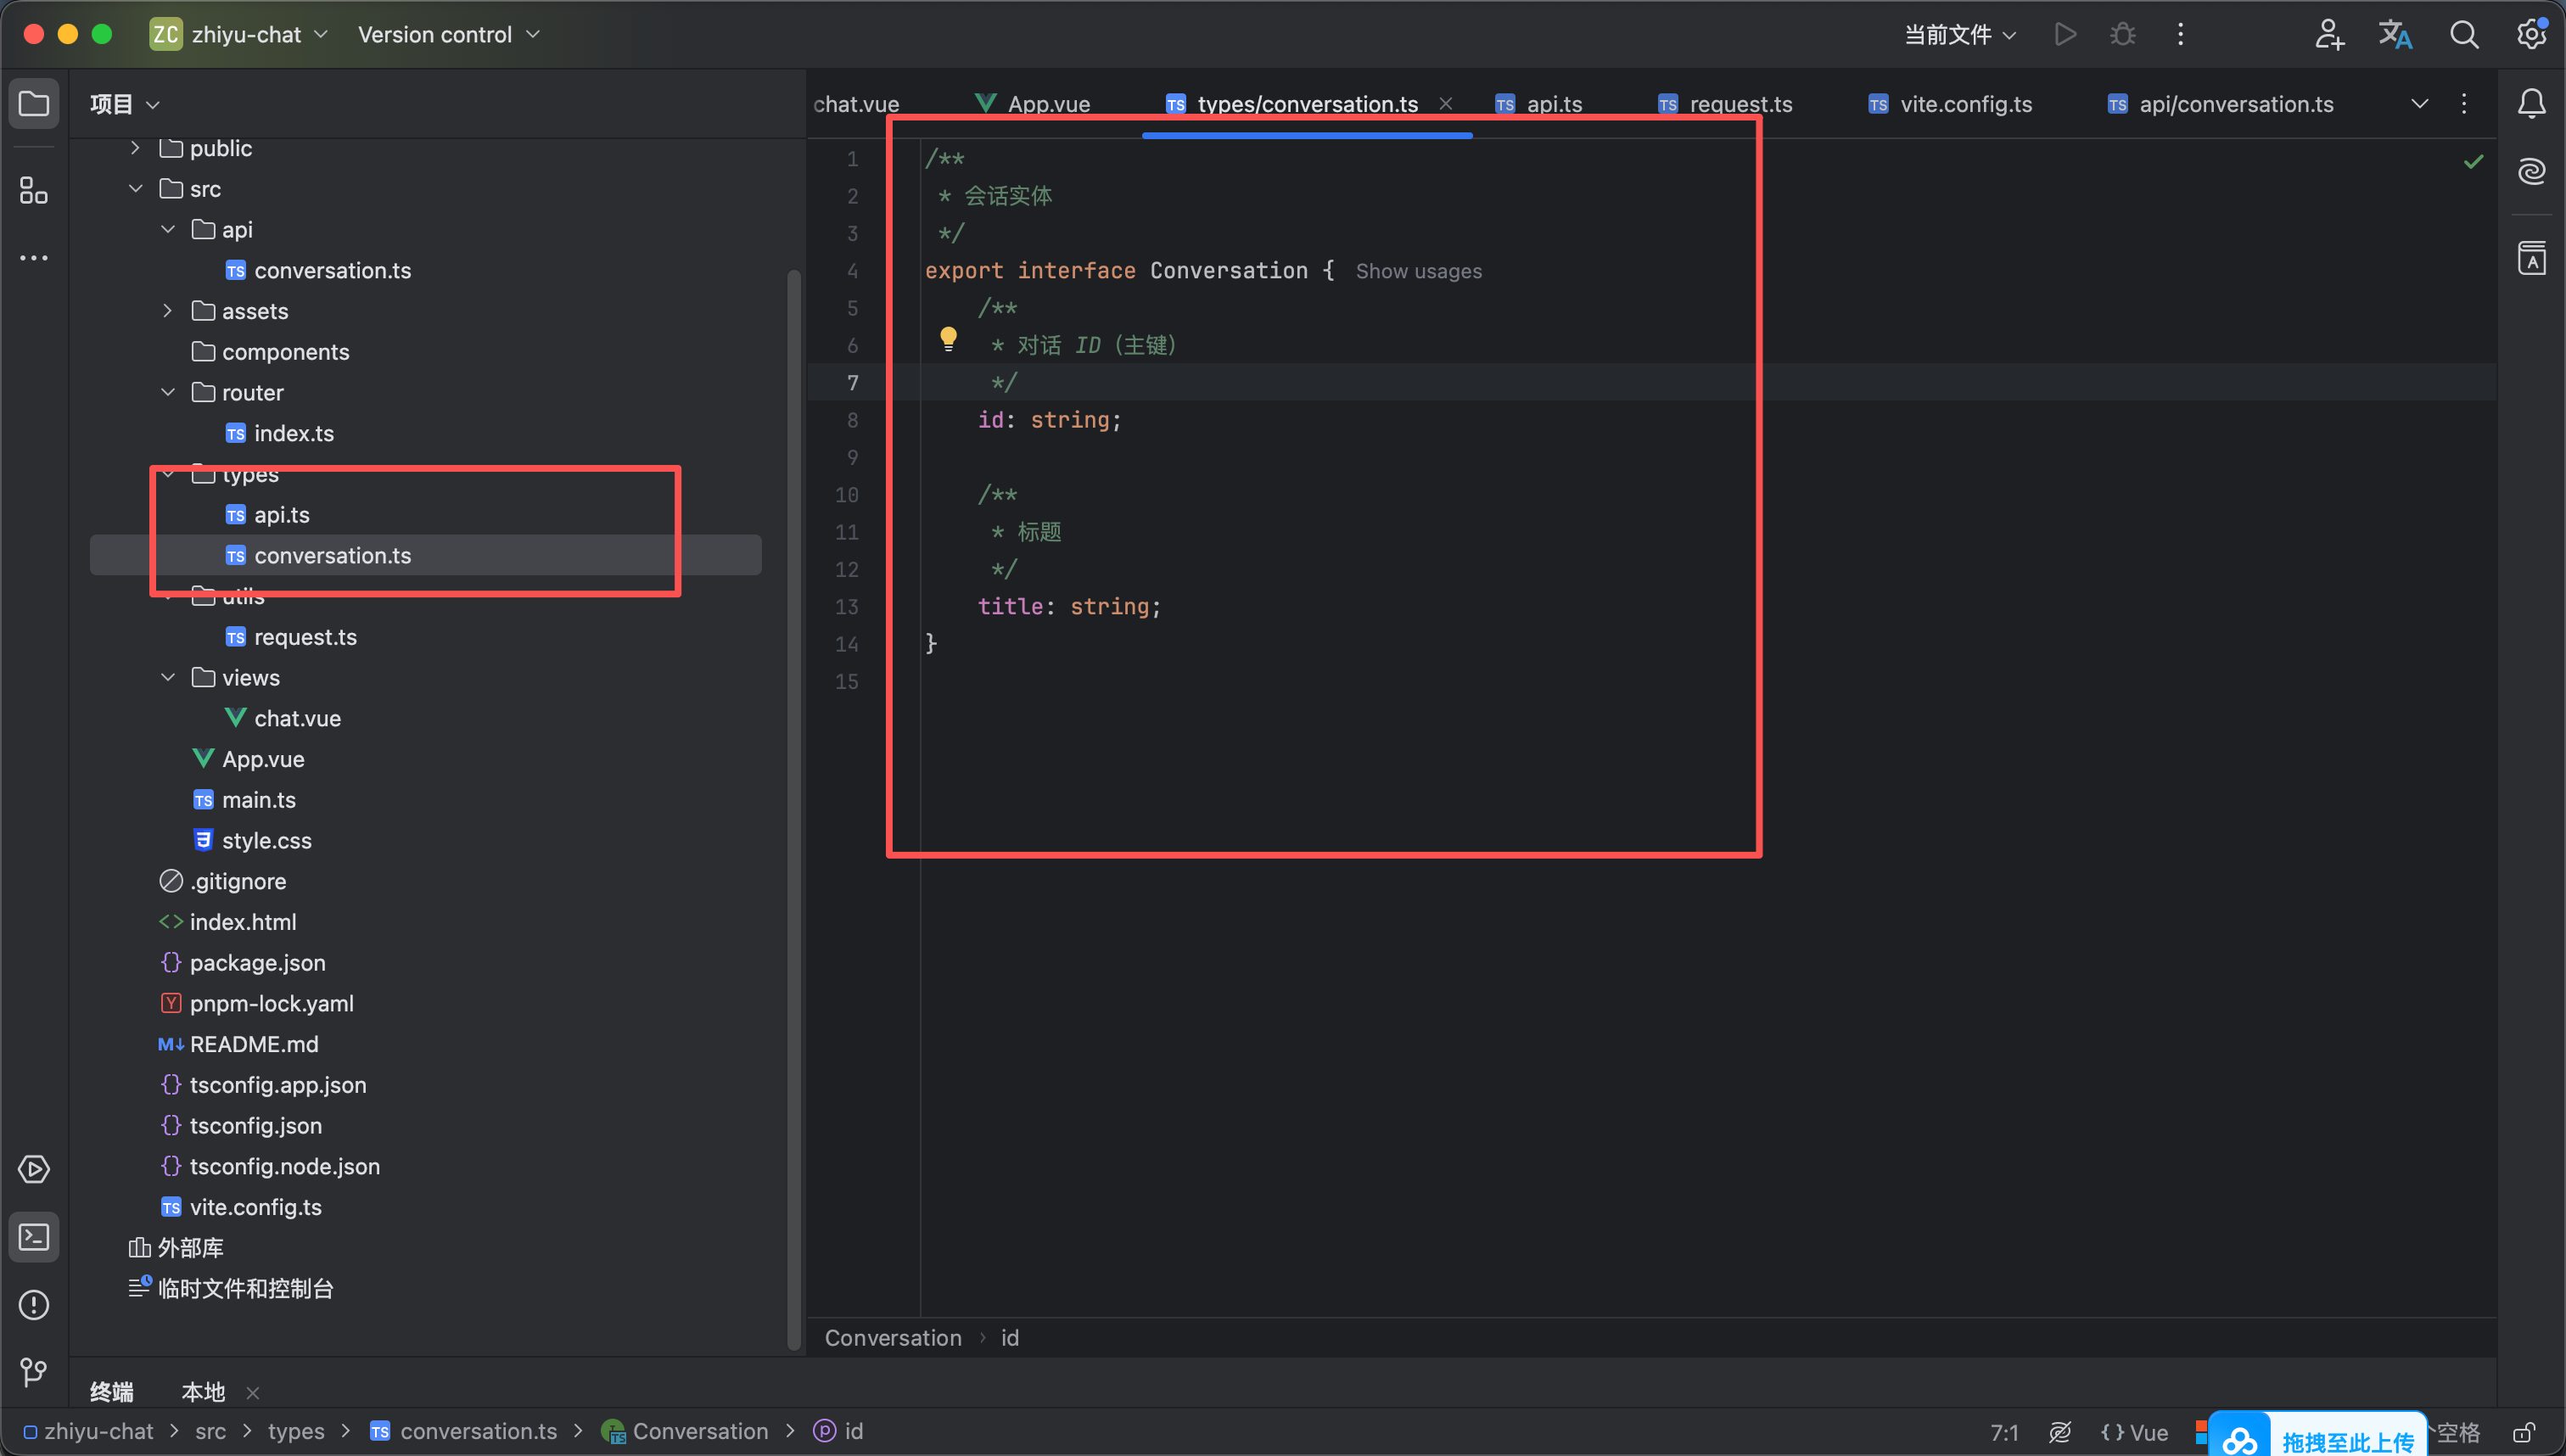
接下来就是编写前端代码了 流程是 点击发送按钮 -> 判断是否为空 ->判断是否有会话id ->没有会话id创建会话


首先我们声明ts 实体类 我们创建一个Conversation.ts 如图3 实体代码如下

/**
* 会话实体
*/
export interface Conversation {
/**
* 对话 ID(主键)
*/
id: string;

/**
* 标题
*/
title: string;
}


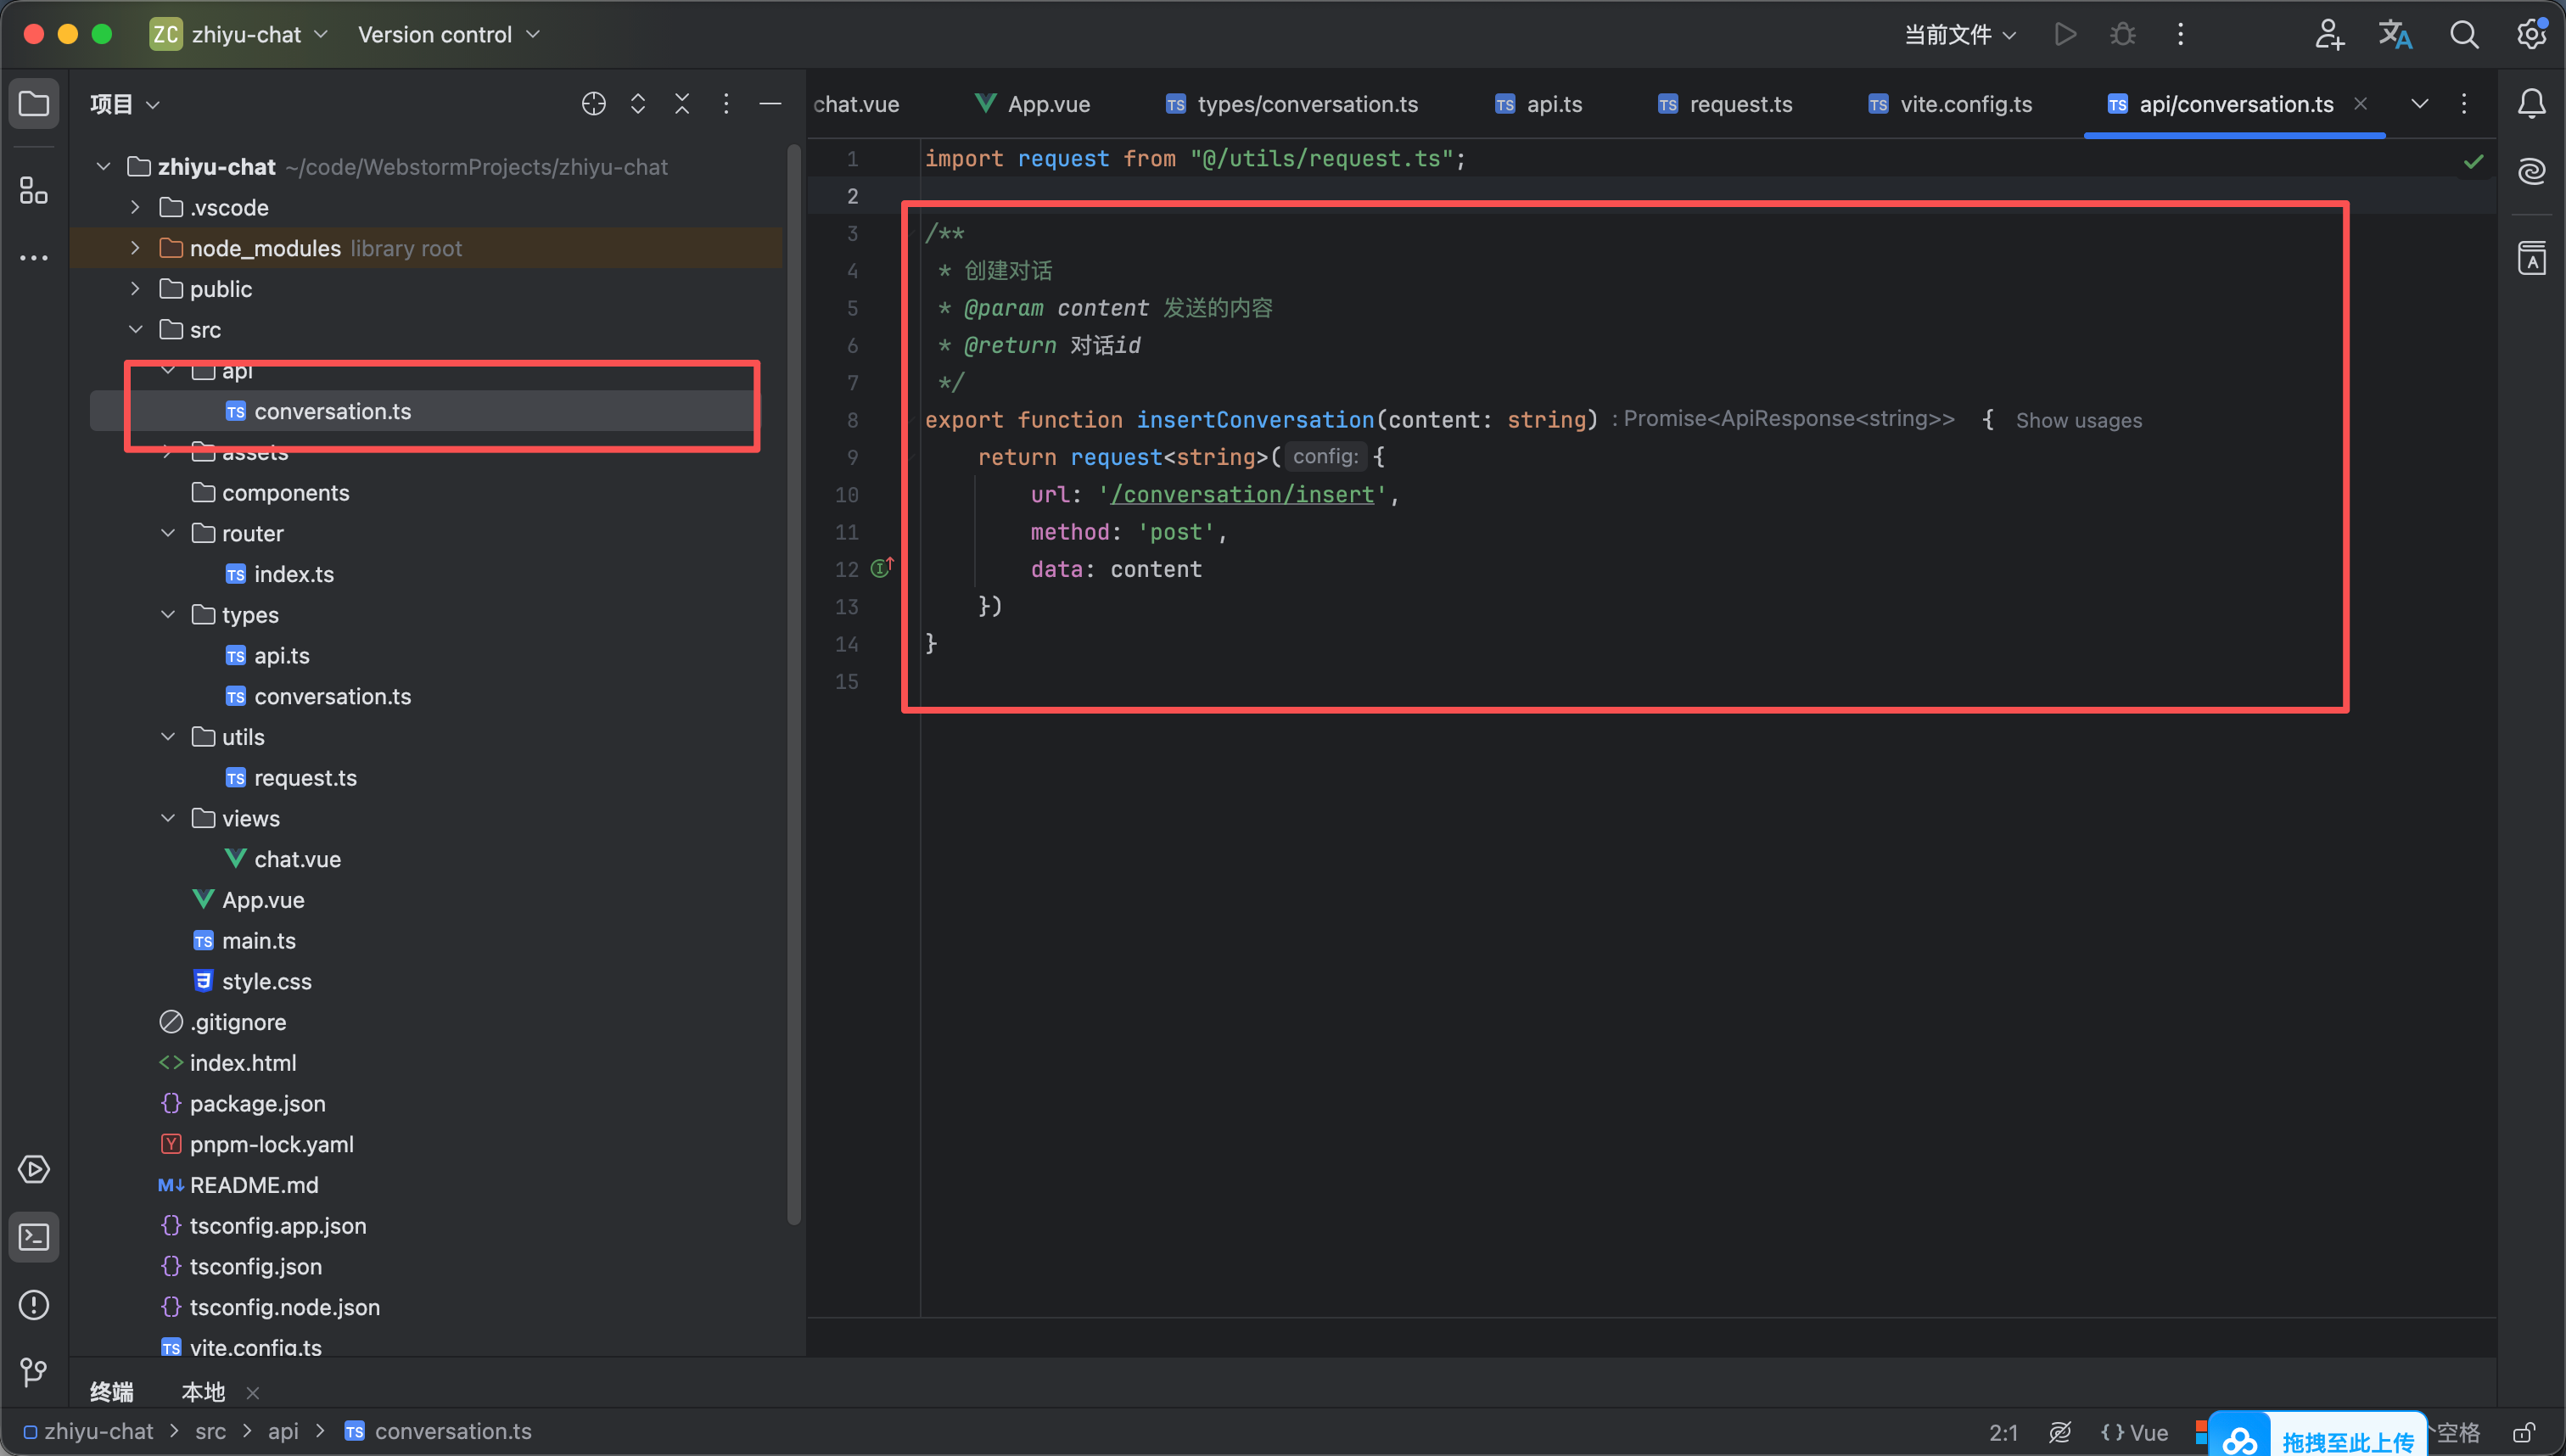
编写api接口 如图4所示我们创建一个api包 在此包下创建一个 conversation.ts 代码如下


import request from "@/utils/request.ts";


/**
* 创建对话
* @param content 发送的内容
* @return 对话id
*/
export function insertConversation(content: string) {
return request<string>({
url: '/conversation/insert',
method: 'post',
data: content
})
}


然后修改chat.vue 的代码如下 演示效果看最后媒体视频


<script setup lang="ts">

import {ref} from "vue";
import type {Conversation} from "@/types/conversation.ts";
import {insertConversation} from "@/api/conversation.ts";

const textareaRef = ref<HTMLTextAreaElement | null>(null)

// 最大高度限制 (px)
const maxHeight = window.innerHeight * 0.5

// 动态调整高度
const adjustHeight = () => {
const el = textareaRef.value
if (!el) return

// 先重置高度
el.style.height = 'auto'

// 根据滚动高度动态计算
if (el.scrollHeight > maxHeight) {
el.style.height = `${maxHeight}px`
el.style.overflowY = 'auto'
} else {
el.style.height = `${el.scrollHeight}px`
el.style.overflowY = 'hidden'
}
}


// 是否存在聊天
const isExistsChat = ref<boolean>(false)

// 输入的内容
const content = ref<string>("");

// 会话id
let conversationId = "";

// 会话列表
const conversationList = ref<Conversation[]>([])


/**
* 创建对话
*/
const createConversation = () => {
insertConversation(content.value).then(response => {
if (response.code == 200) {
conversationId = response.data
conversationList.value.unshift({id: conversationId, title: content.value})
}
})
}

/**
* 发送按钮处理
*/
const sendHandle = () => {
// 为空判断
if(!content.value.trim()){
alert("输入的内容不能为空")
return;
}

// 如果没有会话id就创建对话先
if (!conversationId) {
createConversation()
}
}


</script>

<template>
<div class="chat__container">
<aside class="chat__aside">
<div class="aside__header">
<img src="@/assets/logo.png" class="chat__logo" alt="logo"/>
<span>知屿AI</span>
</div>
<button class="aside__add-session">新建会话</button>
<!-- 会话列表 -->
<div class="aside__session-section">
<span class="aside__session-title">最近对话</span>
<div class="aside__session-list">
<div class="aside__session-item" v-for="item in conversationList" :key="item.id">
<img src="@/assets/book.png" width="17">
<span class="aside__session-text">{{item.title}}</span>
</div>
</div>
</div>
</aside>

<!-- 主体内容部分 -->
<main class="chat__main">
<header class="chat__header">
<div class="chat__header__title">
<img src="@/assets/logo.png" class="chat__logo" alt="logo"/>
<span>AI 智能对话</span>
</div>

<img src="@/assets/remove.png" class="chat__header__remove" alt="删除">
</header>

<div class="chat__main__wrapper">
<div class="chat__content">
<div class="chat__content-list" v-if="isExistsChat">
<div class="chat__content-item chat__content--user">
<div class="chat__content__text">
什么是ai
</div>
</div>
<div class="chat__content-item chat__content--assistant">
<div class="chat__content__avatar">
<img src="@/assets/logo.png" width="100%" alt="logo"/>
</div>
<div class="chat__content__text">
我已经收到你的问题。作为你的 AI 助手,我可以帮你梳理思路、提供建议,或进一步完成具体任务。你想从哪个部分开始?
</div>
</div>


</div>
<!-- 为空的样式 -->
<div class="chat__content-empty" v-else>
<img src="@/assets/logo.png" class="chat__content-empty__img" alt="logo"/>
<span class="chat__content-empty__title">你好,我是知屿 AI</span>
<span class="chat__content-empty__desc">清晰思考,自由创造。从一个问题开始。</span>
</div>
</div>

<div class="chat__input-container">
<textarea class="chat__input-wrapper" v-model="content" @input="adjustHeight"
ref="textareaRef" placeholder="有问题,尽管问"/>
<button class="chat-send-btn" @click="sendHandle">发送</button>
</div>

<div class="chat__main__footer">
内容由 AI 生成,请注意甄别与核实
</div>
</div>

</main>
</div>
</template>

<style lang="scss" scoped>
// 页面整体
.chat__container {
height: 100vh;
display: flex;
}

// 侧边栏部分
.chat__aside {
display: flex;
flex-direction: column;
gap: 25px;
padding: 20px 12px 12px;
background-color: #fcfcfc;
width: 240px;
border: 1px solid #eeeeee;
}

// 侧边栏标题
.aside__header {
display: flex;
align-items: center;
gap: 10px;
font-size: 18px;
color: #333333;
font-weight: 600;
}

// logo
.chat__logo {
width: 30px;
}

// 新建会话按钮
.aside__add-session {
font-weight: 500;
display: flex;
align-items: center;
justify-content: center;
height: 40px;
background-color: #4e6ef2;
border-radius: 12px;
color: white;
font-size: 14px;
border: none;
cursor: pointer;

&:hover {
background-color: #405fdc;
}
}

// 侧边栏的会话记录部分
.aside__session-section {
min-height: 0;
flex: 1;
display: flex;
flex-direction: column;
gap: 5px;
}

// 侧边栏的会话记录小标题
.aside__session-title {
padding-left: 10px;
color: #94a3b8;
font-size: 12px;
font-weight: 500;
}

// 侧边栏会话列表
.aside__session-list {
overflow-y: auto;
flex: 1;
display: flex;
flex-direction: column;

}

// 侧边栏会话项
.aside__session-item {
display: flex;
align-items: center;
gap: 8px;
font-size: 14px;
color: #64748b;
padding: 10px;
border-radius: 12px;

flex-shrink: 0;
}

// 侧边栏会话项文本
.aside__session-text {
white-space: nowrap;
overflow: hidden;
text-overflow: ellipsis;
flex: 1;
}

// 主体内容部分样式
.chat__main {
display: flex;
flex-direction: column;
flex: 1;
background-color: #f8f8f8;
}

// 头部
.chat__header {
flex-shrink: 0;
display: flex;
align-items: center;
justify-content: space-between;
padding: 0 30px;
height: 60px;
background-color: #fcfcfc;
border-bottom: 1px solid #eeeeee;
}

// 头部标题
.chat__header__title {
display: flex;
align-items: center;
justify-content: center;
gap: 10px;
font-size: 18px;
color: #333333;
font-weight: 600;
}

// 头部删除按钮
.chat__header__remove {
cursor: pointer;
width: 20px;
}

// 对话内容主部分
.chat__main__wrapper {
background-color: #f7f8fa;
flex: 1;
display: flex;
flex-direction: column;
align-items: center;
}

// 对话内容部分
.chat__content {
width: 100%;
padding: 26px 32px;
display: flex;
justify-content: center;
flex: 1;
}

// 聊天内容列表
.chat__content-list {
width: 100%;
display: flex;
flex-direction: column;
gap: 26px;
}

// 聊天的每一项
.chat__content-item {
align-items: flex-start;
display: flex;
width: 100%;
gap: 12px;
}

// 聊天文本部分样式
.chat__content__text {
max-width: 80%;
font-size: 14px;
border-radius: 15px;
padding: 14px 18px;
line-height: 28px;
}

// ai的内容样式
.chat__content--assistant {
justify-content: flex-start;

// 头像部分
.chat__content__avatar {
height: 40px;
width: 40px;
line-height: 80px;
}

// 文本部分
.chat__content__text {
color: #333333;
background-color: white;
}
}

// 用户的内容样式
.chat__content--user {
justify-content: flex-end;

// 文本部分
.chat__content__text {
color: white;
background-color: #4e6ef2;
}
}

// 对话空内容外层容器
.chat__content-empty {
display: flex;
flex-direction: column;
align-items: center;
justify-content: center;
}

// 对话空内容的图片
.chat__content-empty__img {
width: 55px;
margin-bottom: 20px;
}

// 空内容提示标题
.chat__content-empty__title {
font-size: 32px;
color: #1e293b;
font-weight: 600;
margin-bottom: 10px;
}

// 空内容提示描述
.chat__content-empty__desc {
font-size: 14px;
color: #64748b;
}

// 对话底部
.chat__main__footer {
padding: 12px;
text-align: center;
font-size: 12px;
color: #94a3b8;
}

// 输入部分的容器
.chat__input-container {
display: flex;
align-items: flex-end;
gap: 10px;
padding: 8px 20px;
background-color: white;
border: 2px solid #eeeeee;
border-radius: 15px;
box-shadow: 0 8px 30px rgba(29, 39, 64, 0.08);
width: 90%;
max-width: 800px;
}

// 输入里部分
.chat__input-wrapper {
width: 100%;
flex: 1;
outline: none;
border: none;
resize: none;
box-sizing: border-box;
padding: 10px 0;
line-height: 1.5;
min-height: 50px;
font-size: 14px;
color: #333333;
}


// 发送按钮
.chat-send-btn {
height: 40px;
font-size: 12px;
padding: 8px 16px;
border-radius: 10px;
color: white;
background-color: #4e6ef2;
font-weight: 500;
border: none;

&:hover {
background-color: #405fdc;
}
}
</style>


9

对话列表查询

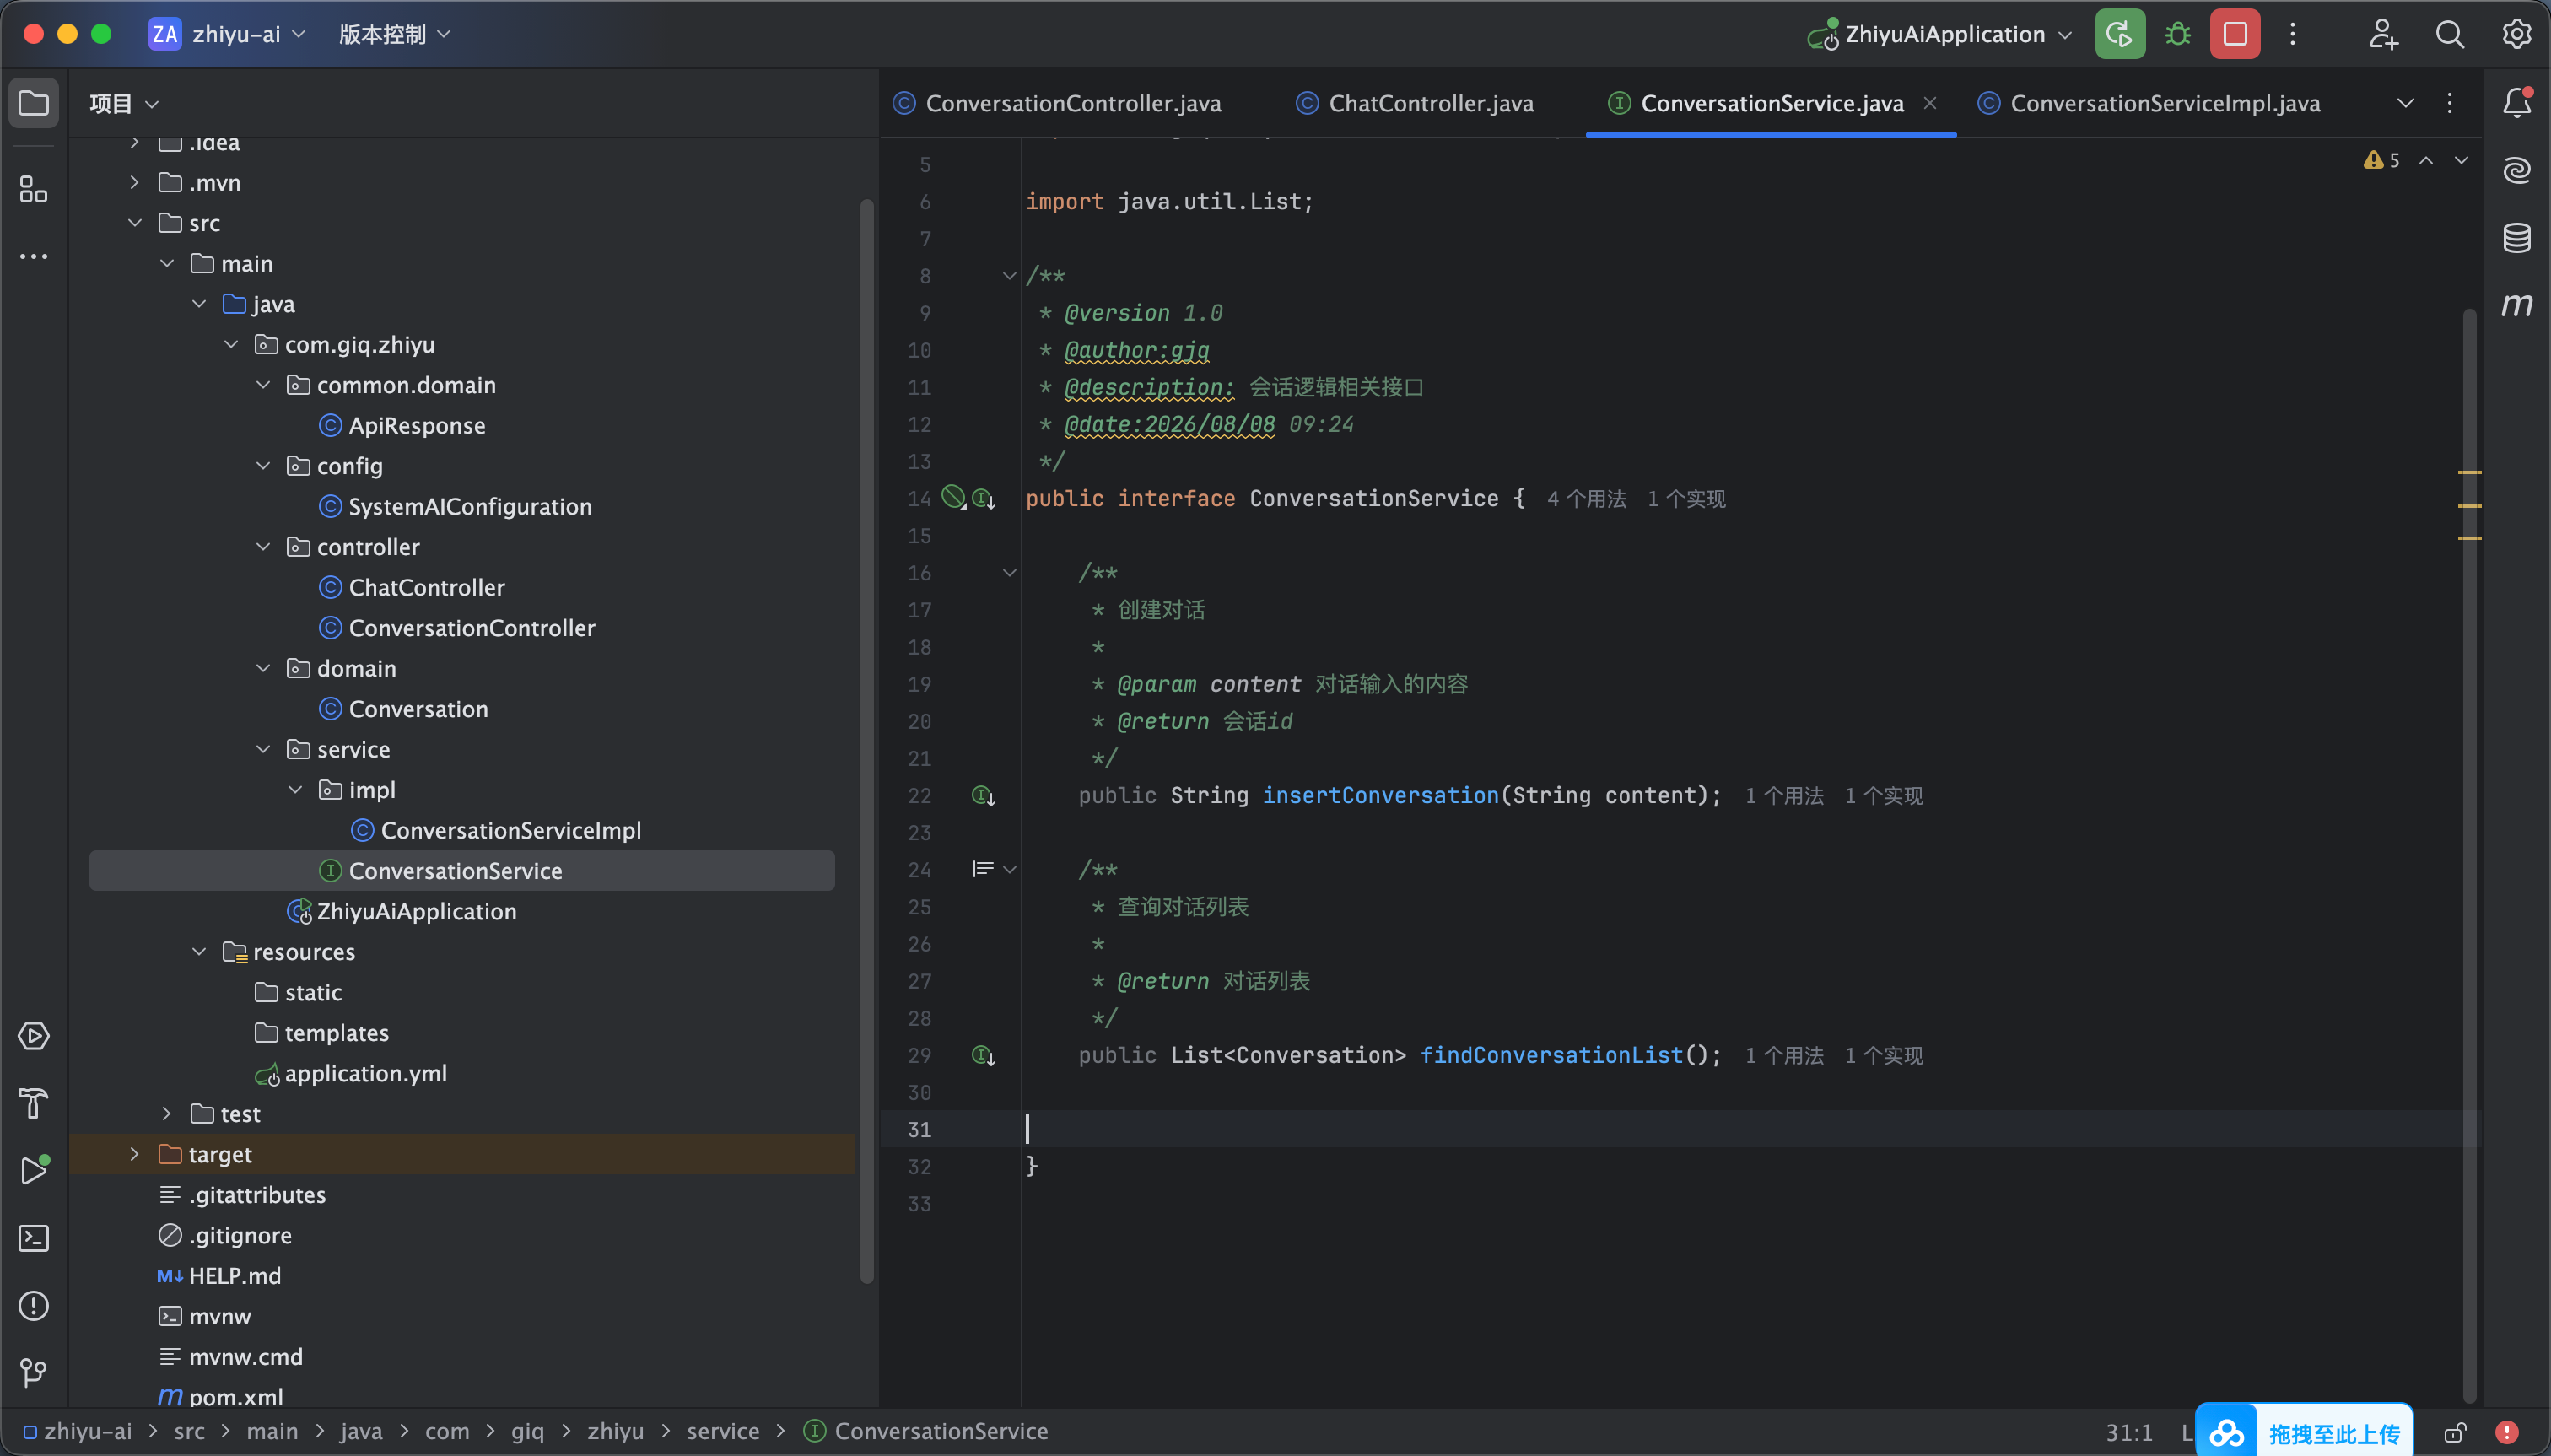
跟上一步的流程一样 首先我们先来创建一个service 如图1

/**
* 查询对话列表
*
* @return 对话列表
*/
public List<Conversation> findConversationList();


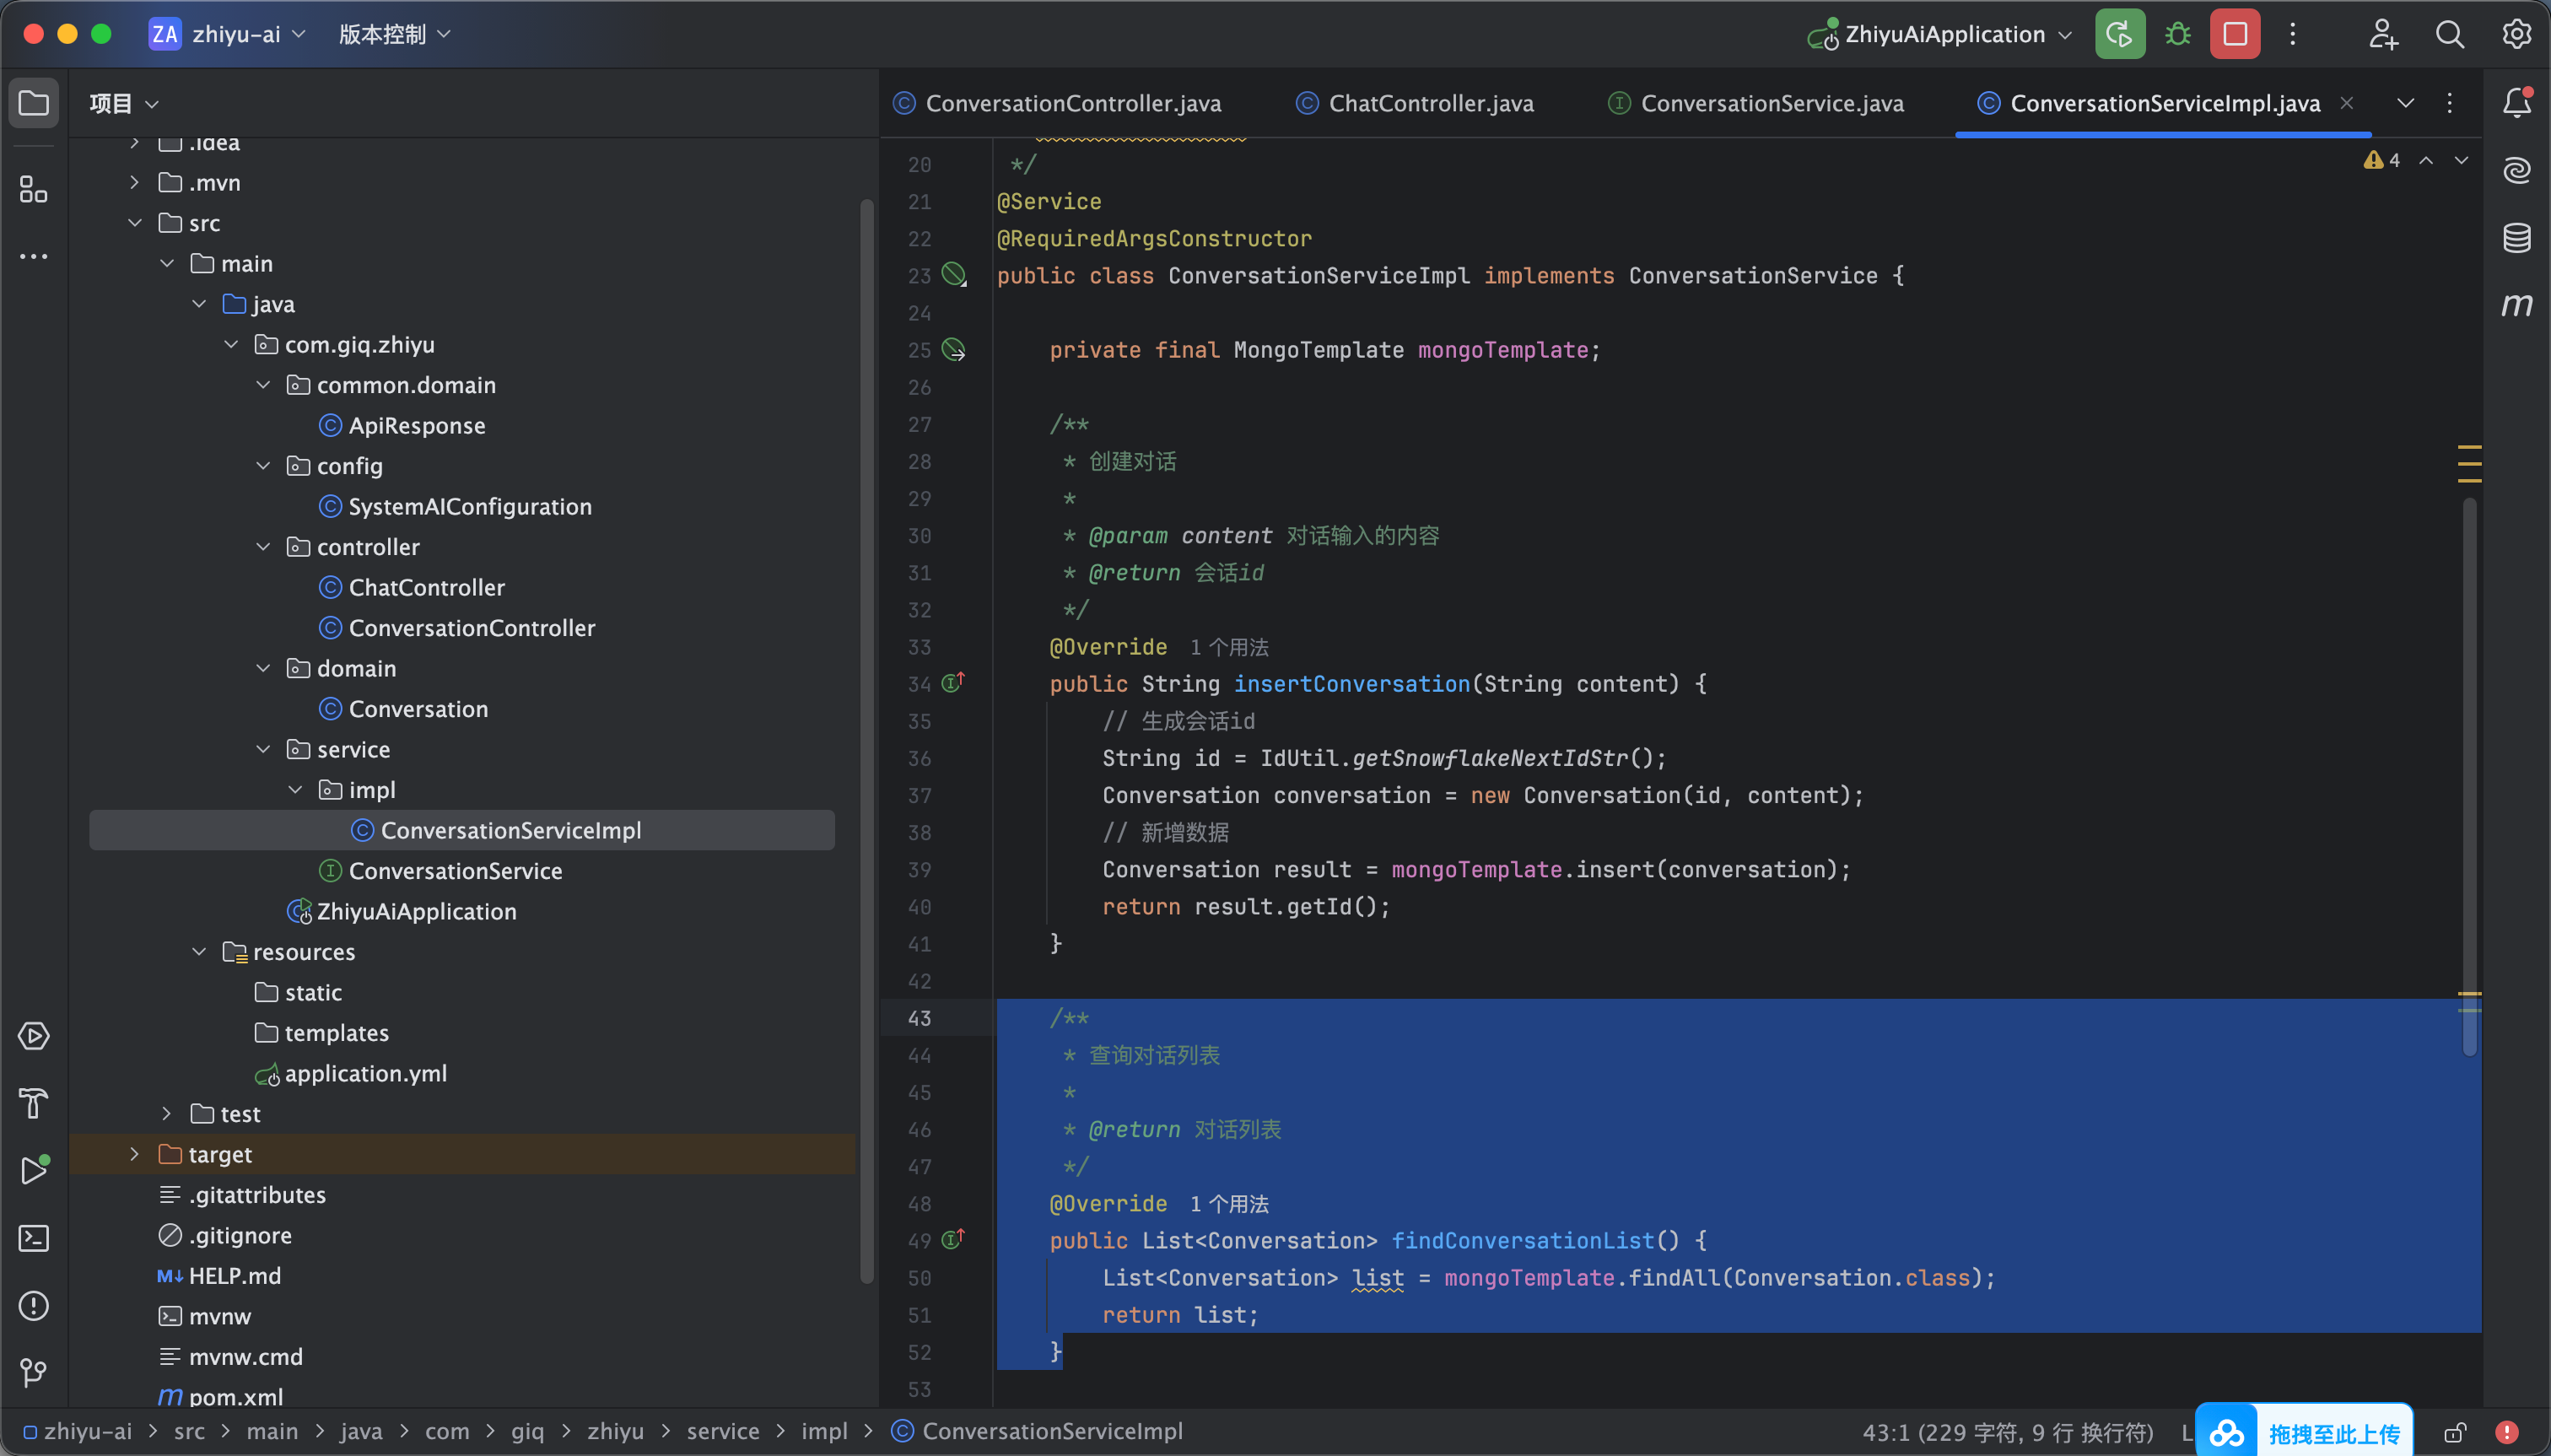
然后在impl里编写service的实现 如图2

/**
* 查询对话列表
*
* @return 对话列表
*/
@Override
public List<Conversation> findConversationList() {
List<Conversation> list = mongoTemplate.findAll(Conversation.class);
return list;
}


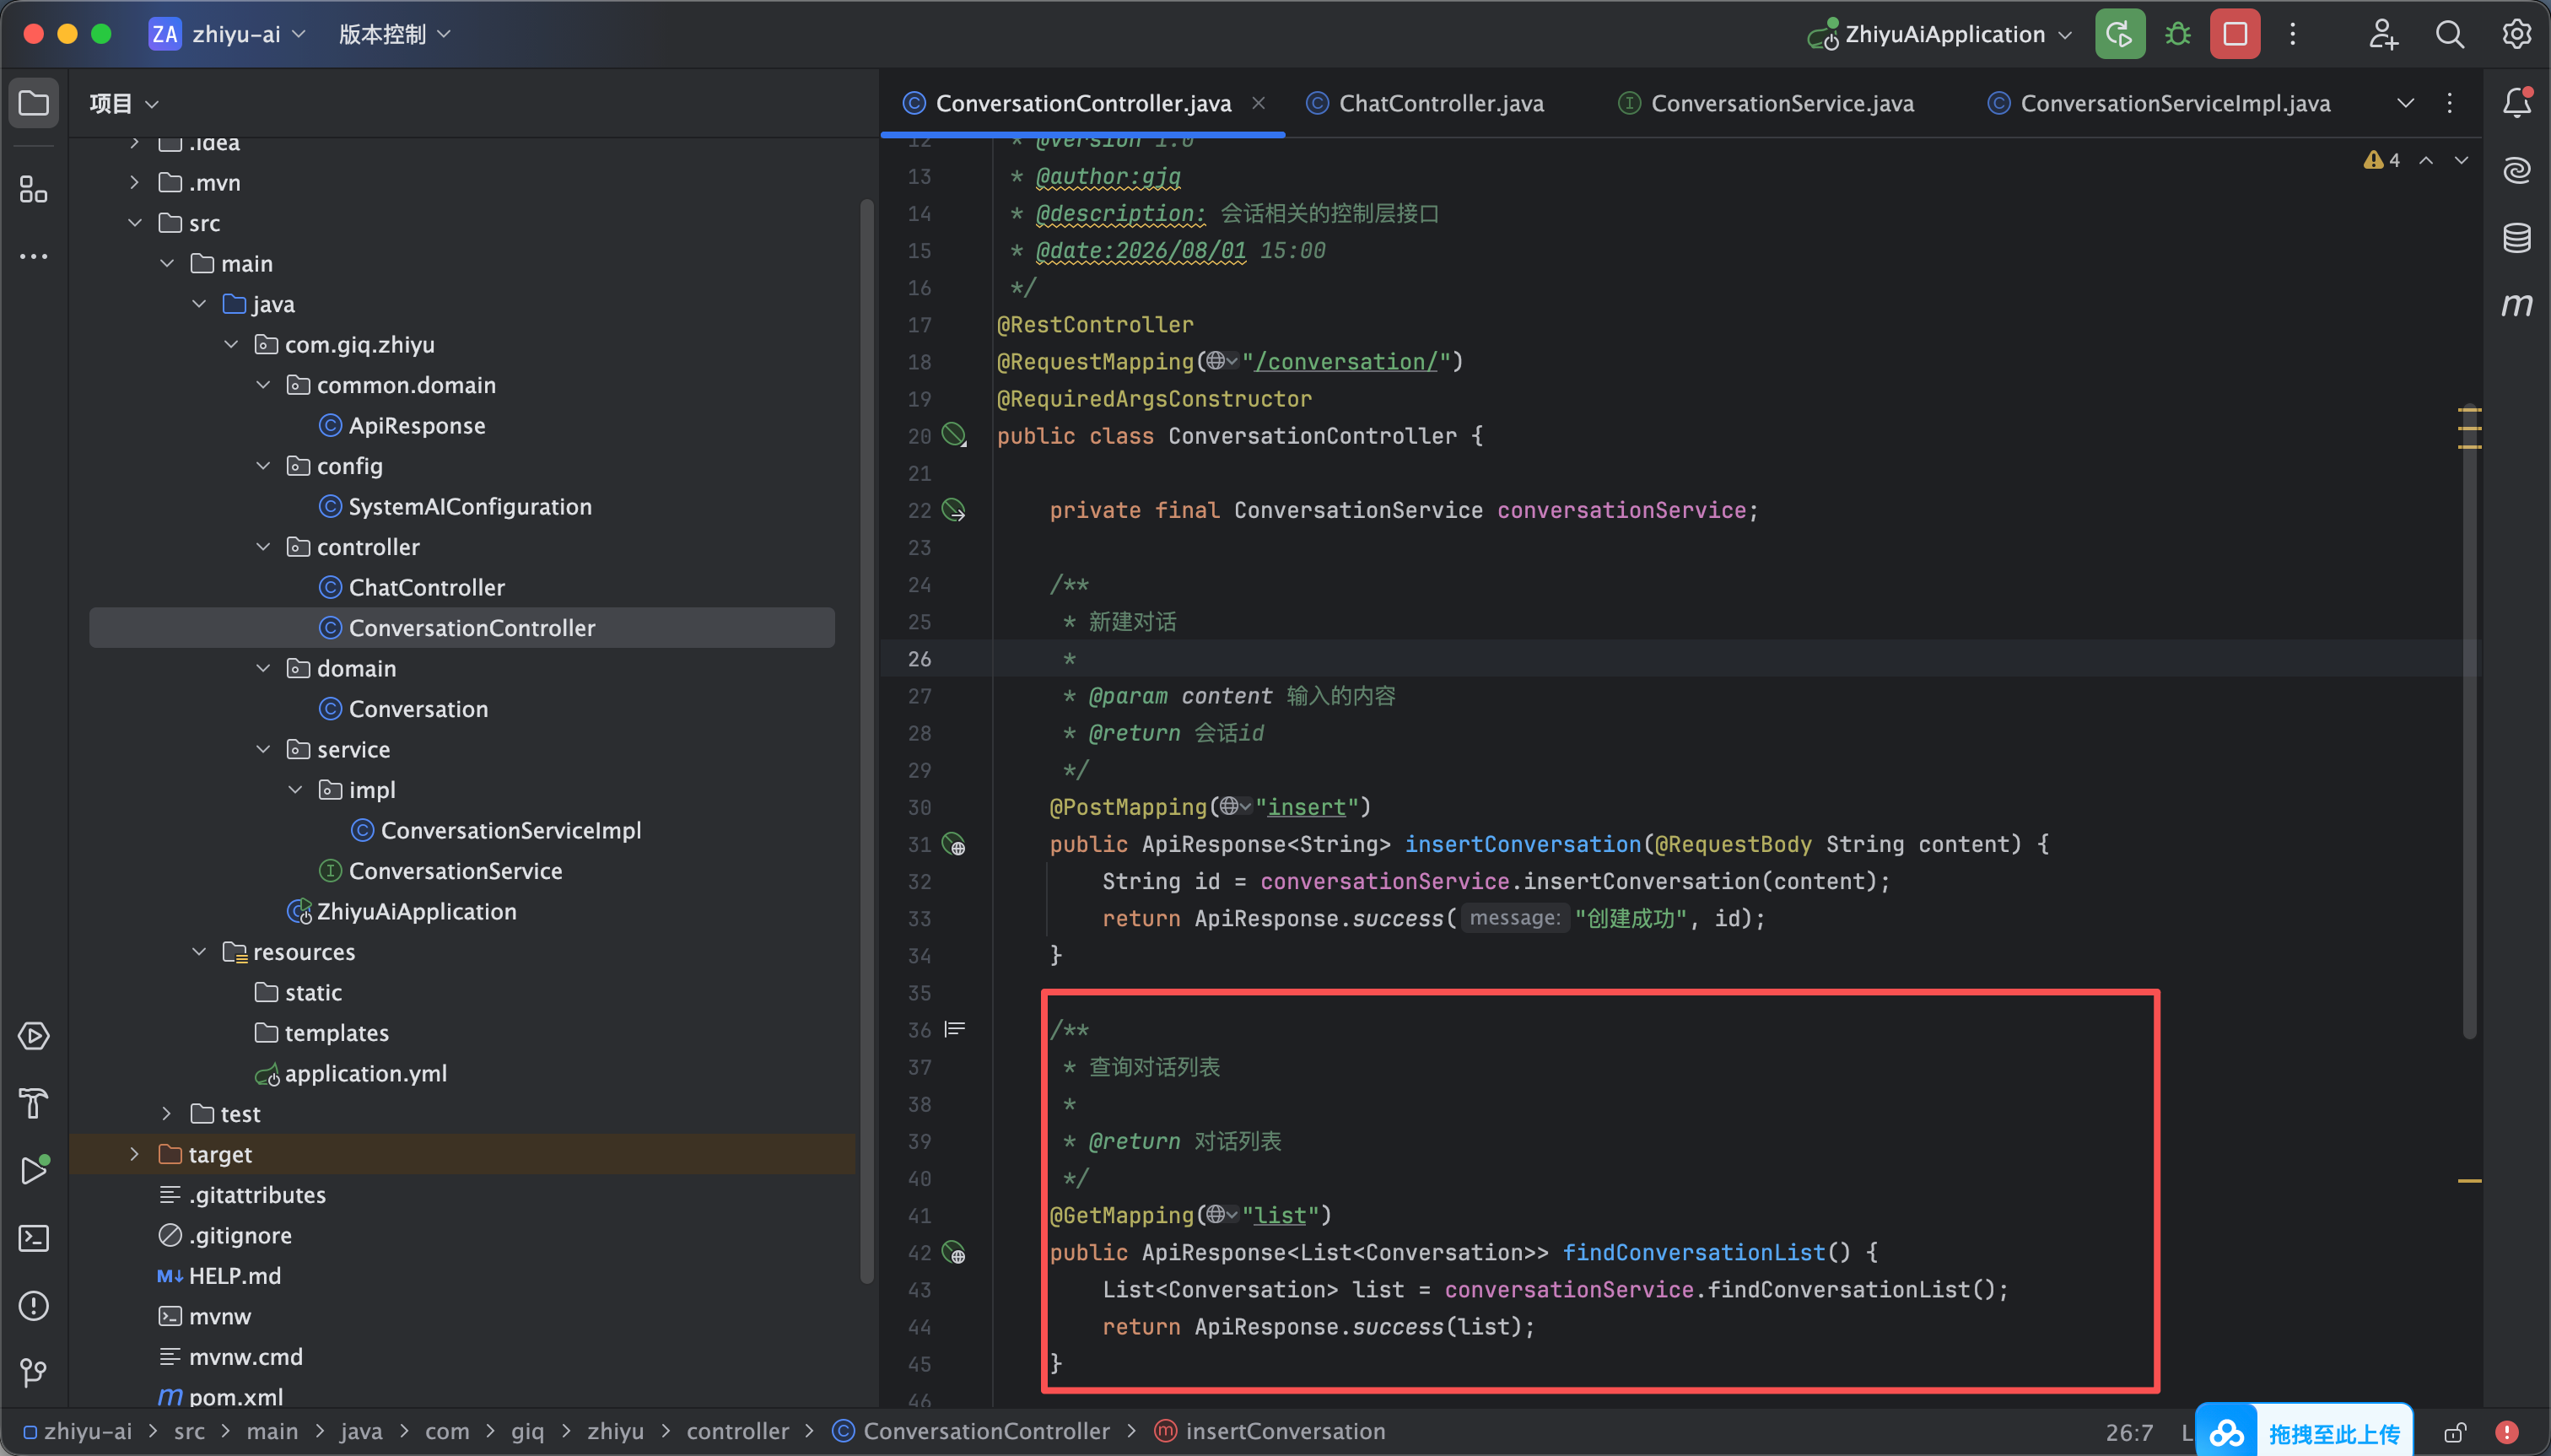
然后在controller里添加查询接口 如图3

/**
* 查询对话列表
*
* @return 对话列表
*/
@GetMapping("list")
public ApiResponse<List<Conversation>> findConversationList() {
List<Conversation> list = conversationService.findConversationList();
return ApiResponse.success(list);
}


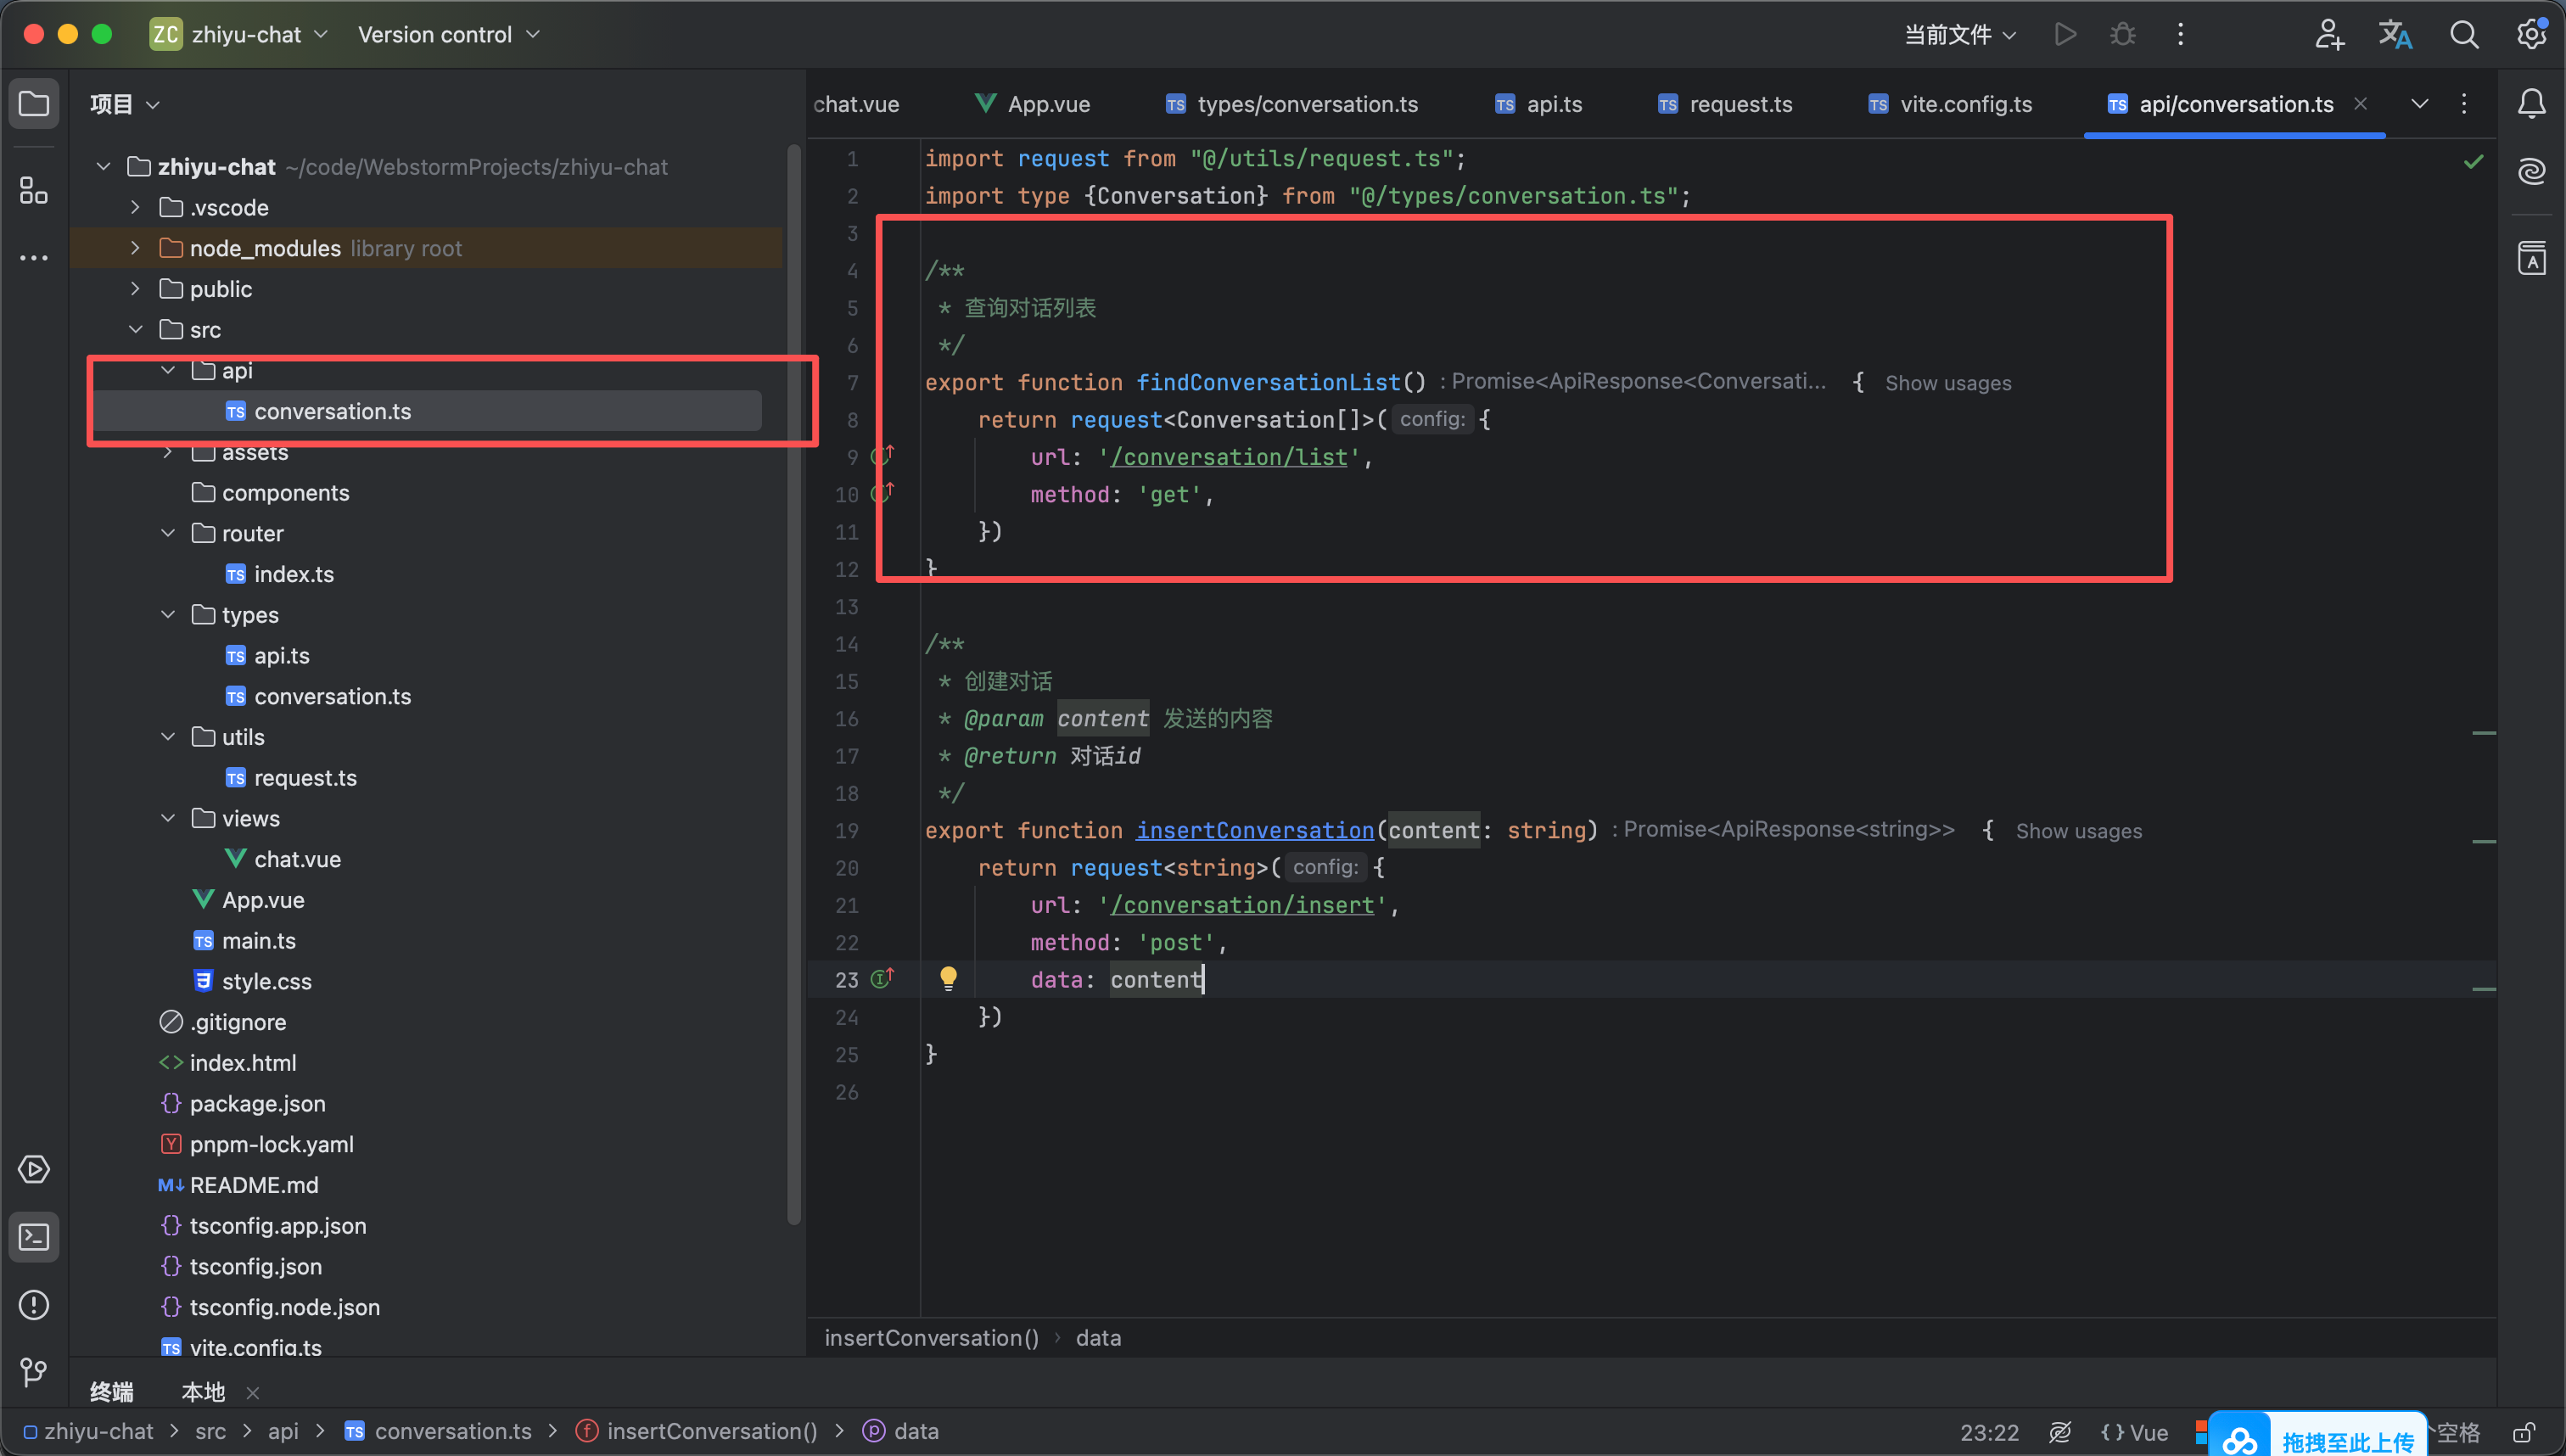
然后在前端api.ts里编写 findConversationList() 如图5

import request from "@/utils/request.ts";
import type {Conversation} from "@/types/conversation.ts";

/**
* 查询对话列表
*/
export function findConversationList() {
return request<Conversation[]>({
url: '/conversation/list',
method: 'get',
})
}

/**
* 创建对话
* @param content 发送的内容
* @return 对话id
*/
export function insertConversation(content: string) {
return request<string>({
url: '/conversation/insert',
method: 'post',
data: content
})
}


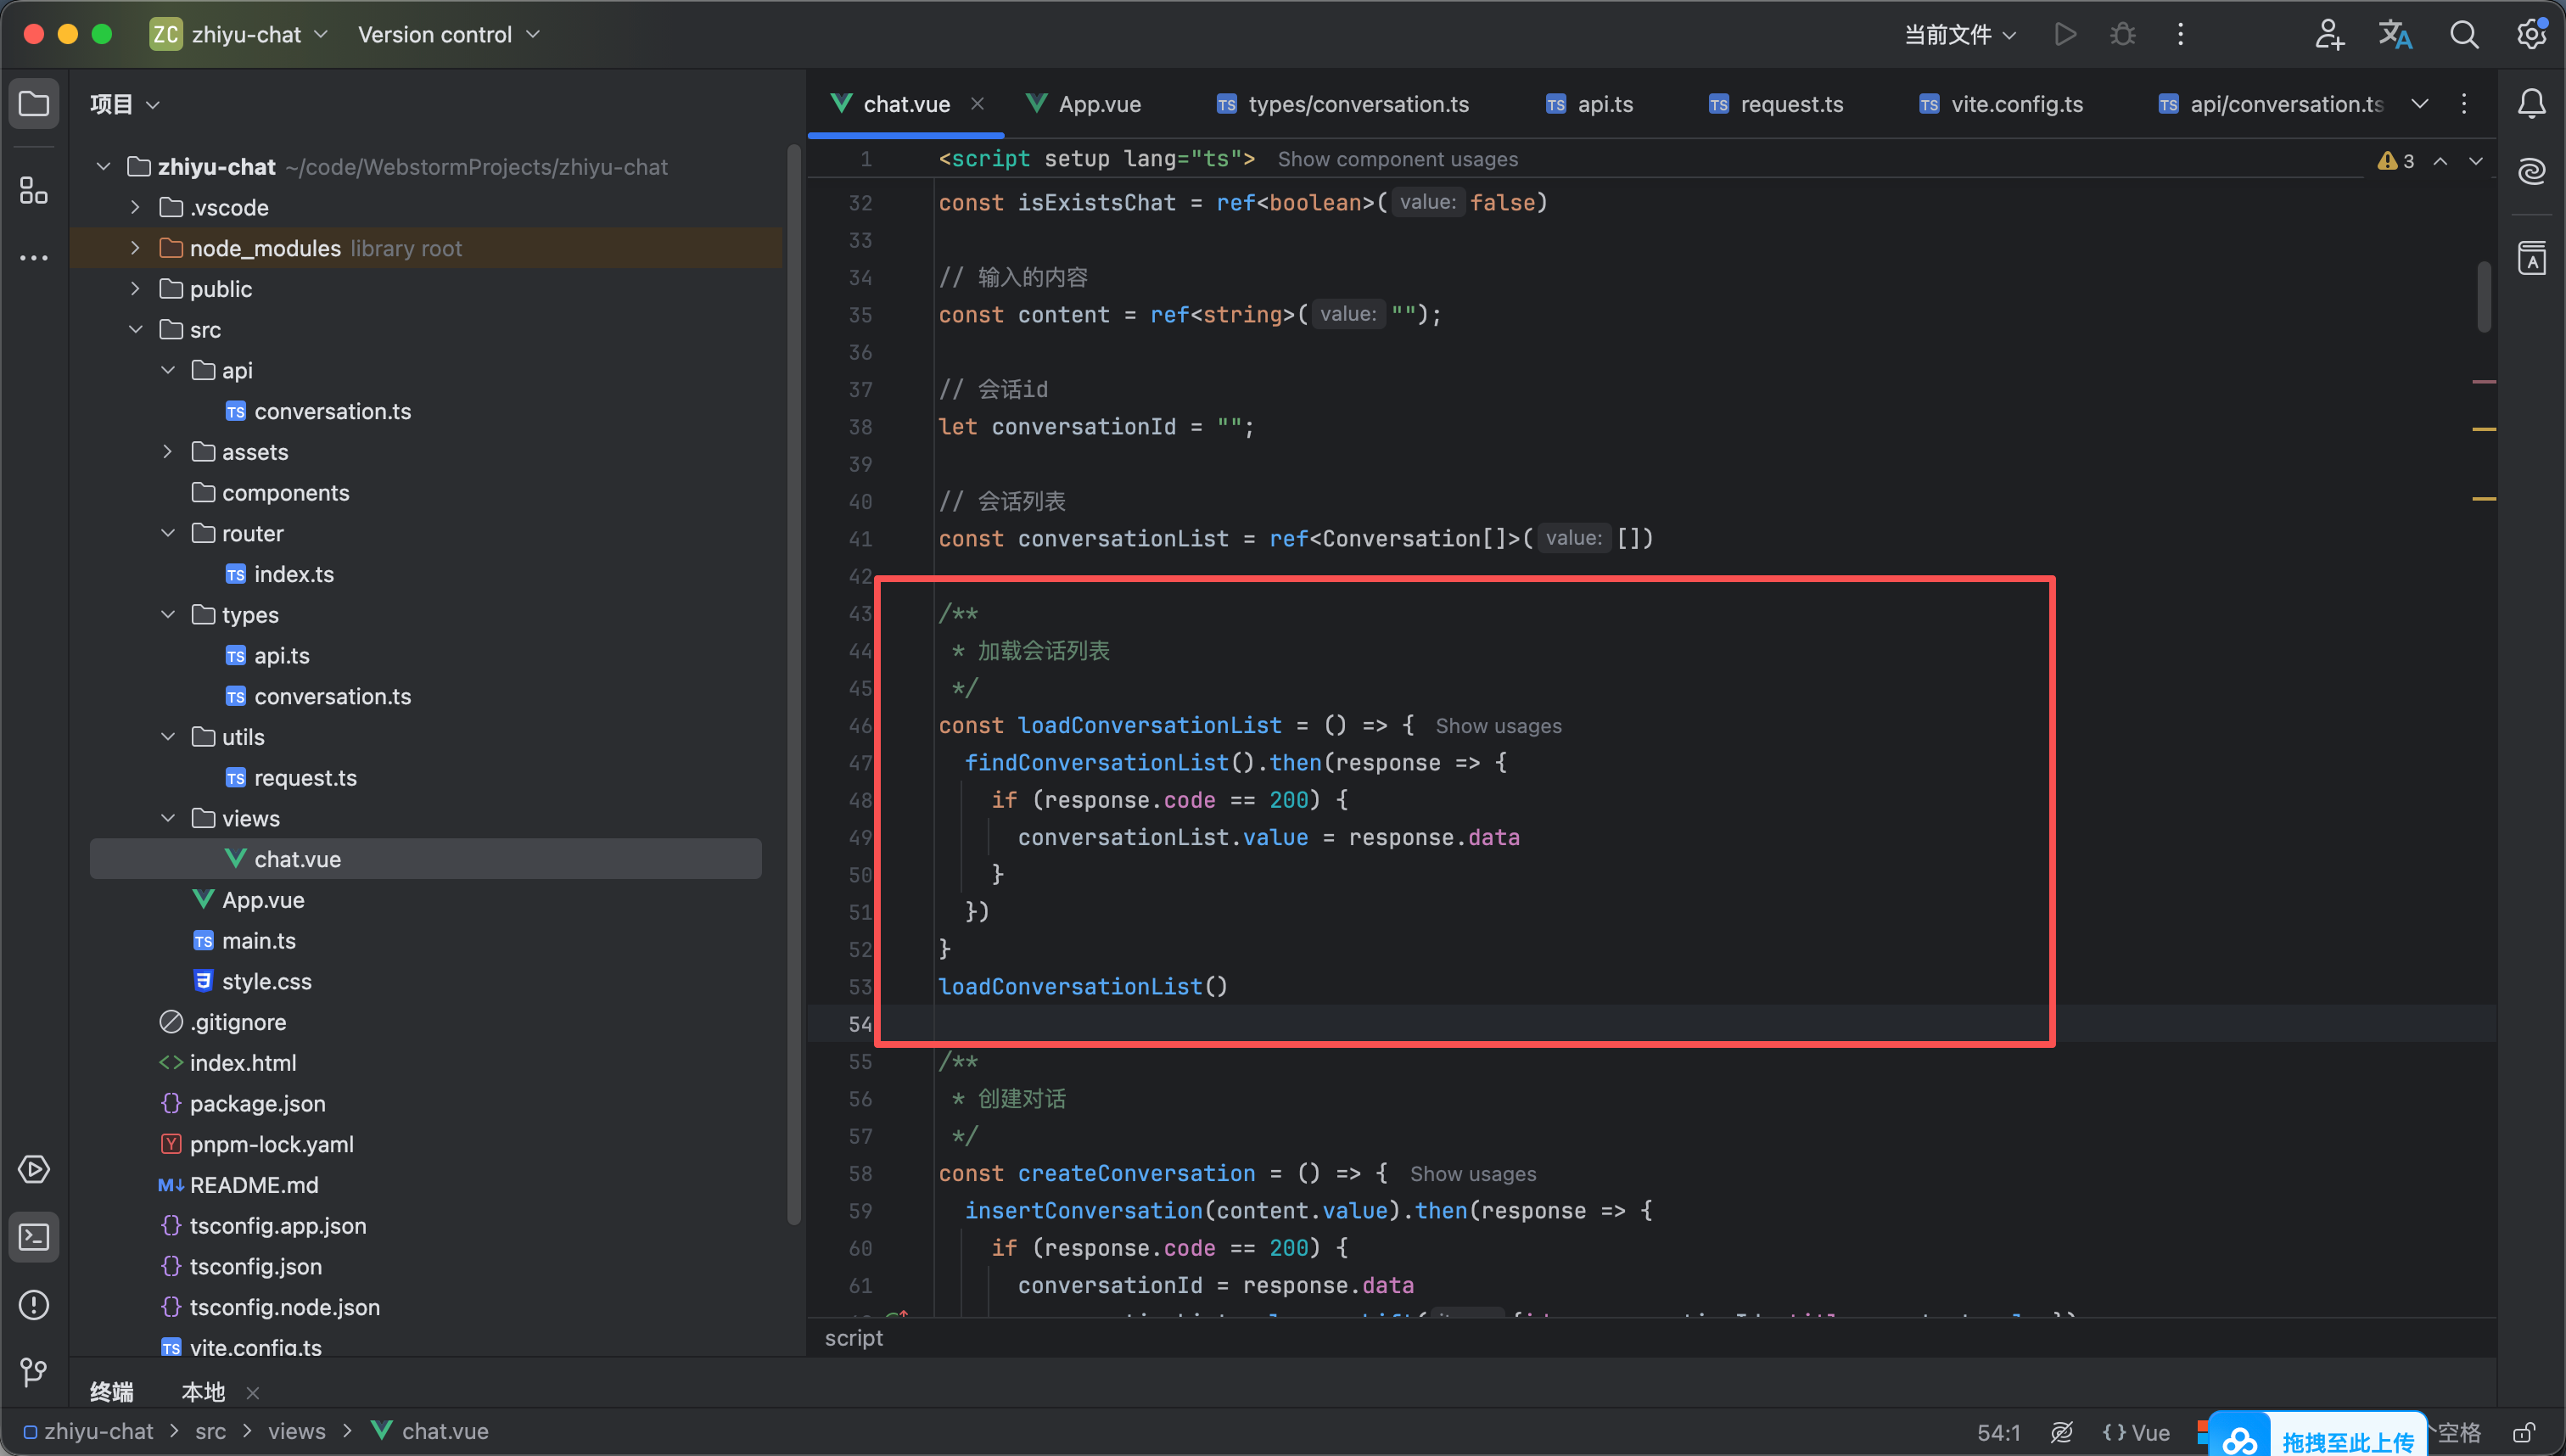
然后chat.vue 里面就添加一个load方法进行查询并赋值给conversationList 然后在页面加载时候调用一下

/**
* 加载会话列表
*/
const loadConversationList = () => {
findConversationList().then(response => {
if (response.code == 200) {
conversationList.value = response.data
}
})
}
loadConversationList()


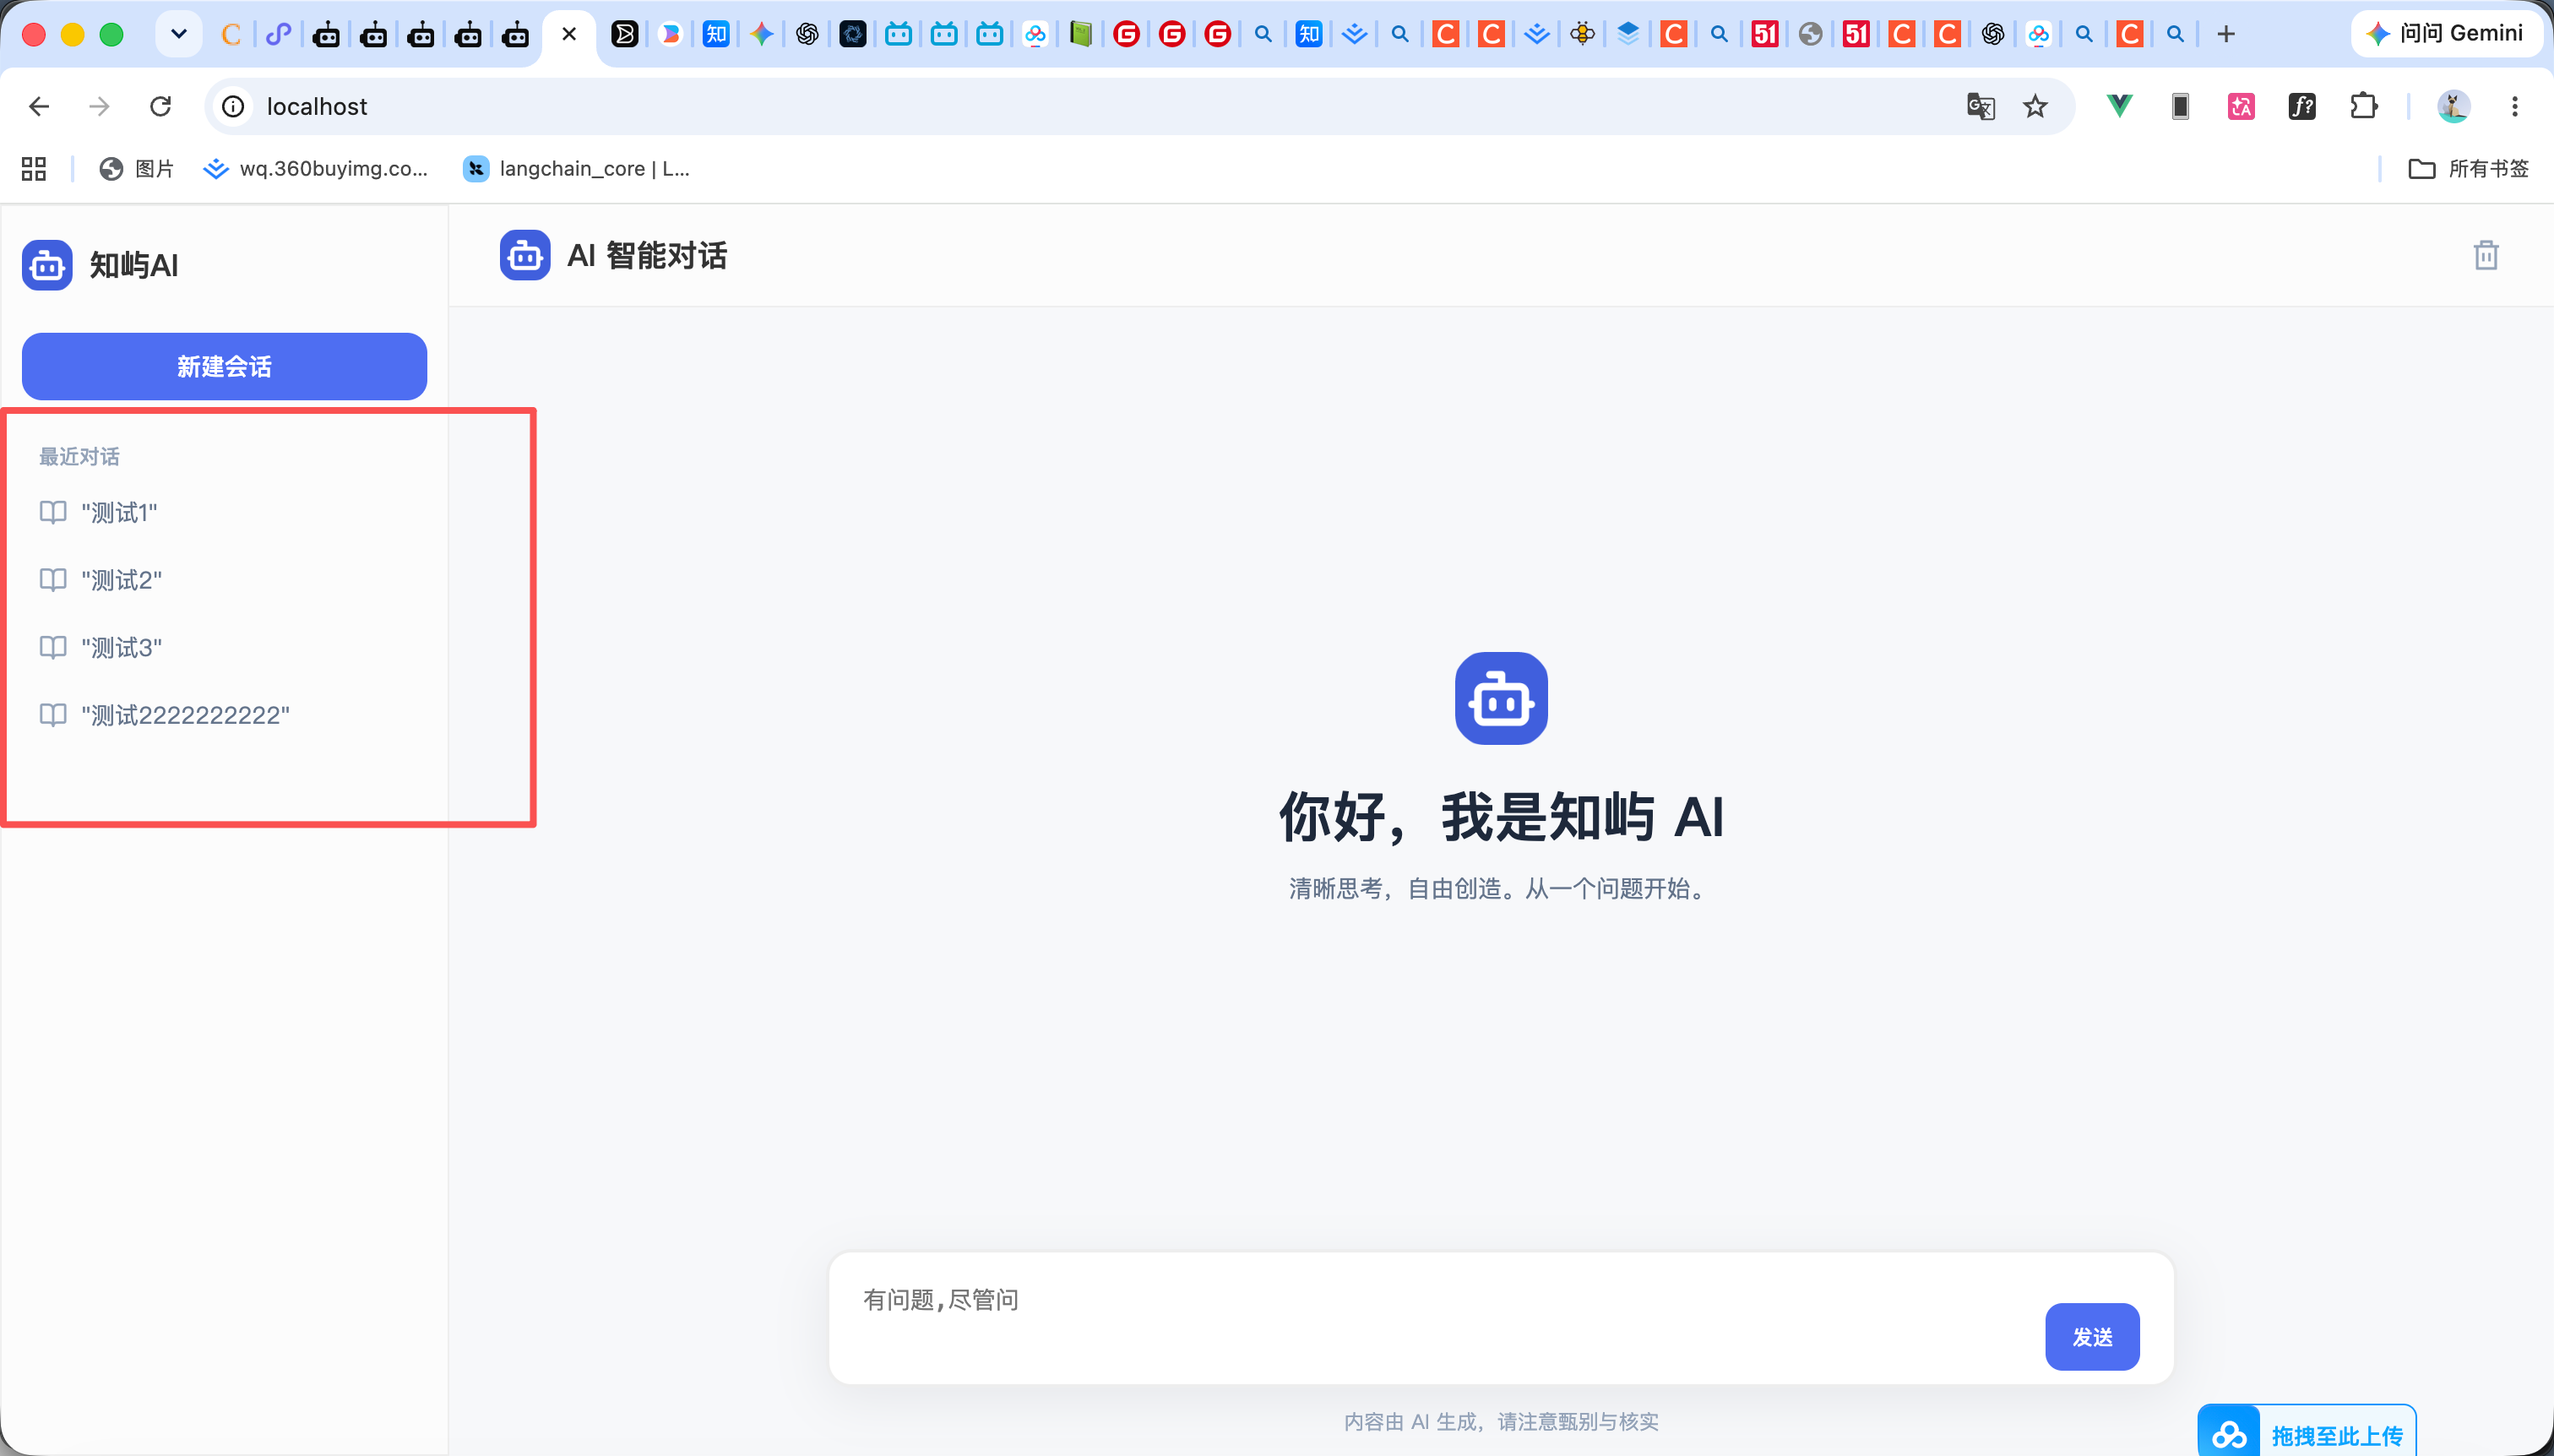
效果如图6


10

发送消息

对话分为两个方法 查询聊天记录和发送消息


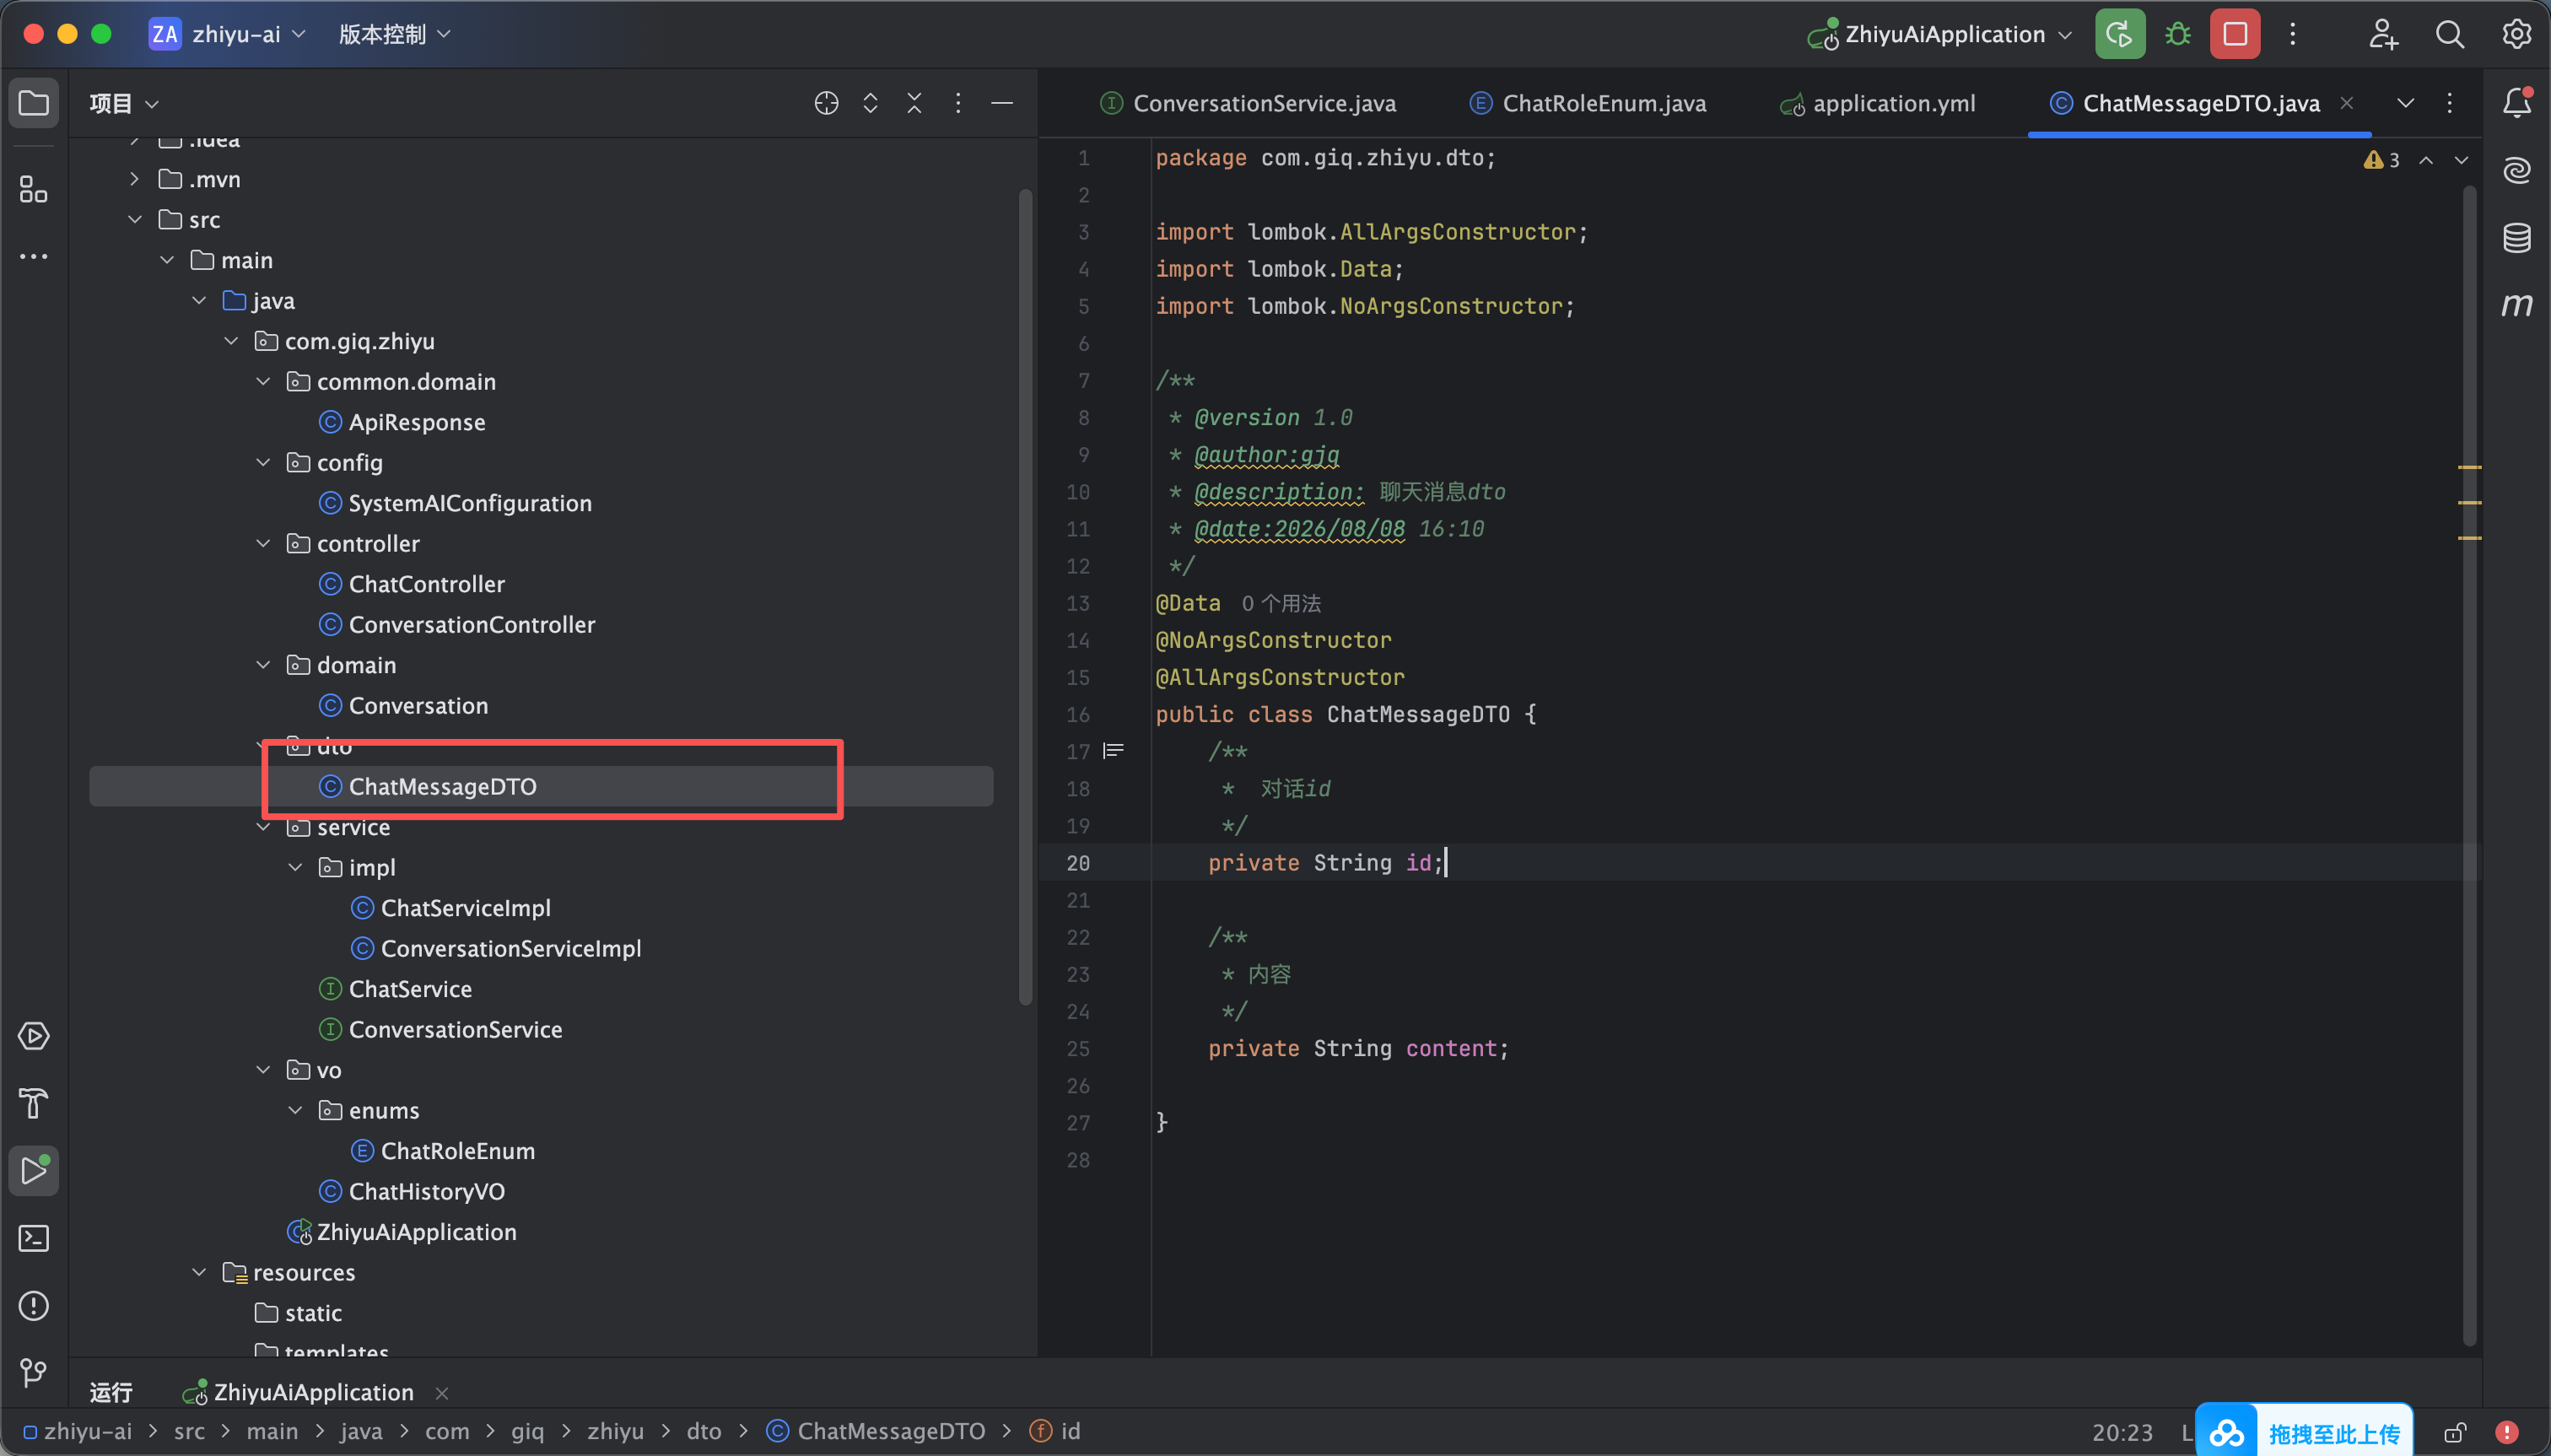
我们先来写发送消息方法 创建一个dto包 在dto包下创建一个 ChatMessageDTO 的实体类 用于接收用户给ai发送的消息 如图1所示

package com.giq.zhiyu.dto;

import lombok.AllArgsConstructor;
import lombok.Data;
import lombok.NoArgsConstructor;

/**
* @version 1.0
* @author:gjq
* @description: 聊天消息dto
* @date:2026/08/08 16:10
*/
@Data
@NoArgsConstructor
@AllArgsConstructor
public class ChatMessageDTO {
/**
* 对话id
*/
private String id;

/**
* 内容
*/
private String content;

}


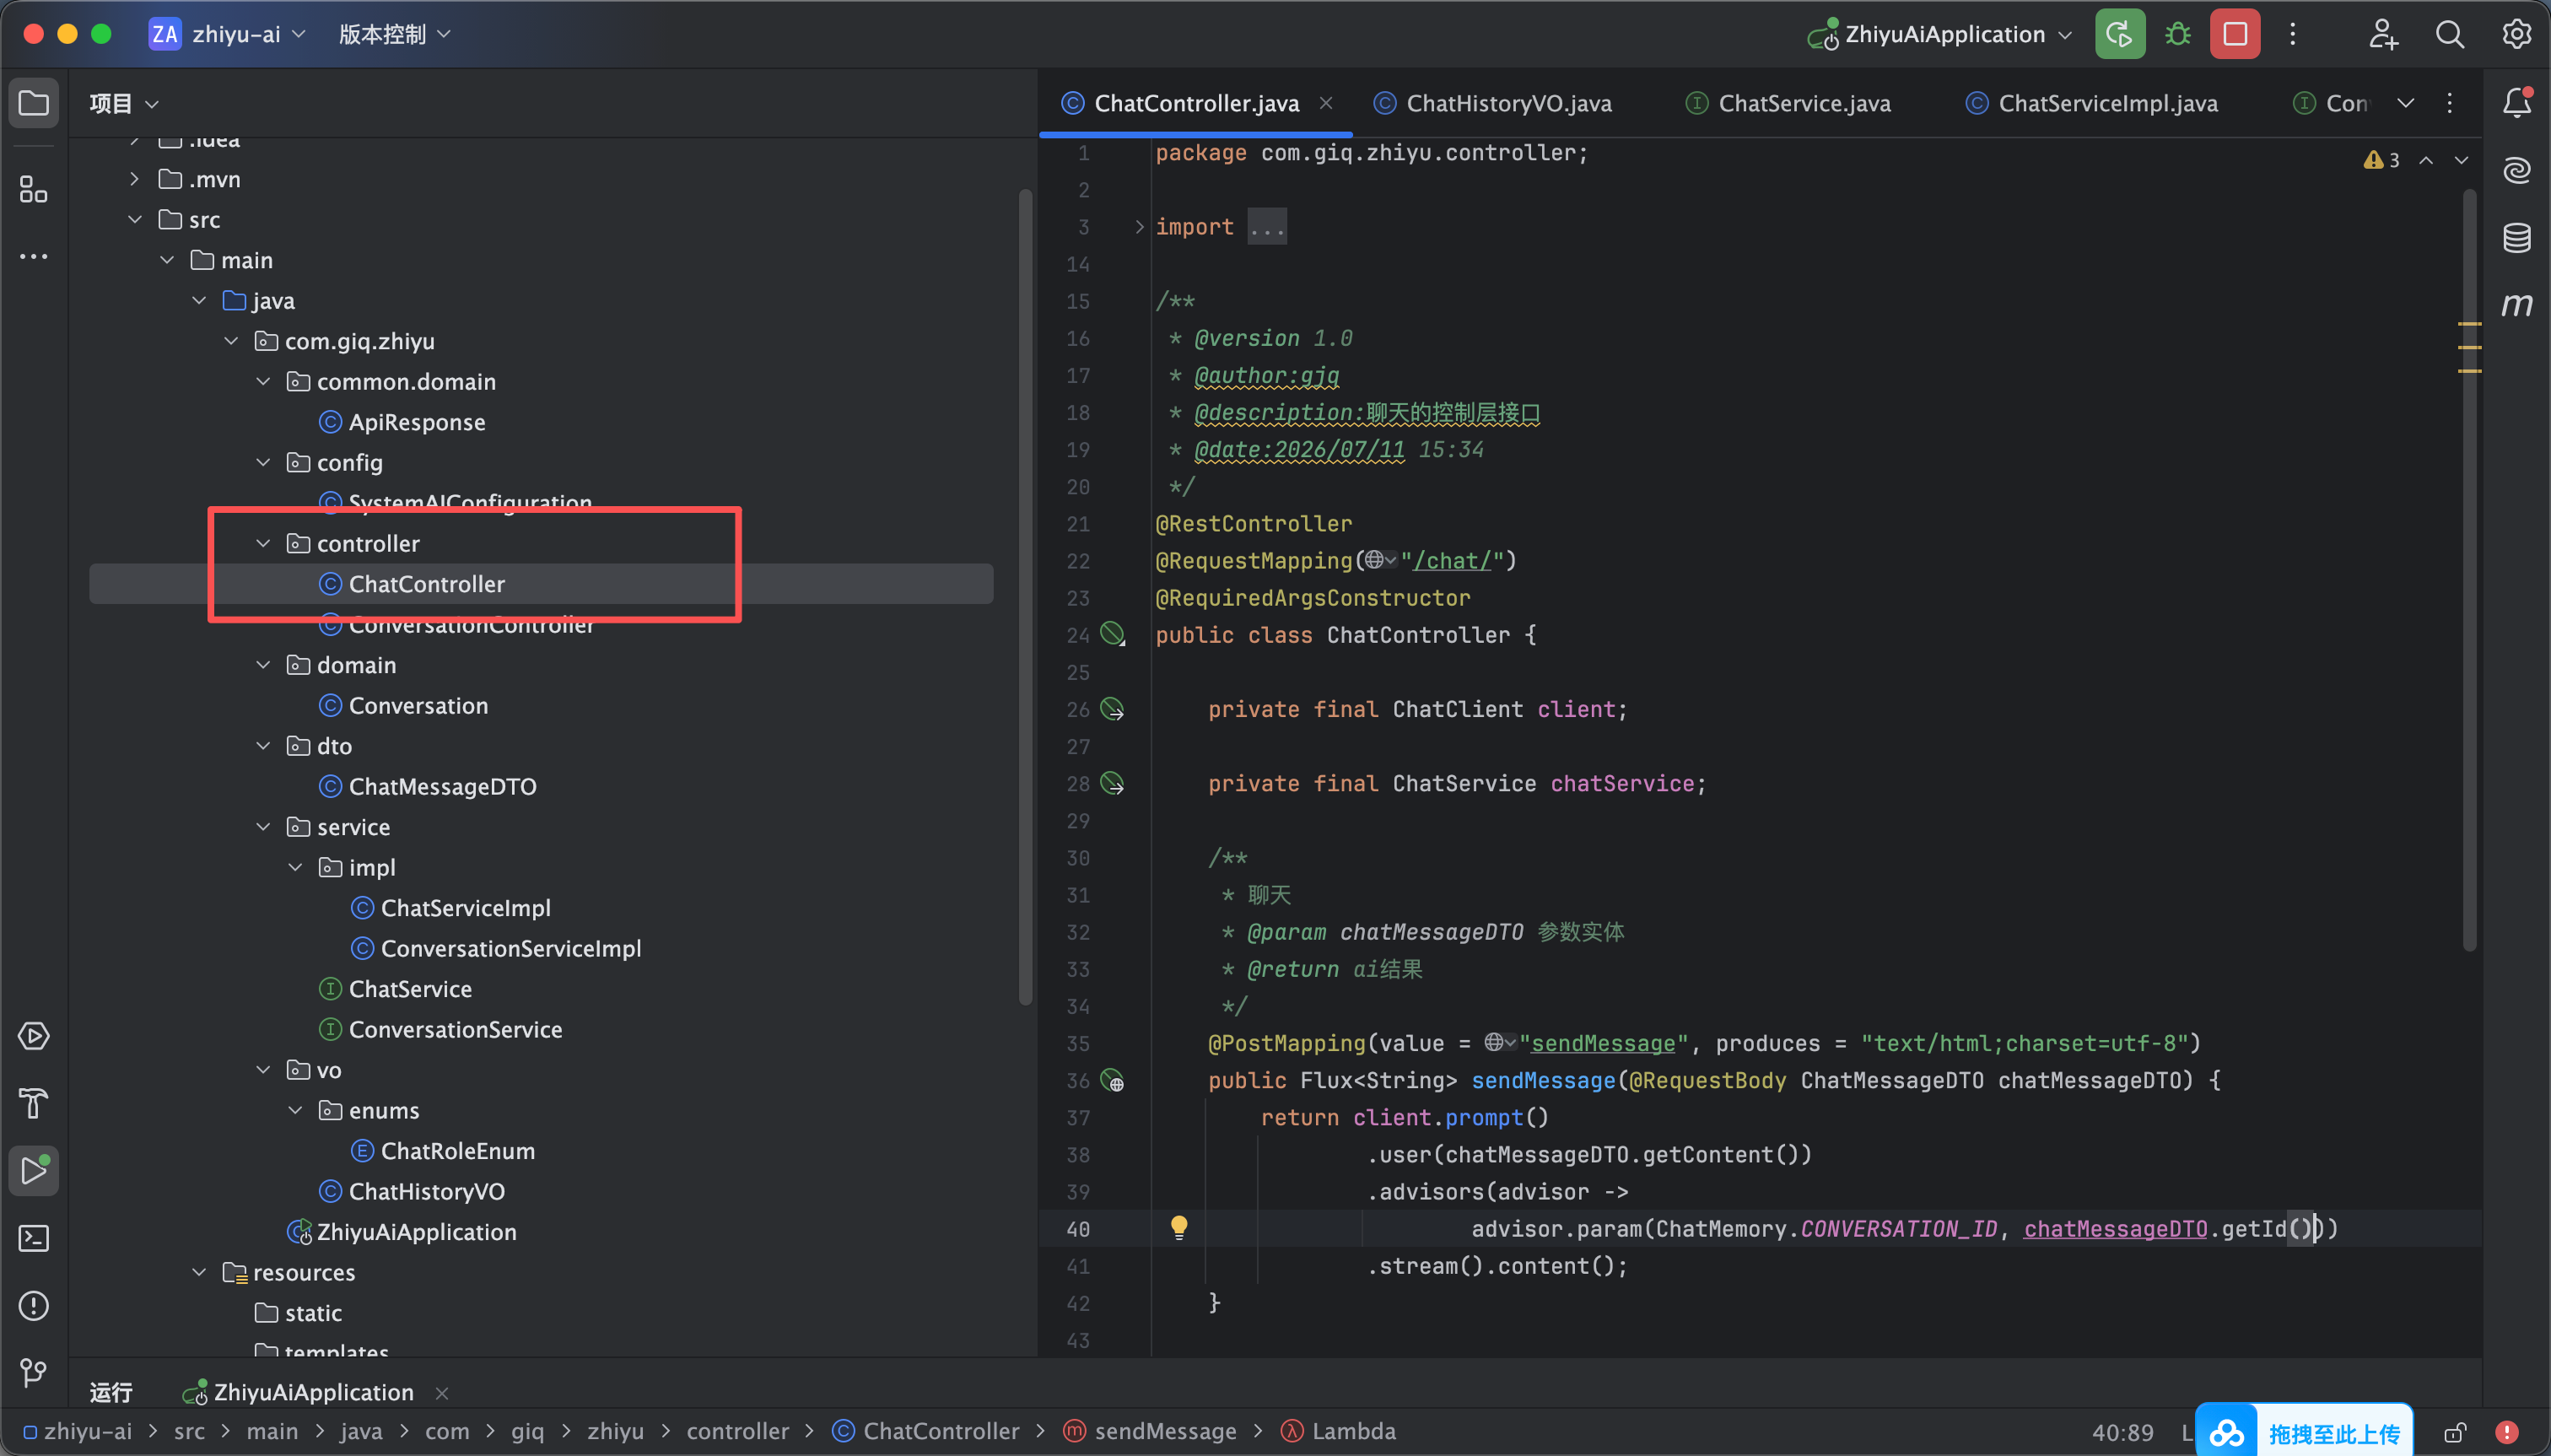
然后创建一个ChatController 里面有一个sendMessage方法用户发送消息给ai 如图2所示代码如下

package com.giq.zhiyu.controller;

import com.giq.zhiyu.common.domain.ApiResponse;
import com.giq.zhiyu.dto.ChatMessageDTO;
import com.giq.zhiyu.service.ChatService;
import com.giq.zhiyu.vo.ChatHistoryVO;
import lombok.RequiredArgsConstructor;
import org.springframework.ai.chat.client.ChatClient;
import org.springframework.ai.chat.memory.ChatMemory;
import org.springframework.web.bind.annotation.*;
import reactor.core.publisher.Flux;

import java.util.List;

/**
* @version 1.0
* @author:gjq
* @description:聊天的控制层接口
* @date:2026/07/11 15:34
*/
@RestController
@RequestMapping("/chat/")
@RequiredArgsConstructor
public class ChatController {

private final ChatClient client;

private final ChatService chatService;

/**
* 聊天
* @param chatMessageDTO 参数实体
* @return ai结果
*/
@PostMapping(value = "sendMessage", produces = "text/html;charset=utf-8")
public Flux<String> sendMessage(@RequestBody ChatMessageDTO chatMessageDTO) {
return client.prompt()
.user(chatMessageDTO.getContent())
.advisors(advisor ->
advisor.param(ChatMemory.CONVERSATION_ID, chatMessageDTO.getId()))
.stream().content();
}

}


后面的接口就算编写好了 我们来写前端


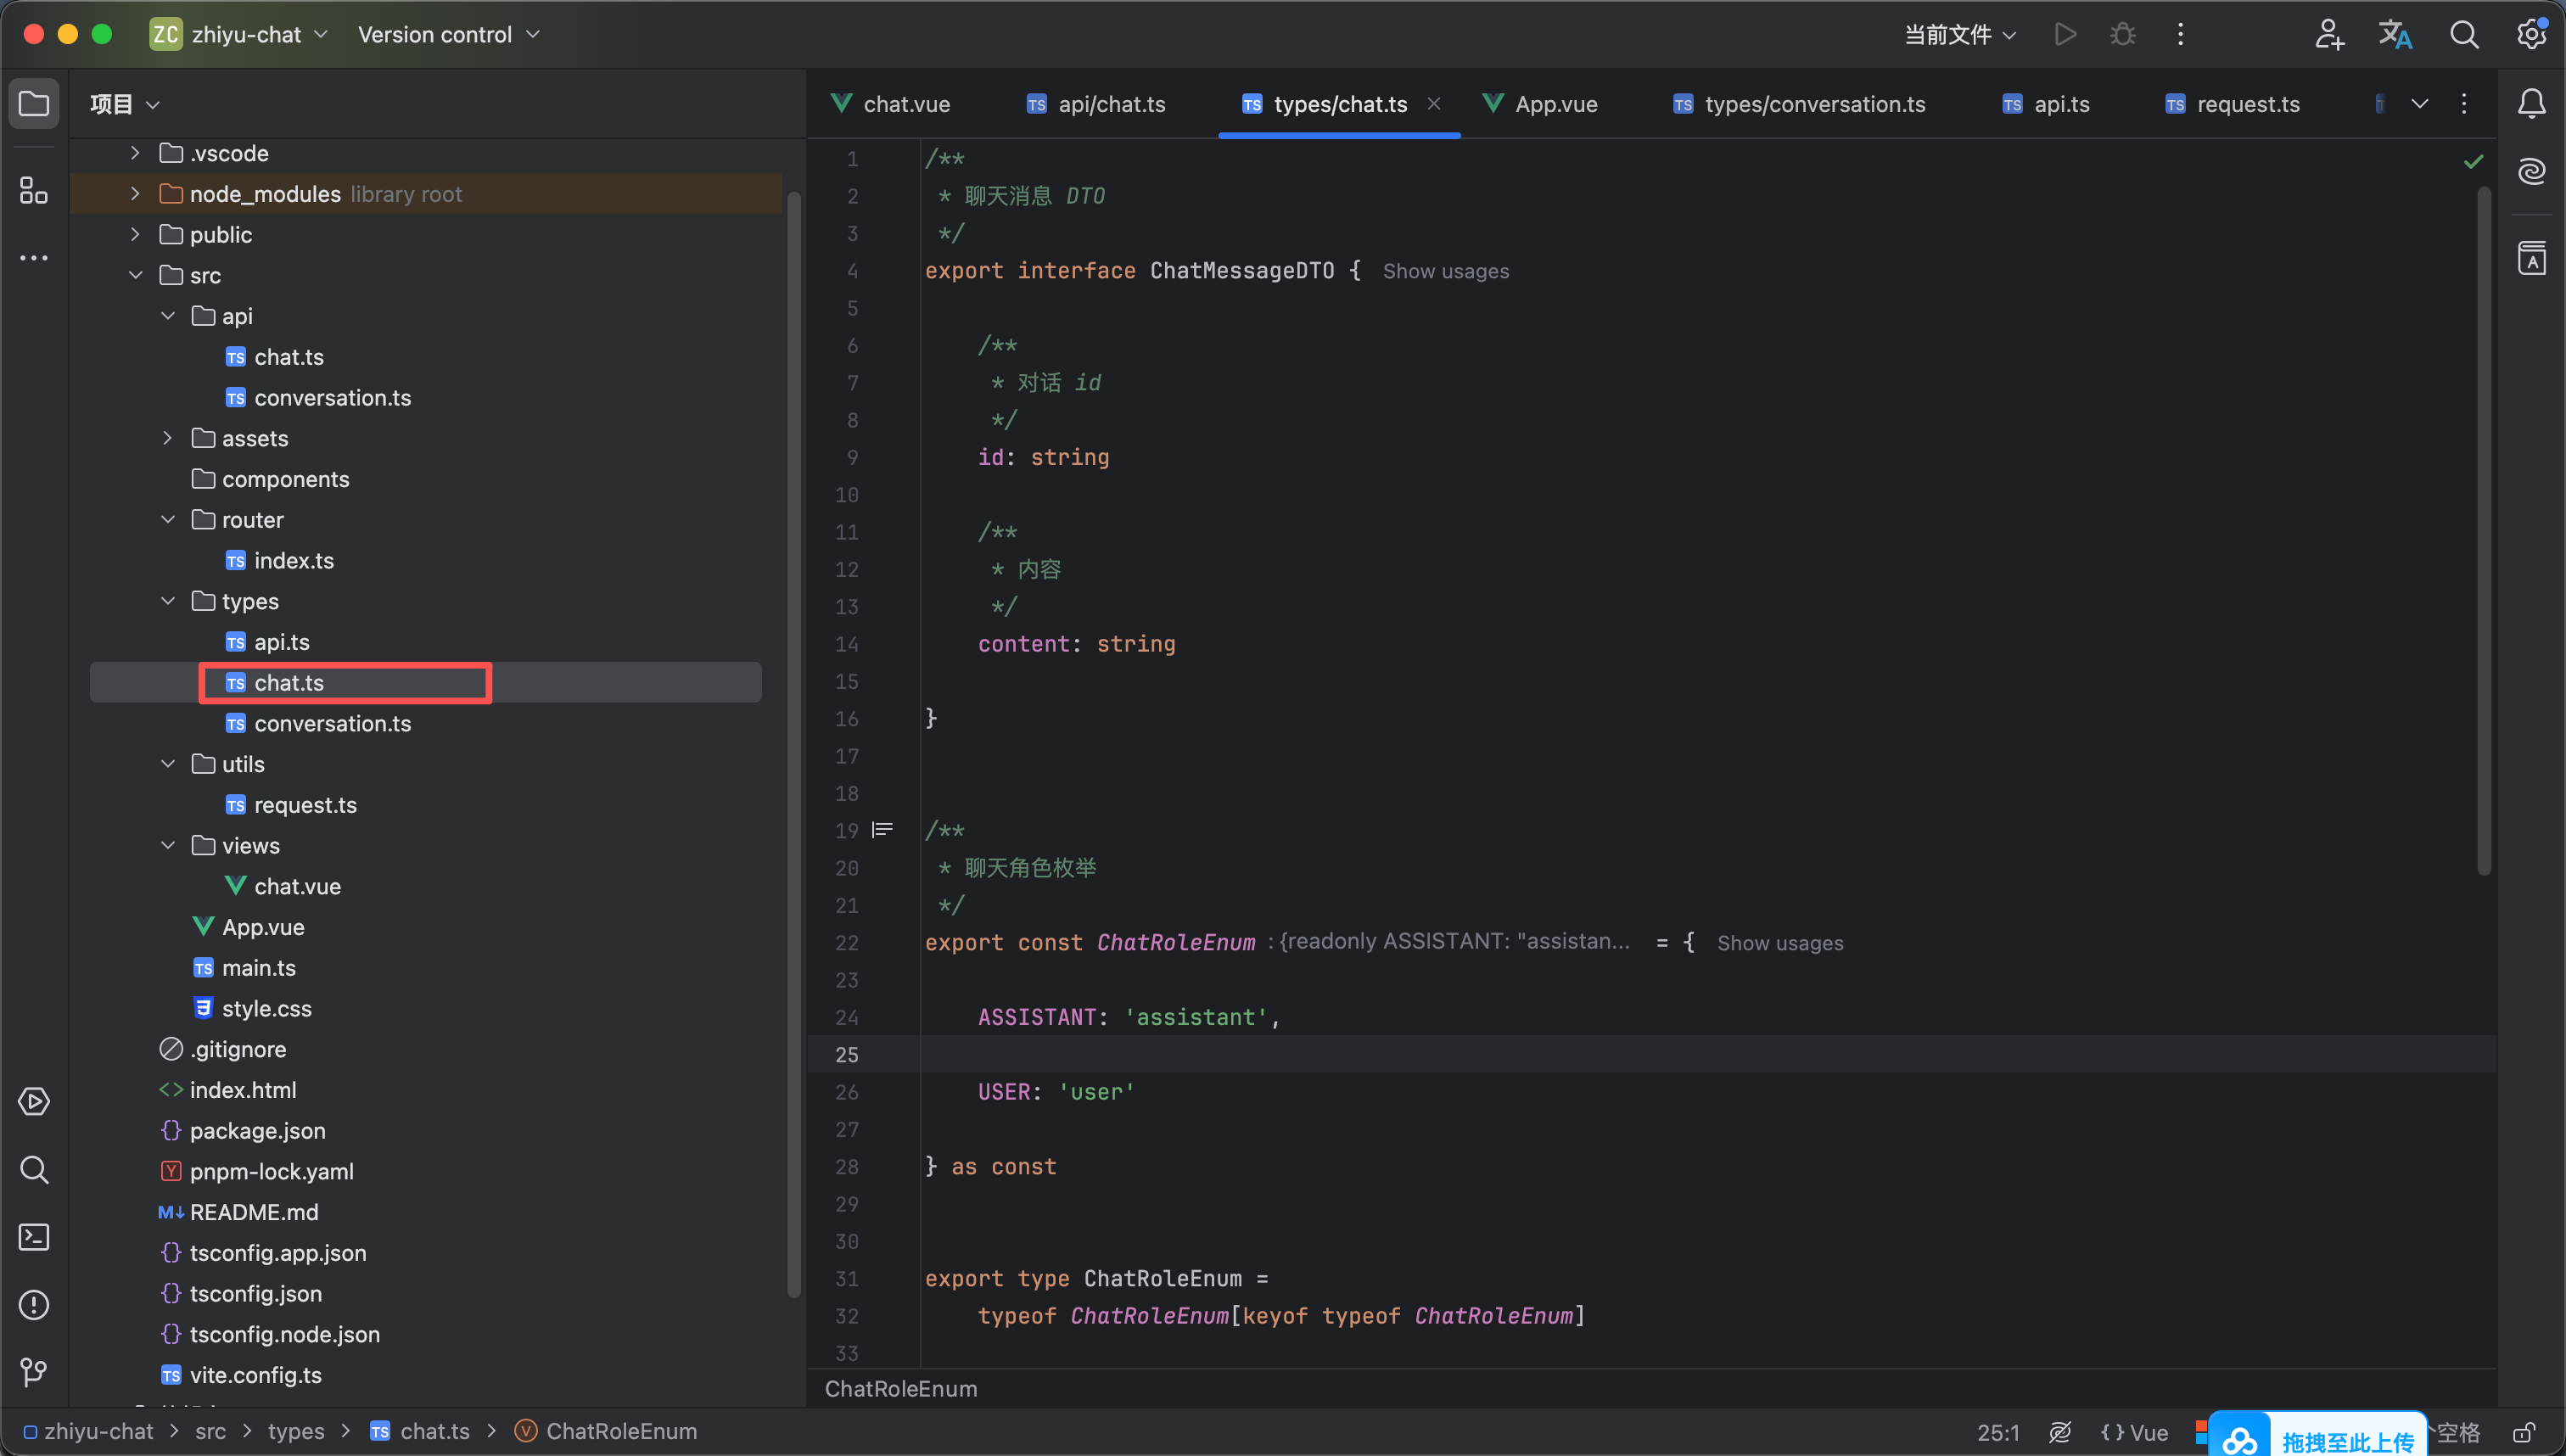
首先我们先来声明类型 在types 创建chat.ts 这个里面有 三个 分别是用户传输的dto 角色枚举 以及展示的vo实体

代码如下

/**
* 聊天消息 DTO
*/
export interface ChatMessageDTO {

/**
* 对话 id
*/
id: string

/**
* 内容
*/
content: string

}


/**
* 聊天角色枚举
*/
export const ChatRoleEnum = {

ASSISTANT: 'assistant',

USER: 'user'

} as const


export type ChatRoleEnum =
typeof ChatRoleEnum[keyof typeof ChatRoleEnum]


/**
* 聊天记录展示实体
*/
export interface ChatHistoryVO {

/**
* 内容
*/
content: string

/**
* 角色
*/
role: ChatRoleEnum

}


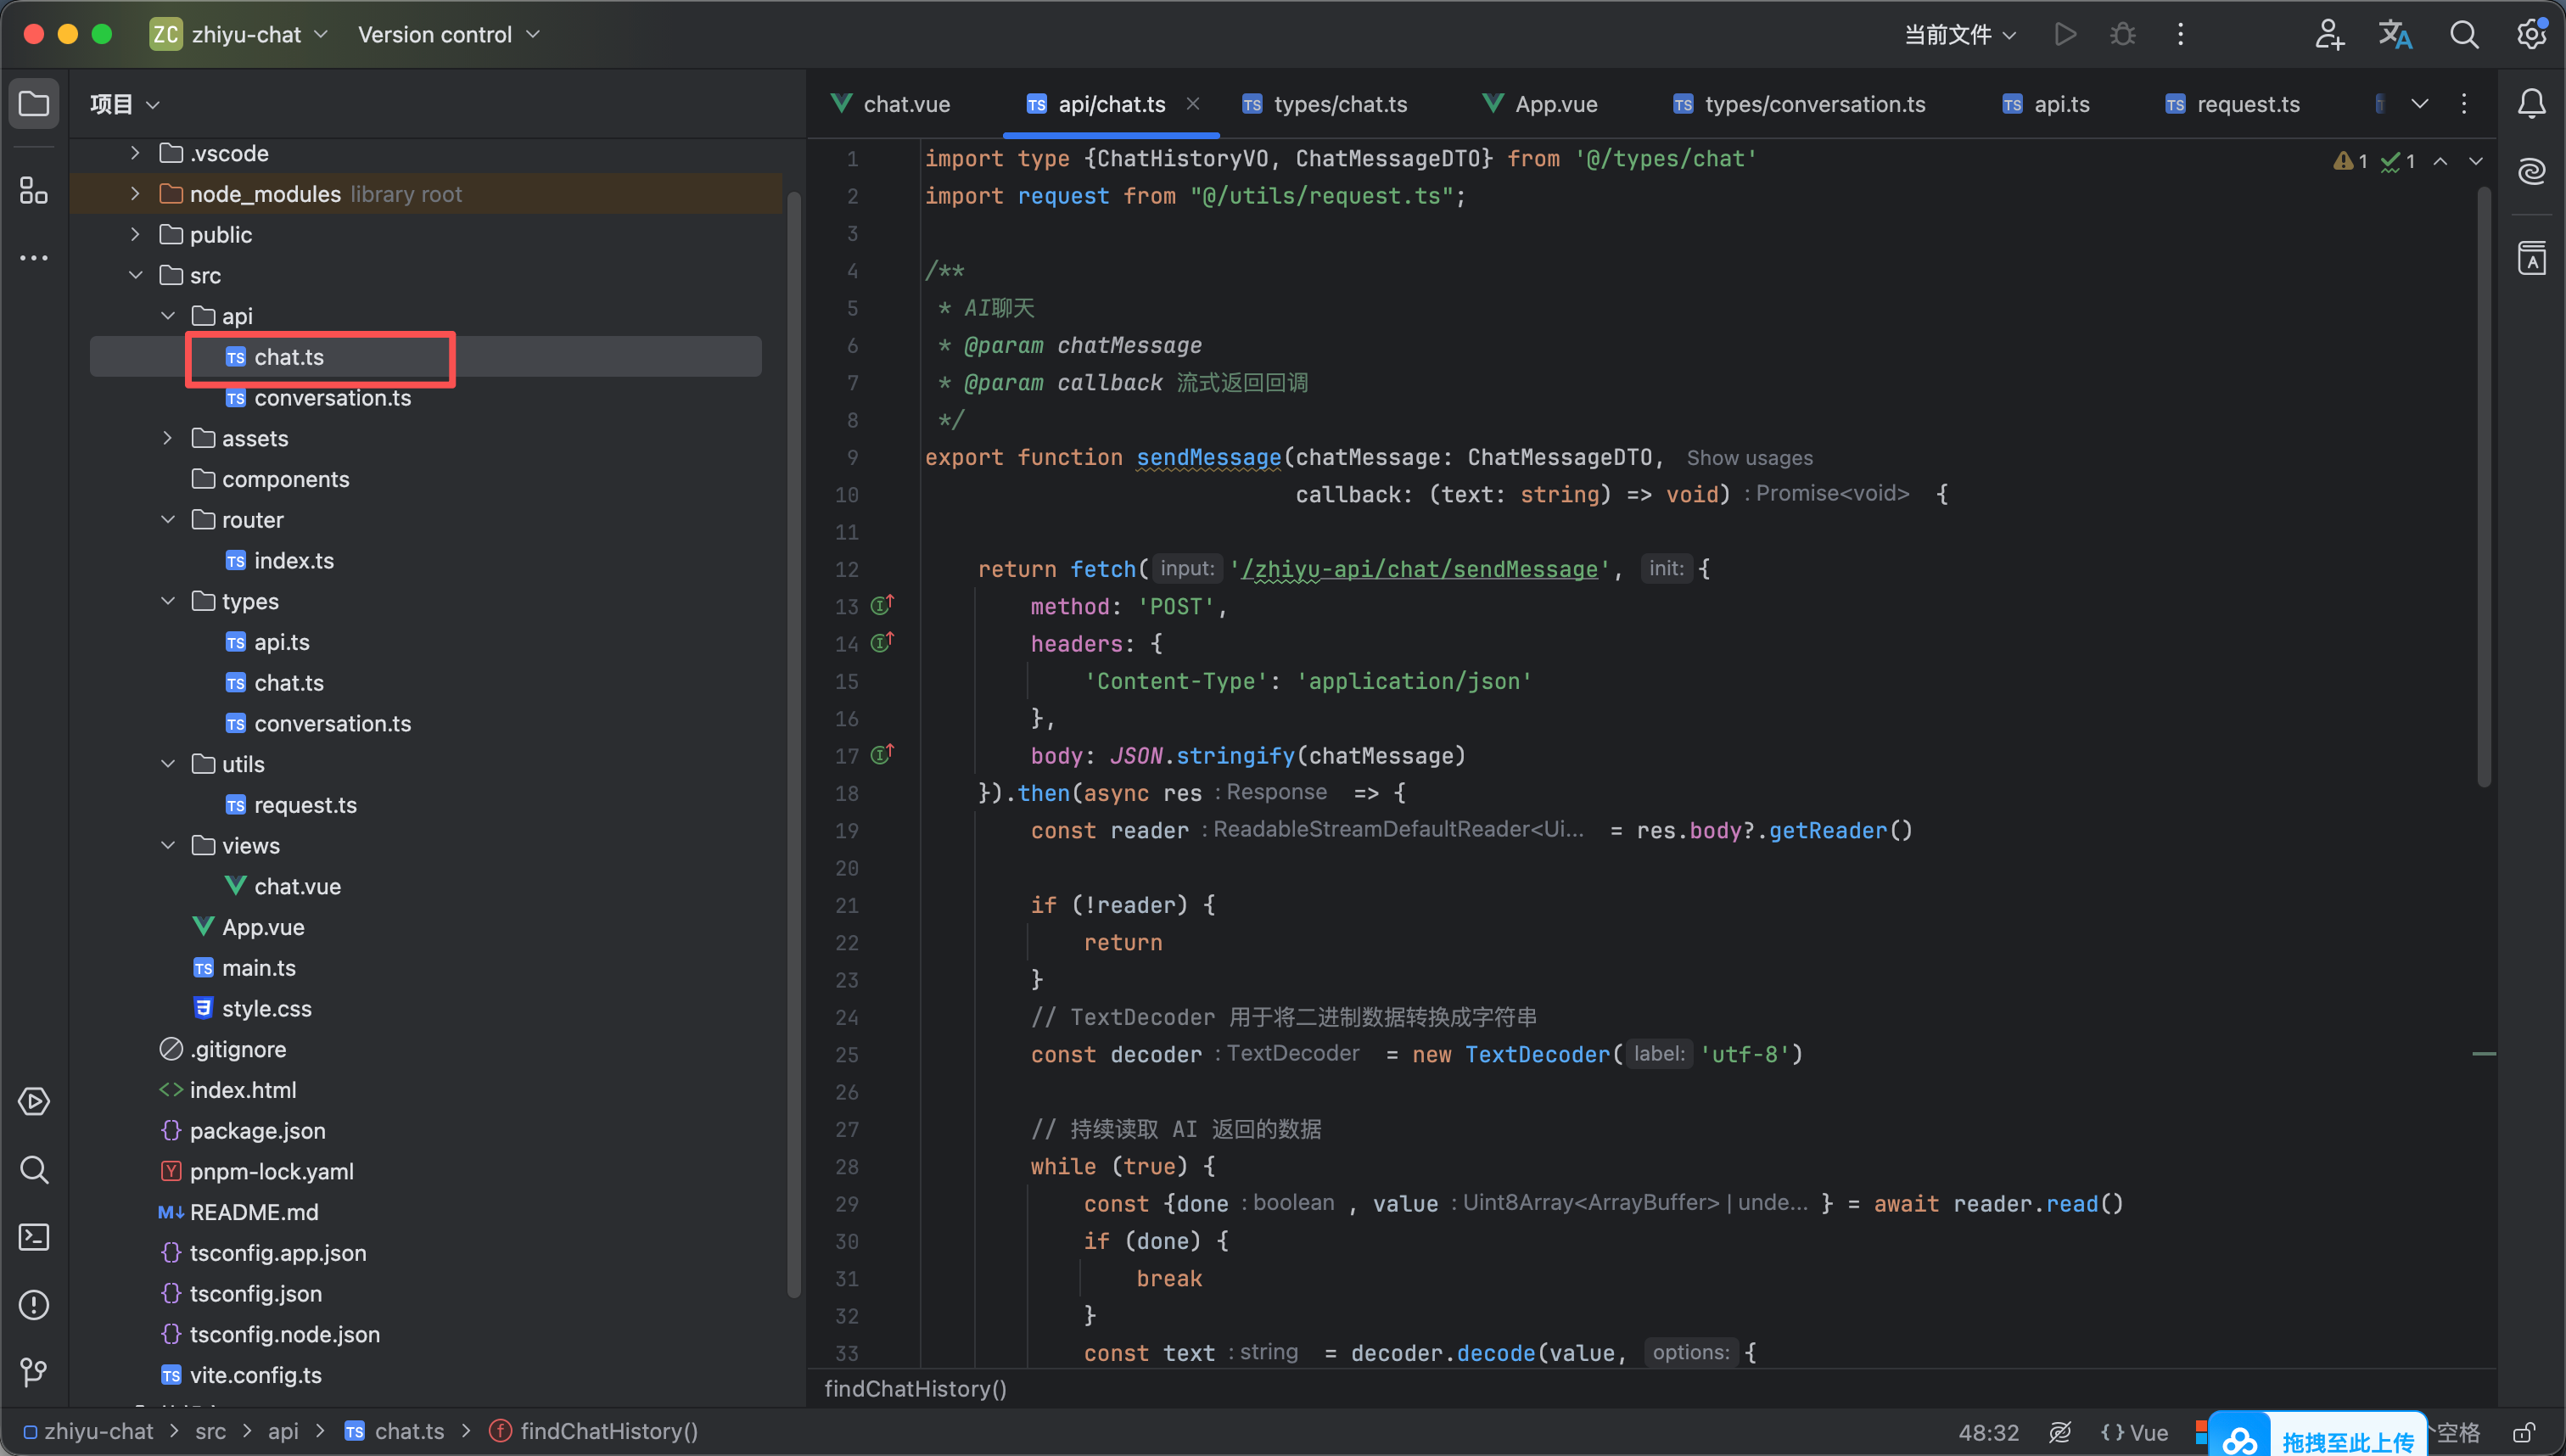
接着我们在api里创建一个chat.ts 因为axios 对流式的响应兼容并不友好所以我们fetch来实现

代码如下

import type {ChatMessageDTO} from '@/types/chat'

/**
* AI聊天
* @param chatMessage
* @param callback 流式返回回调
*/
export function sendMessage(chatMessage: ChatMessageDTO,
callback: (text: string) => void) {

return fetch('/zhiyu-api/chat/sendMessage', {
method: 'POST',
headers: {
'Content-Type': 'application/json'
},
body: JSON.stringify(chatMessage)
}).then(async res => {
const reader = res.body?.getReader()

if (!reader) {
return
}
// TextDecoder 用于将二进制数据转换成字符串
const decoder = new TextDecoder('utf-8')

// 持续读取 AI 返回的数据
while (true) {
const {done, value} = await reader.read()
if (done) {
break
}
const text = decoder.decode(value, {
stream: true
})
callback(text)
}

})

}


我直接给整个前端代码 样式和方法我都有所调整 最后的视频会讲解

用户点击发送后如果有会话id就创建一个对话实体 然后一直更新content的值 并通过监听跳转到底部

代码如下

<script setup lang="ts">

import {computed, nextTick, onMounted, reactive, ref, watch} from "vue";
import type {Conversation} from "@/types/conversation.ts";
import {findConversationList, insertConversation} from "@/api/conversation.ts";
import {type ChatHistoryVO, ChatRoleEnum} from "@/types/chat.ts";
import {sendMessage} from "@/api/chat.ts";
import {useRoute} from "vue-router";

const route = useRoute()

const textareaRef = ref<HTMLTextAreaElement | null>(null)

const handleKeyDown = (e: any) => {
// 过滤中文输入法状态下的 Enter(例如选词敲回车不触发发送或换行)
if (e.isComposing) return

// 判断是否按下了组合键 shift+enter
const hasModifierKey = e.shiftKey
if (hasModifierKey) {
// 组合键按下:阻止默认行为并插入换行
e.preventDefault()
const el = textareaRef.value
if (!el) return

const start = el.selectionStart
const end = el.selectionEnd
// // 在光标处插入换行
content.value = content.value.substring(0, start) + '\n' + content.value.substring(end)
// 保持光标位置在新行的开头
nextTick(() => {
el.selectionStart = el.selectionEnd = start + 1
})
} else {
// 单独按下 Enter:阻止默认换行,触发发送
e.preventDefault()
sendHandle()
}
}

// 最大高度限制 (px)
const maxHeight = window.innerHeight * 0.5

// 动态调整高度
const adjustHeight = () => {
const el = textareaRef.value
if (!el) return

// 先重置高度
el.style.height = 'auto'

// 根据滚动高度动态计算
if (el.scrollHeight > maxHeight) {
el.style.height = `${maxHeight}px`
el.style.overflowY = 'auto'
} else {
el.style.height = `${el.scrollHeight}px`
el.style.overflowY = 'hidden'
}
}

// 输入的内容
const content = ref<string>("");

watch(content, () => {
nextTick(() => {
adjustHeight()
})
})

// 是否存在聊天
const isExistsChat = computed(() => {
return conversationId.value && chatHistory.value.length > 0
})


// 会话id
const conversationId = ref<string>("");


// 对话记录列表
const chatHistory = ref<ChatHistoryVO[]>([])


onMounted(() => {
// 获取并赋值
conversationId.value = route.params.conversationId as string || ''

})


// 会话列表
const conversationList = ref<Conversation[]>([])

/**
* 加载会话列表
*/
const loadConversationList = () => {
findConversationList().then(response => {
if (response.code == 200) {
conversationList.value = response.data
}
})
}
loadConversationList()

/**
* 创建对话
*/
const createConversation = () => {
insertConversation(content.value).then(response => {
if (response.code == 200) {
conversationId.value = response.data
conversationList.value.unshift({id: conversationId.value, title: content.value})
// 聊天
chatMessage()
}
})
}

/**
* 发送按钮处理
*/
const sendHandle = async () => {
// 为空判断
if (!content.value.trim()) {
alert("输入的内容不能为空")
return;
}

// 如果没有会话id就创建对话先
if (!conversationId.value) {
createConversation()
} else {
chatMessage()
}
}

const chatContainerRef = ref<HTMLElement | null>(null)

// 监听自动跳转到底部
watch(() => chatHistory.value,
async () => {
// 等待 Vue 把新蹦出来的字渲染到 DOM 树中
await nextTick()
chatContainerRef.value!.scrollTo({top: chatContainerRef.value!.scrollHeight, behavior: "auto"});
},
{deep: true}
)

// 是否发送中
const sending = ref<boolean>(false)

/**
* 聊天消息
*/
const chatMessage = () => {
sending.value = true;
// 添加用户自己的消息
chatHistory.value.push({
role: ChatRoleEnum.USER,
content: content.value,
});

let history = reactive({role: ChatRoleEnum.ASSISTANT, content: ''});
// 添加ai消息
chatHistory.value.push(history);
// 创建传输实体
const dto = {id: conversationId.value, content: content.value}
// 情况输入框的值
content.value = "";
sendMessage(dto, (text: string) => {
history.content += text
}).finally(() => {
sending.value = false;
})

}


</script>

<template>
<div class="chat__container">
<aside class="chat__aside">
<div class="aside__header">
<img src="@/assets/logo.png" class="chat__logo" alt="logo"/>
<span>知屿AI</span>
</div>
<button class="aside__add-session">新建会话</button>
<!-- 会话列表 -->
<div class="aside__session-section">
<span class="aside__session-title">最近对话</span>
<div class="aside__session-list">
<a v-for="item in conversationList" :key="item.id"
:href="`/chat/${item.id}`" class="aside__session-item">
<img src="@/assets/book.png" width="17" alt="img">
<span class="aside__session-text">{{ item.title }}</span>
</a>
</div>
</div>
</aside>

<!-- 主体内容部分 -->
<main class="chat__main">
<header class="chat__header">
<div class="chat__header__title">
<img src="@/assets/logo.png" class="chat__logo" alt="logo"/>
<span>AI 智能对话</span>
</div>

<img src="@/assets/remove.png" class="chat__header__remove" alt="删除">
</header>

<div class="chat__main__wrapper">
<div class="chat__content" ref="chatContainerRef">
<div class="chat__content-list" v-if="isExistsChat">
<div :class="`chat__content-item chat__content--${item.role}`" v-for="(item,index) in chatHistory"
:key="index">
<div class="chat__content__avatar" v-if="item.role == ChatRoleEnum.ASSISTANT">
<img src="@/assets/logo.png" width="100%" alt="logo"/>
</div>
<div class="chat__content__text">
{{ item.content }}
</div>
</div>
</div>
<!-- 为空的样式 -->
<div class="chat__content-empty" v-else>
<img src="@/assets/logo.png" class="chat__content-empty__img" alt="logo"/>
<span class="chat__content-empty__title">你好,我是知屿 AI</span>
<span class="chat__content-empty__desc">清晰思考,自由创造。从一个问题开始。</span>
</div>
</div>

<div class="chat__input-container">
<textarea @keydown.enter="handleKeyDown" class="chat__input-wrapper"
v-model="content" ref="textareaRef" placeholder="有问题,尽管问"/>
<button class="chat-send-btn" :disabled="sending" @click="sendHandle">发送</button>
</div>

<div class="chat__main__footer">
内容由 AI 生成,请注意甄别与核实
</div>
</div>

</main>
</div>
</template>

<style lang="scss" scoped>
// 页面整体
.chat__container {
height: 100vh;
display: flex;
}

// 侧边栏部分
.chat__aside {
display: flex;
flex-direction: column;
gap: 25px;
padding: 20px 12px 12px;
background-color: #fcfcfc;
width: 240px;
border: 1px solid #eeeeee;
}

// 侧边栏标题
.aside__header {
display: flex;
align-items: center;
gap: 10px;
font-size: 18px;
color: #333333;
font-weight: 600;
}

// logo
.chat__logo {
width: 30px;
}

// 新建会话按钮
.aside__add-session {
font-weight: 500;
display: flex;
align-items: center;
justify-content: center;
height: 40px;
background-color: #4e6ef2;
border-radius: 12px;
color: white;
font-size: 14px;
border: none;
cursor: pointer;

&:hover {
background-color: #405fdc;
}
}

// 侧边栏的会话记录部分
.aside__session-section {
min-height: 0;
flex: 1;
display: flex;
flex-direction: column;
gap: 5px;
}

// 侧边栏的会话记录小标题
.aside__session-title {
padding-left: 10px;
color: #94a3b8;
font-size: 12px;
font-weight: 500;
}

// 侧边栏会话列表
.aside__session-list {
overflow-y: auto;
flex: 1;
display: flex;
flex-direction: column;

}

// 侧边栏会话项
.aside__session-item {
display: flex;
align-items: center;
gap: 8px;
font-size: 14px;
color: #64748b;
padding: 10px;
border-radius: 12px;
text-decoration: none;
flex-shrink: 0;
}

// 侧边栏会话项文本
.aside__session-text {
white-space: nowrap;
overflow: hidden;
text-overflow: ellipsis;
flex: 1;
}

// 主体内容部分样式
.chat__main {
display: flex;
flex-direction: column;
flex: 1;
background-color: #f8f8f8;
}

// 头部
.chat__header {
flex-shrink: 0;
display: flex;
align-items: center;
justify-content: space-between;
padding: 0 30px;
height: 60px;
background-color: #fcfcfc;
border-bottom: 1px solid #eeeeee;
}

// 头部标题
.chat__header__title {
display: flex;
align-items: center;
justify-content: center;
gap: 10px;
font-size: 18px;
color: #333333;
font-weight: 600;
}

// 头部删除按钮
.chat__header__remove {
cursor: pointer;
width: 20px;
}

// 对话内容主部分
.chat__main__wrapper {
min-height: 0;
background-color: #f7f8fa;
flex: 1;
display: flex;
flex-direction: column;
align-items: center;
}

// 对话内容部分
.chat__content {
width: 100%;
padding: 26px 32px;
display: flex;
justify-content: center;
flex: 1;
overflow-y: auto;

// 滚动条轨道
&::-webkit-scrollbar {
width: 8px; // 滚动条宽度
}

// 滚动条滑块
&::-webkit-scrollbar-thumb {
background-color: #888; // 滑块颜色
border-radius: 4px; // 滑块圆角
}

// 滚动条滑块悬停状态
&::-webkit-scrollbar-thumb:hover {
background-color: #555; // 悬停时滑块颜色
}

// 滚动条轨道背景
&::-webkit-scrollbar-track {
background-color: #f1f1f1; // 轨道背景颜色
border-radius: 4px; // 轨道圆角
}
}

// 聊天内容列表
.chat__content-list {
width: 100%;
display: flex;
flex-direction: column;
gap: 26px;
}

// 聊天的每一项
.chat__content-item {
align-items: flex-start;
display: flex;
width: 100%;
gap: 12px;
}

// 聊天文本部分样式
.chat__content__text {
max-width: 80%;
font-size: 14px;
border-radius: 15px;
padding: 14px 18px;
line-height: 28px;
word-wrap: break-word;
white-space: pre-wrap;
overflow-wrap: break-word;
}

// ai的内容样式
.chat__content--assistant {
justify-content: flex-start;

// 头像部分
.chat__content__avatar {
height: 40px;
width: 40px;
line-height: 80px;
}

// 文本部分
.chat__content__text {
color: #333333;
background-color: white;

// 为空显示正在思考
&:empty::after {
content: "正在思考...";
display: inline-block;
color: #999;
font-style: italic;
font-size: 14px;
}
}
}

// 用户的内容样式
.chat__content--user {
justify-content: flex-end;

// 文本部分
.chat__content__text {
color: white;
background-color: #4e6ef2;
}
}

// 对话空内容外层容器
.chat__content-empty {
display: flex;
flex-direction: column;
align-items: center;
justify-content: center;
}

// 对话空内容的图片
.chat__content-empty__img {
width: 55px;
margin-bottom: 20px;
}

// 空内容提示标题
.chat__content-empty__title {
font-size: 32px;
color: #1e293b;
font-weight: 600;
margin-bottom: 10px;
}

// 空内容提示描述
.chat__content-empty__desc {
font-size: 14px;
color: #64748b;
}

// 对话底部
.chat__main__footer {
padding: 12px;
text-align: center;
font-size: 12px;
color: #94a3b8;
}

// 输入部分的容器
.chat__input-container {
margin-top: 20px;
position: sticky;
display: flex;
align-items: flex-end;
gap: 10px;
padding: 8px 20px;
background-color: white;
border: 2px solid #eeeeee;
border-radius: 15px;
box-shadow: 0 8px 30px rgba(29, 39, 64, 0.08);
width: 90%;
max-width: 900px;
}

// 输入里部分
.chat__input-wrapper {
width: 100%;
flex: 1;
outline: none;
border: none;
resize: none;
box-sizing: border-box;
padding: 10px 0;
line-height: 1.5;
min-height: 50px;
font-size: 14px;
color: #333333;
}


// 发送按钮
.chat-send-btn {
height: 40px;
font-size: 12px;
padding: 8px 16px;
border-radius: 10px;
color: white;
background-color: #4e6ef2;
font-weight: 500;
border: none;

&:hover {
background-color: #405fdc;
}
}

// 禁用状态
.chat-send-btn:disabled {
background-color: #c0c4cc;
color: #ffffff;
cursor: not-allowed;
opacity: 0.7;
}
</style>


11

历史记录

接下来我们来实现历史记录功能


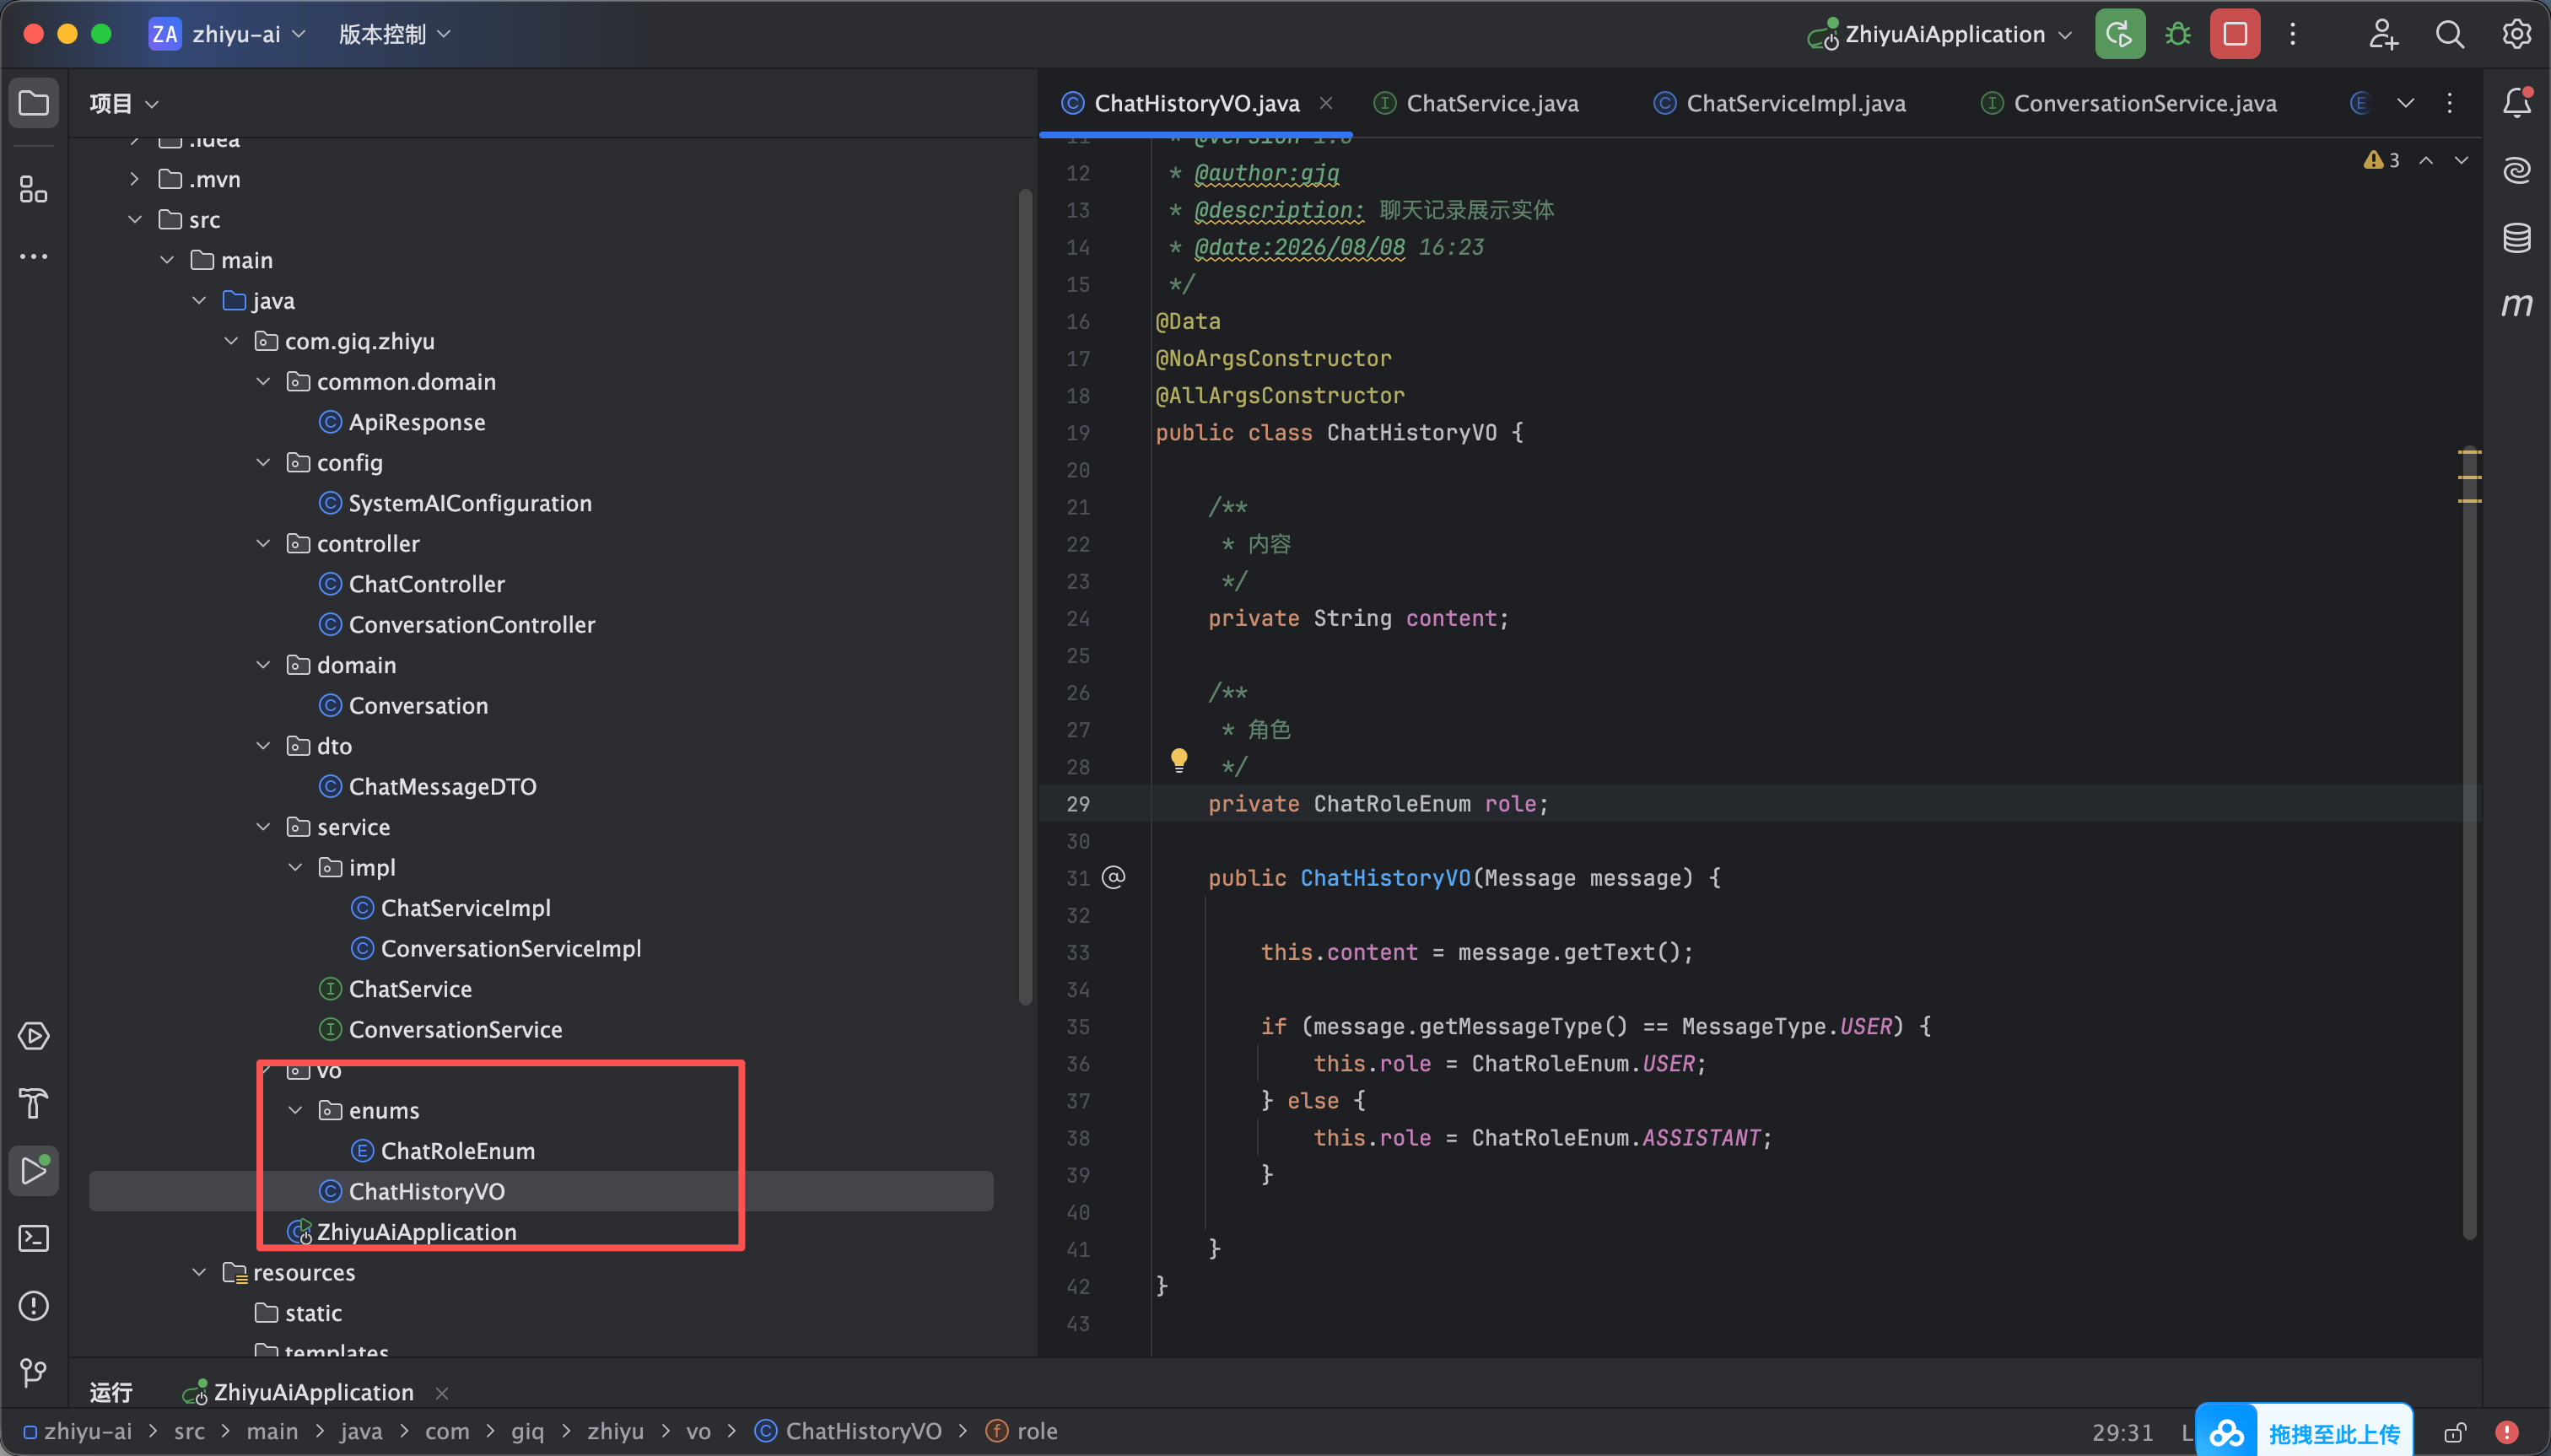
首先创建一个vo实体用于数据的展示 这个构造函数是为了与springai的进行映射 枚举是两种角色身份


代码如下

package com.giq.zhiyu.vo.enums;

import com.fasterxml.jackson.annotation.JsonValue;
import lombok.Getter;

/**
* @version 1.0
* @author:gjq
* @description: 聊天角色枚举
* @date:2026/08/08 16:27
*/
@Getter
public enum ChatRoleEnum {

ASSISTANT("assistant"),

USER("user");


private final String value;


ChatRoleEnum(String value) {
this.value = value;
}


@JsonValue
public String getValue() {
return value;
}

}


package com.giq.zhiyu.vo;

import com.giq.zhiyu.vo.enums.ChatRoleEnum;
import lombok.AllArgsConstructor;
import lombok.Data;
import lombok.NoArgsConstructor;
import org.springframework.ai.chat.messages.Message;
import org.springframework.ai.chat.messages.MessageType;

/**
* @version 1.0
* @author:gjq
* @description: 聊天记录展示实体
* @date:2026/08/08 16:23
*/
@Data
@NoArgsConstructor
@AllArgsConstructor
public class ChatHistoryVO {

/**
* 内容
*/
private String content;

/**
* 角色
*/
private ChatRoleEnum role;

public ChatHistoryVO(Message message) {

this.content = message.getText();

if (message.getMessageType() == MessageType.USER) {
this.role = ChatRoleEnum.USER;
} else {
this.role = ChatRoleEnum.ASSISTANT;
}

}
}


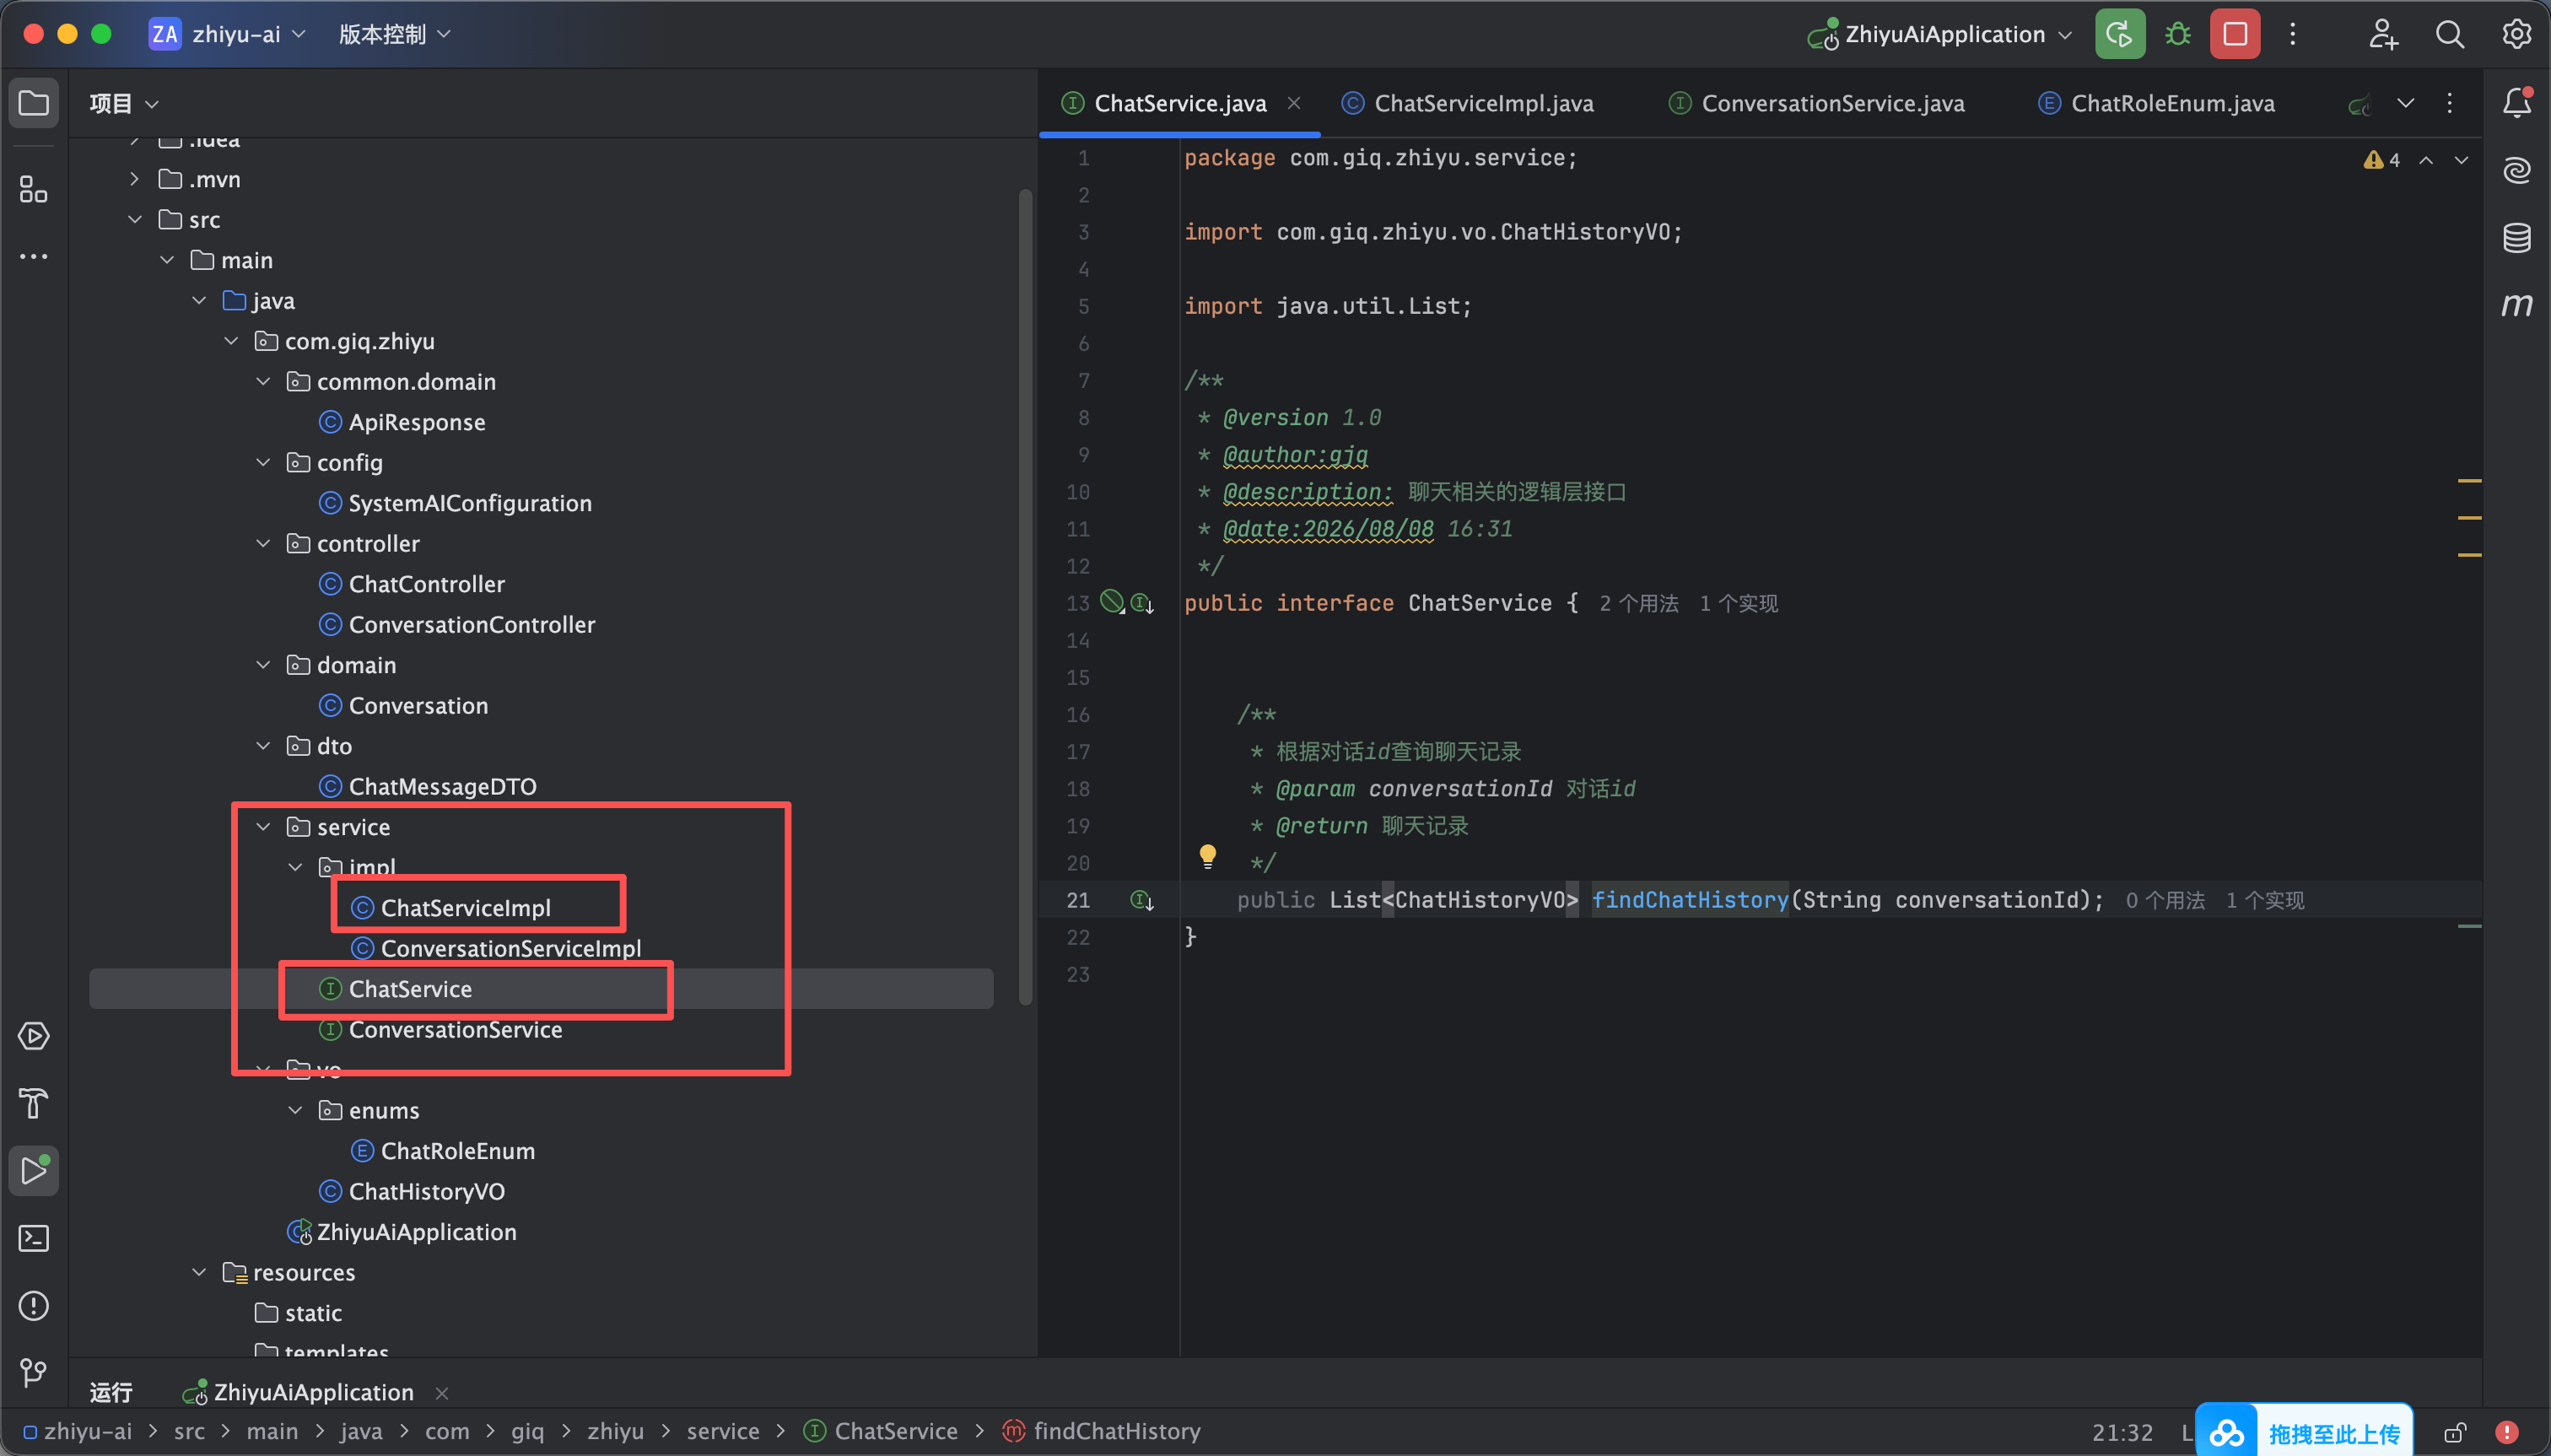
然后后端创建一个ChatService 和他的实现 如图1所示

因为springai以及替我们实现了记忆存储的功能我们调用他的ChatMemory 进行查询即可


ChatService代码如下

package com.giq.zhiyu.service;

import com.giq.zhiyu.vo.ChatHistoryVO;

import java.util.List;

/**
* @version 1.0
* @author:gjq
* @description: 聊天相关的逻辑层接口
* @date:2026/08/08 16:31
*/
public interface ChatService {


/**
* 根据对话id查询聊天记录
* @param conversationId 对话id
* @return 聊天记录
*/
public List<ChatHistoryVO> findChatHistory(String conversationId);
}


ChatServiceImpl 代码如下

package com.giq.zhiyu.service.impl;

import com.giq.zhiyu.service.ChatService;
import com.giq.zhiyu.vo.ChatHistoryVO;
import lombok.RequiredArgsConstructor;
import org.springframework.ai.chat.memory.ChatMemory;
import org.springframework.ai.chat.messages.Message;
import org.springframework.stereotype.Service;

import java.util.List;

/**
* @version 1.0
* @author:gjq
* @description: 聊天相关的逻辑层接口实现
* @date:2026/08/08 16:32
*/
@Service
@RequiredArgsConstructor
public class ChatServiceImpl implements ChatService {

private final ChatMemory chatMemory;

/**
* 根据对话id查询聊天记录
*
* @param conversationId 对话id
* @return 记录列表
*/
@Override
public List<ChatHistoryVO> findChatHistory(String conversationId) {
List<Message> messageList = chatMemory.get(conversationId);
return messageList.stream().map(ChatHistoryVO::new).toList();
}
}


然后我们的controller层进行调用即可 代码如下

package com.giq.zhiyu.controller;

import com.giq.zhiyu.common.domain.ApiResponse;
import com.giq.zhiyu.dto.ChatMessageDTO;
import com.giq.zhiyu.service.ChatService;
import com.giq.zhiyu.vo.ChatHistoryVO;
import lombok.RequiredArgsConstructor;
import org.springframework.ai.chat.client.ChatClient;
import org.springframework.ai.chat.memory.ChatMemory;
import org.springframework.web.bind.annotation.*;
import reactor.core.publisher.Flux;

import java.util.List;

/**
* @version 1.0
* @author:gjq
* @description:聊天的控制层接口
* @date:2026/07/11 15:34
*/
@RestController
@RequestMapping("/chat/")
@RequiredArgsConstructor
public class ChatController {

private final ChatClient client;

private final ChatService chatService;

/**
* 聊天
* @param chatMessageDTO 参数实体
* @return ai结果
*/
@PostMapping(value = "sendMessage", produces = "text/html;charset=utf-8")
public Flux<String> sendMessage(@RequestBody ChatMessageDTO chatMessageDTO) {
return client.prompt()
.user(chatMessageDTO.getContent())
.advisors(advisor ->
advisor.param(ChatMemory.CONVERSATION_ID, chatMessageDTO.getId()))
.stream().content();
}

/**
* 查询聊天记录列表
* @param id 对话id
* @return 聊天记录
*/
@GetMapping("history")
public ApiResponse<List<ChatHistoryVO>> findChatHistory(String id){
List<ChatHistoryVO> chatHistory = chatService.findChatHistory(id);
return ApiResponse.success(chatHistory);
}
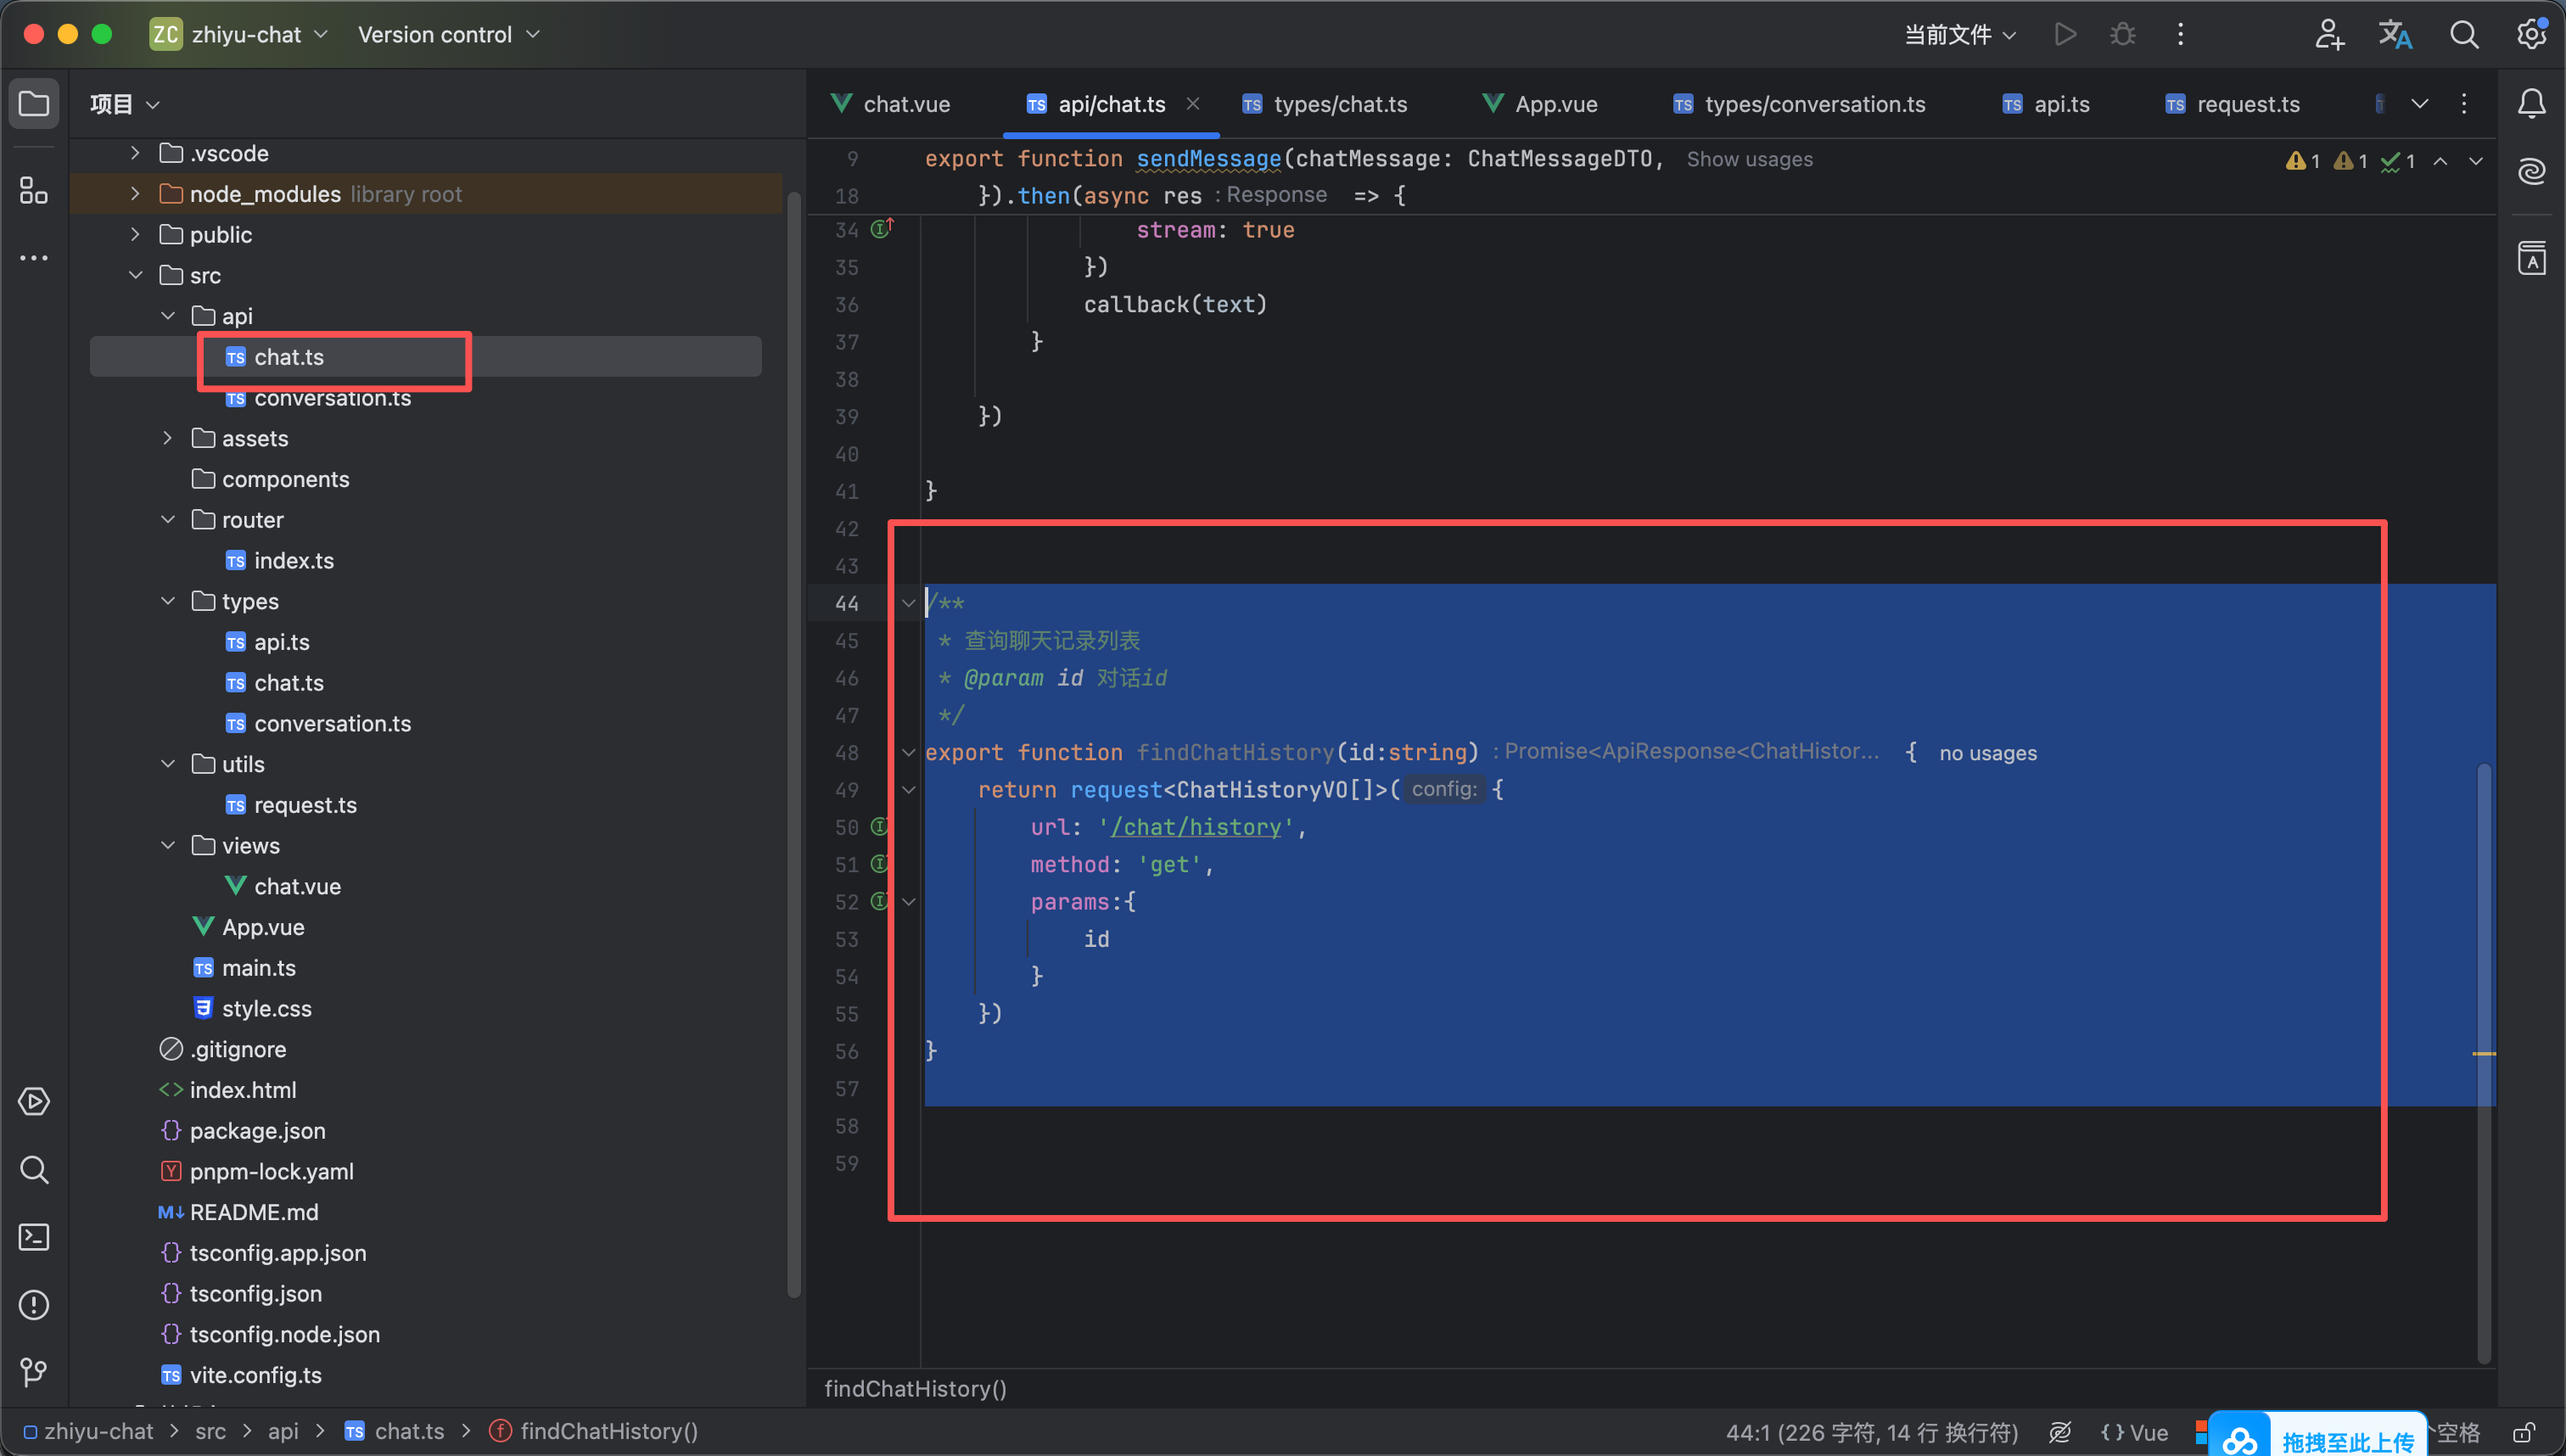
}


接下来写前端的api调用部分 如图3所示在api/chat.ts 中加入以下代码


/**
* 查询聊天记录列表
* @param id 对话id
*/
export function findChatHistory(id:string) {
return request<ChatHistoryVO[]>({
url: '/chat/history',
method: 'get',
params:{
id
}
})
}


然后chat.ts 没有加多少 就一个方法的调用赋值和判断是否存在对话id 效果和介绍看最后一个视频

代码如下

/**
* 查询聊天记录
*/
const findHistory = () => {
findChatHistory(conversationId.value).then(response => {
if (response.code == 200) {
console.log(response.data)
chatHistory.value = response.data
}
})
}

onMounted(() => {
// 获取并赋值
conversationId.value = route.params.conversationId as string || ''
// 有对话id就查询聊天记录
if (conversationId) {
findHistory()
}

})


12

清除聊天&会话记录

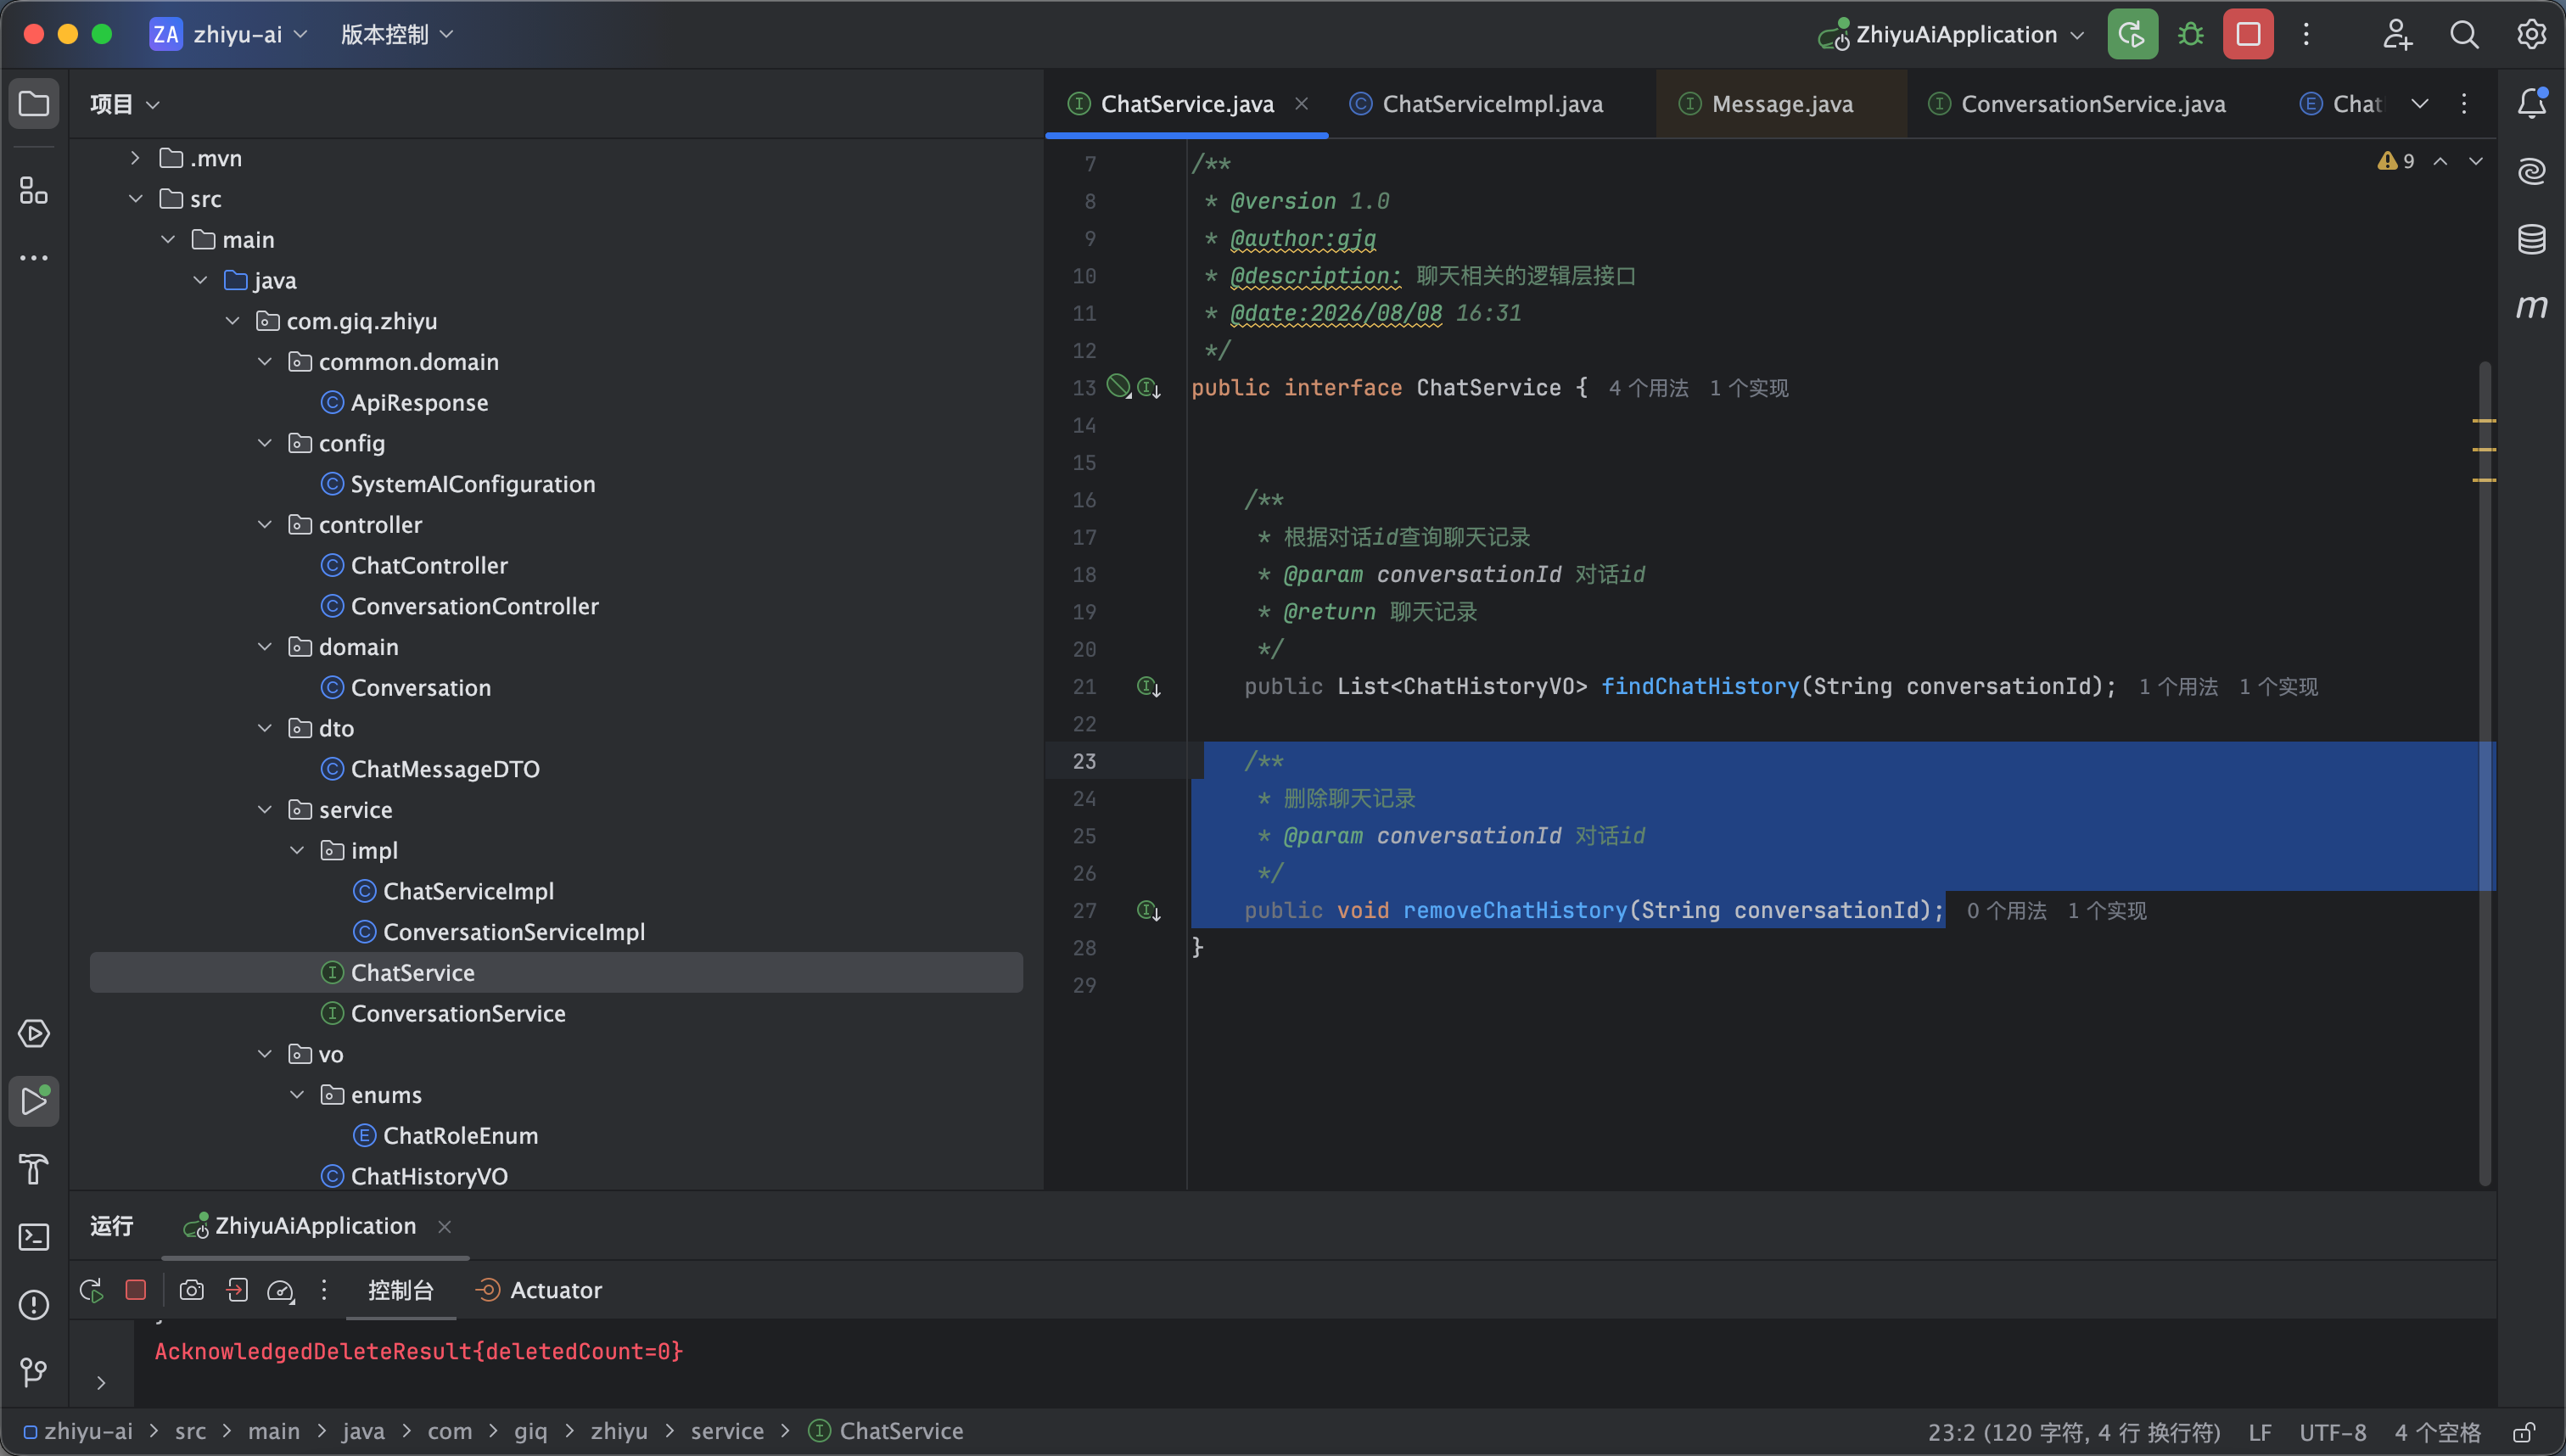
接下来我们来写清除记录 分为两部分 一个是清除会话 一个是 清除历史记录 但是我设计的是一个按钮

如图1所示在chatservice里添加一个删除聊天记录的接口

实现代码如下

/**
* 删除聊天记录
* @param conversationId 对话id
*/
public void removeChatHistory(String conversationId);


/**
* 删除聊天记录
*
* @param conversationId 对话id
*/
@Override
public void removeChatHistory(String conversationId) {
chatMemory.clear(conversationId);
}


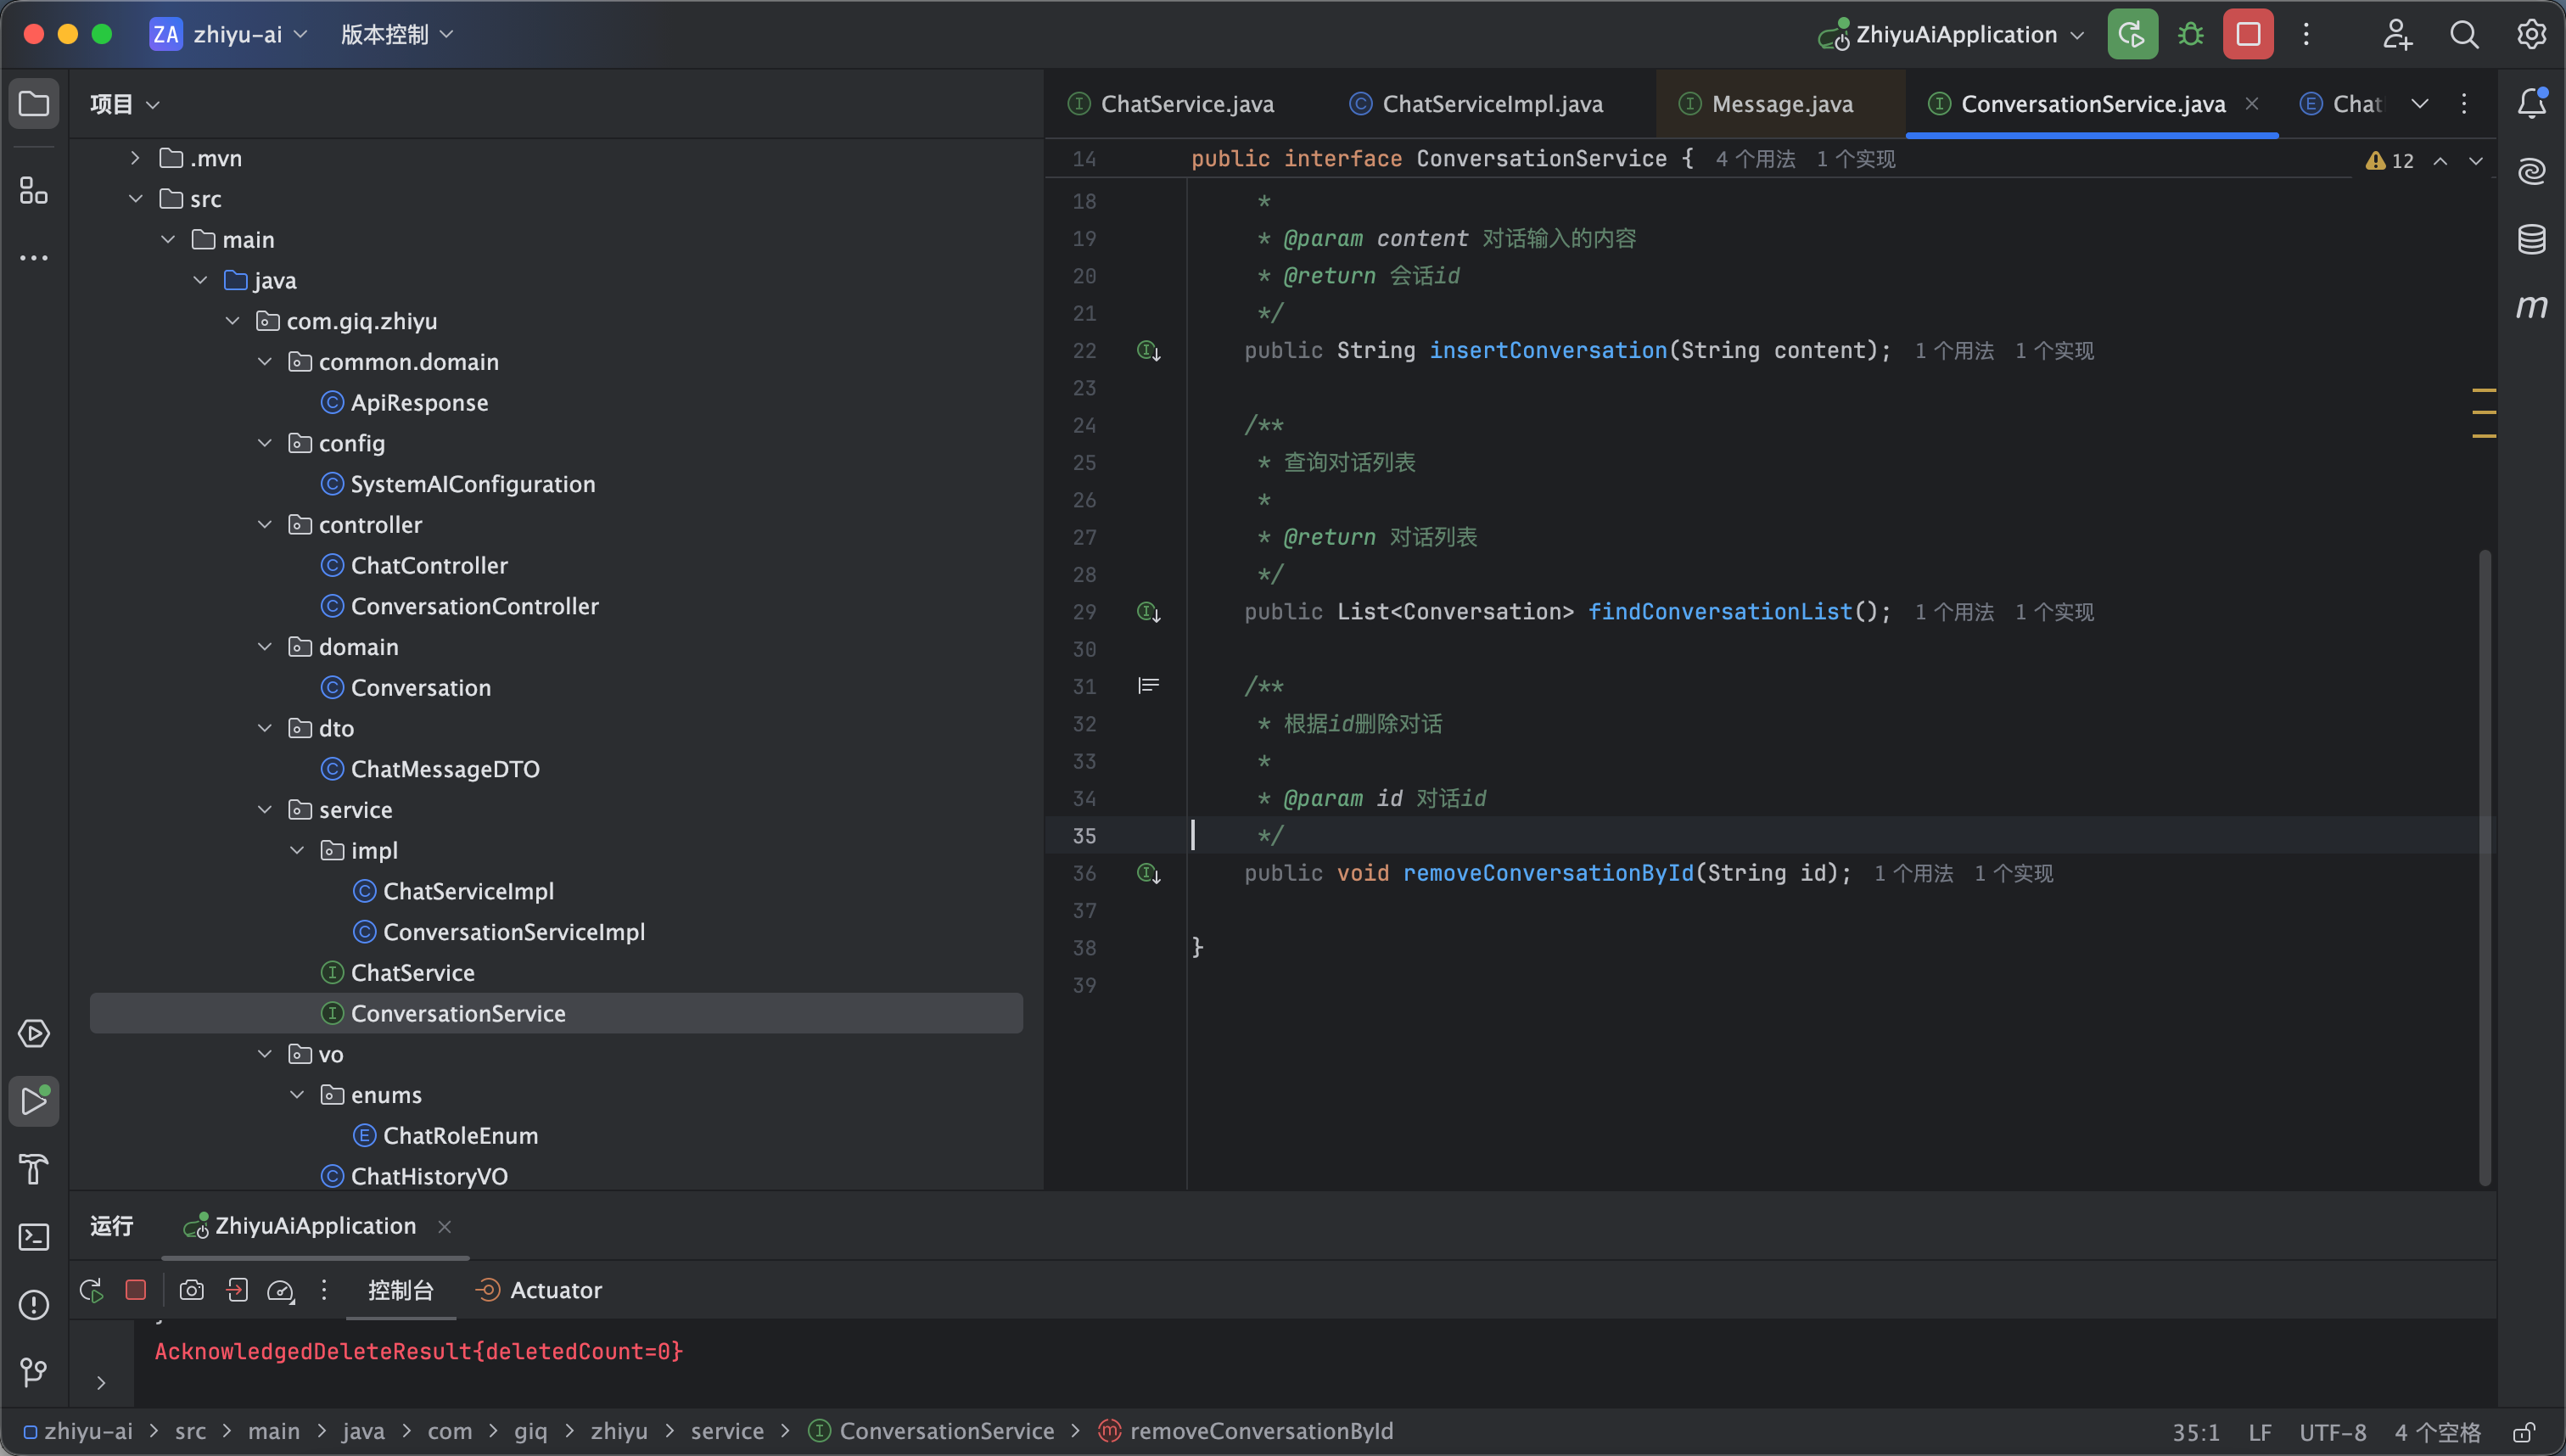
然后在 ConversationService添加一个删除对话的接口 如图2

/**
* 根据id删除对话
*
* @param id 对话id
*/
public void removeConversationById(String id);


实现代码如下 需要引入chatService 调用删除聊天记录方法

/**
* 根据id删除对话
*
* @param id 对话id
*/
@Override
public void removeConversationById(String id) {

chatService.removeChatHistory(id);
Query query = Query.query(
Criteria.where("_id").is(id)
);
mongoTemplate.remove(query, Conversation.class);
}


然后ConversationController 里就是正常的业务调用 添加代码如下


/**
* 根据id删除对话
*
* @param id 对话id
* @return 是否删除成功
*/
@DeleteMapping("remove/{id}")
public ApiResponse removeConversationById(@PathVariable String id) {
conversationService.removeConversationById(id);
return ApiResponse.success();
}


接下来是前端部分


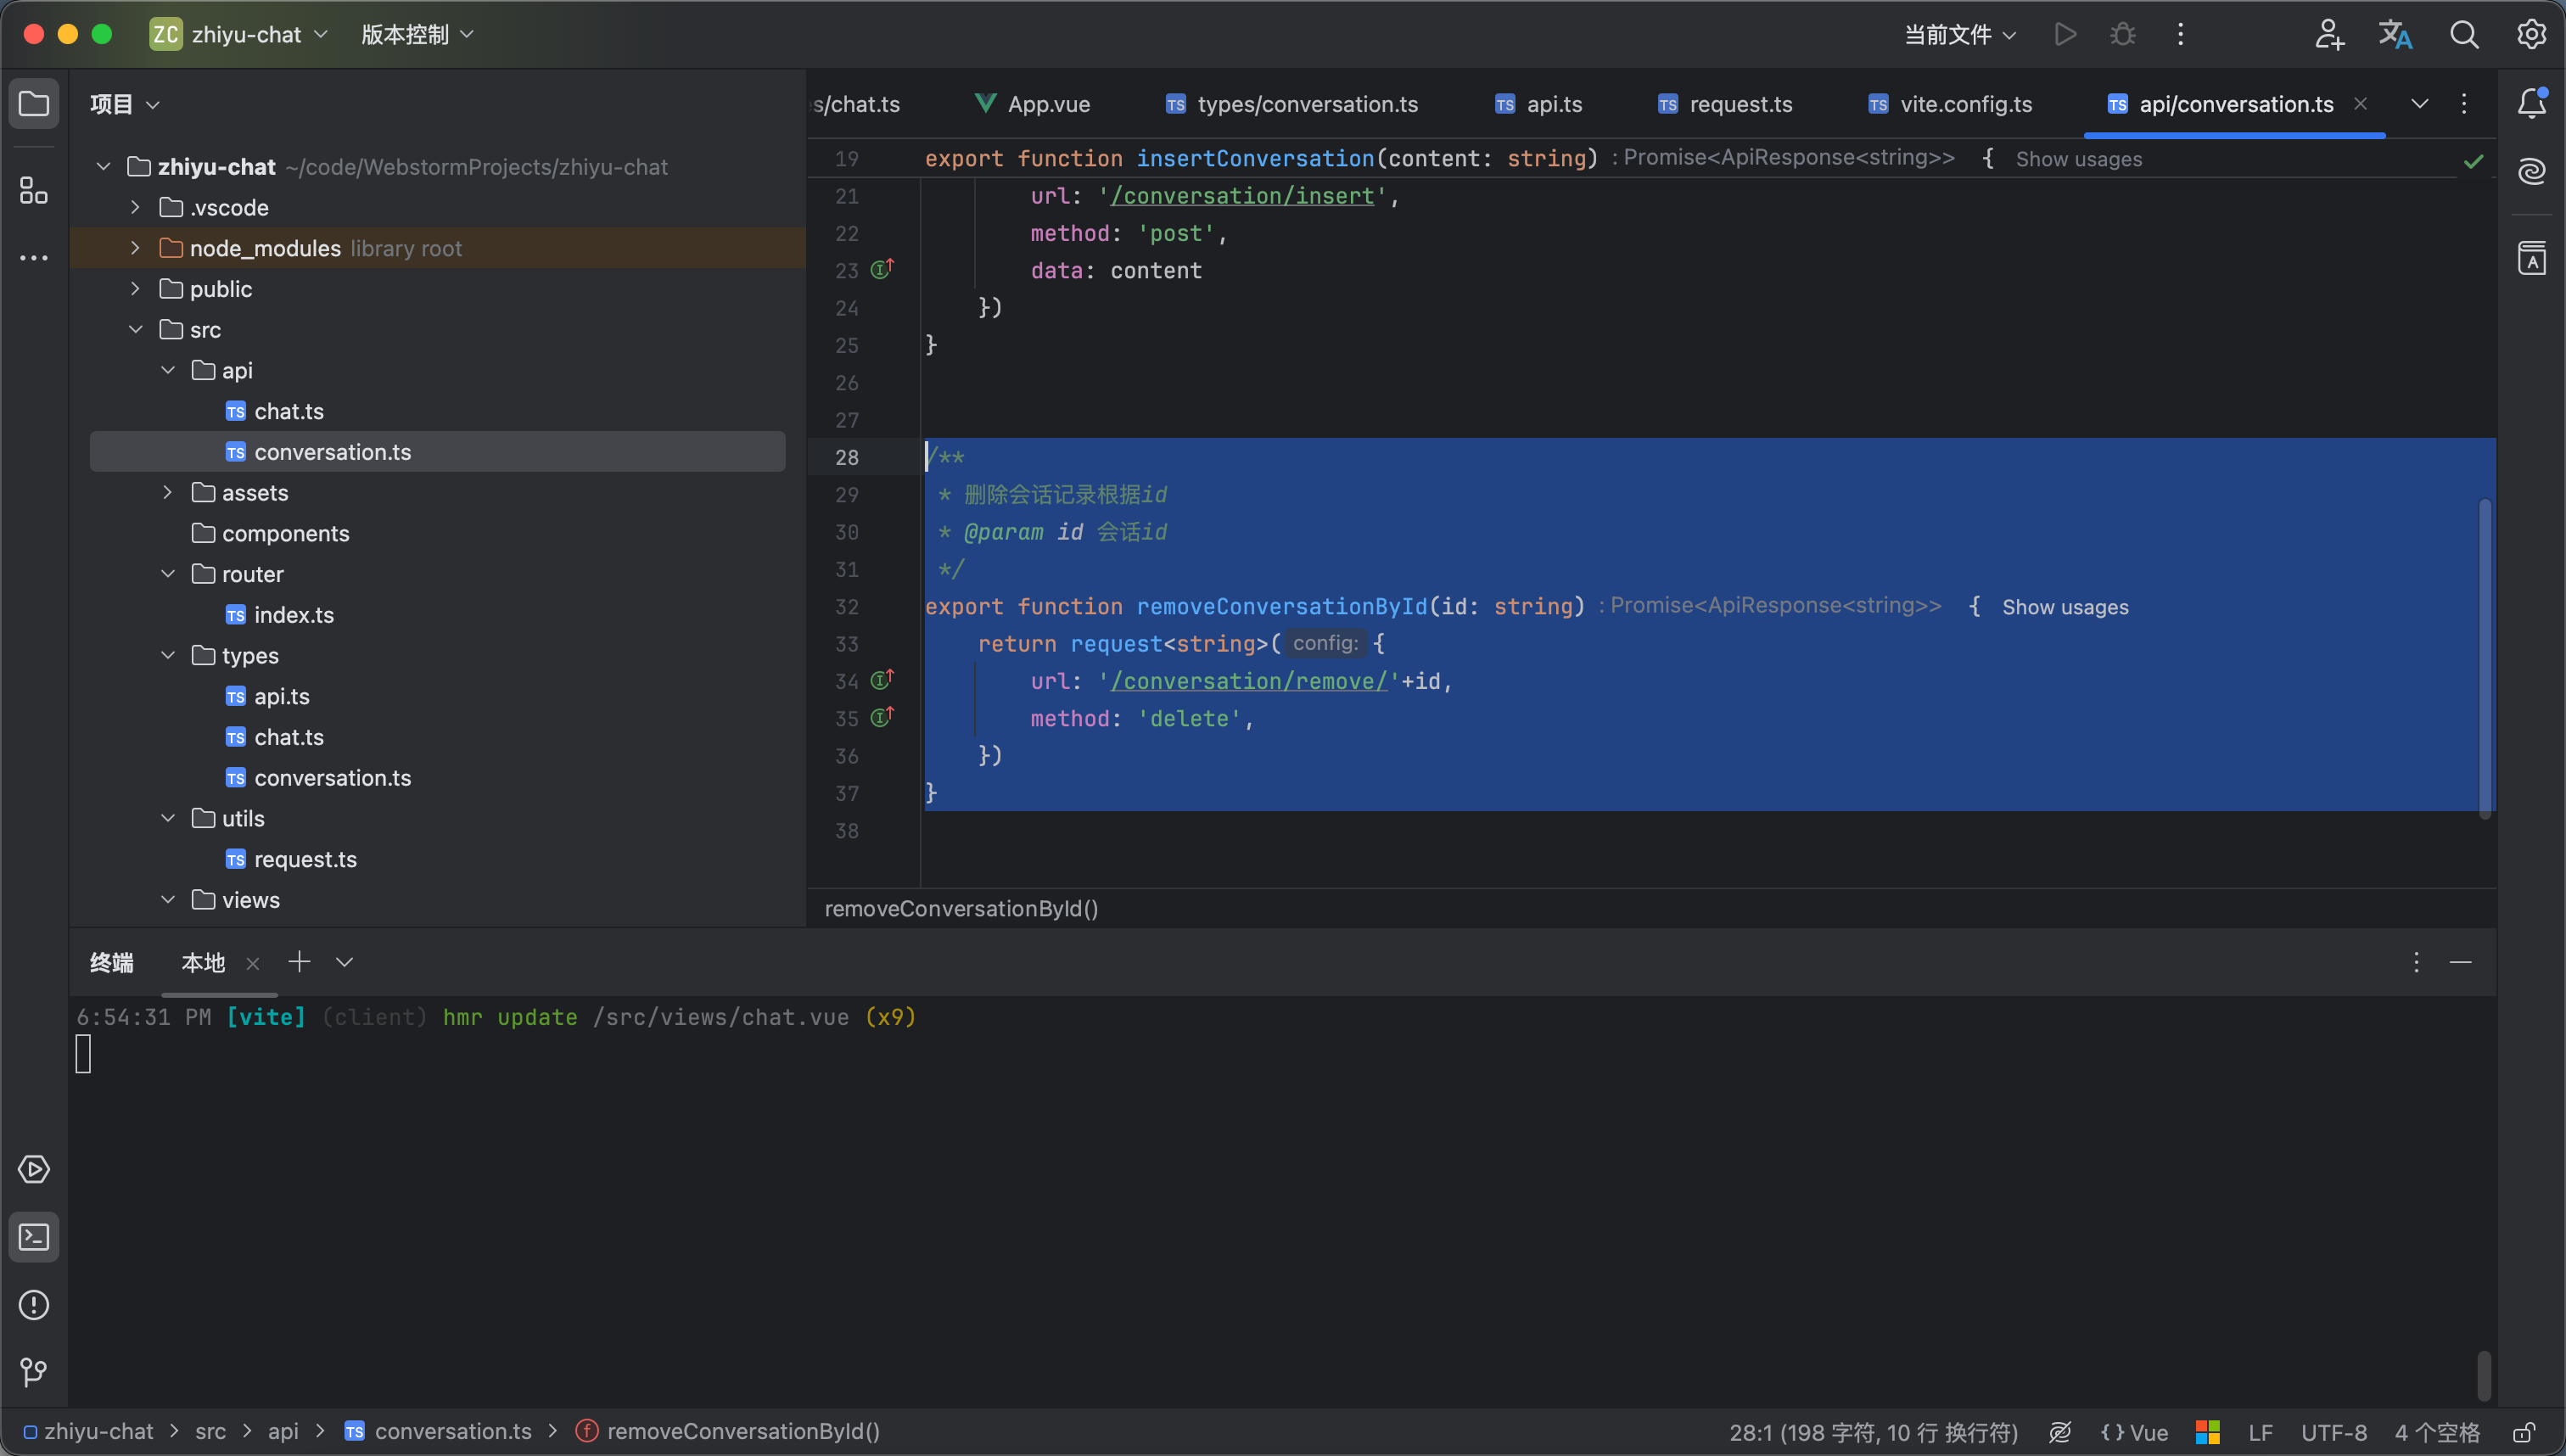
先写请求调用部分 如图3行·

/**
* 删除会话记录根据id
* @param id 会话id
*/
export function removeConversationById(id: string) {
return request<string>({
url: '/conversation/remove/'+id,
method: 'delete',
})
}


chat.vue 完整代码如下 如图3所示就是删除成功后跳转路由并刷新页面


<script setup lang="ts">

import {computed, nextTick, onMounted, reactive, ref, watch} from "vue";
import type {Conversation} from "@/types/conversation.ts";
import {findConversationList, insertConversation, removeConversationById} from "@/api/conversation.ts";
import {type ChatHistoryVO, ChatRoleEnum} from "@/types/chat.ts";
import {findChatHistory, sendMessage} from "@/api/chat.ts";
import {useRoute, useRouter} from "vue-router";

const router = useRouter()
const route = useRoute()

const textareaRef = ref<HTMLTextAreaElement | null>(null)

const handleKeyDown = (e: any) => {
// 过滤中文输入法状态下的 Enter(例如选词敲回车不触发发送或换行)
if (e.isComposing) return

// 判断是否按下了组合键 shift+enter
const hasModifierKey = e.shiftKey
if (hasModifierKey) {
// 组合键按下:阻止默认行为并插入换行
e.preventDefault()
const el = textareaRef.value
if (!el) return

const start = el.selectionStart
const end = el.selectionEnd
// // 在光标处插入换行
content.value = content.value.substring(0, start) + '\n' + content.value.substring(end)
// 保持光标位置在新行的开头
nextTick(() => {
el.selectionStart = el.selectionEnd = start + 1
})
} else {
// 单独按下 Enter:阻止默认换行,触发发送
e.preventDefault()
sendHandle()
}
}

// 最大高度限制 (px)
const maxHeight = window.innerHeight * 0.5

// 动态调整高度
const adjustHeight = () => {
const el = textareaRef.value
if (!el) return

// 先重置高度
el.style.height = 'auto'

// 根据滚动高度动态计算
if (el.scrollHeight > maxHeight) {
el.style.height = `${maxHeight}px`
el.style.overflowY = 'auto'
} else {
el.style.height = `${el.scrollHeight}px`
el.style.overflowY = 'hidden'
}
}

// 输入的内容
const content = ref<string>("");

watch(content, () => {
nextTick(() => {
adjustHeight()
})
})

/**
* 是否存在聊天
*/
const isExistsChat = computed(() => {
return !!conversationId.value &&
chatHistory.value.length > 0
})


// 会话id
const conversationId = ref<string>("");

/**
* 删除会话
*/
const removeConversation = () => {
removeConversationById(conversationId.value).then(response => {
if (response.code == 200) {
window.location.href = '/chat'
}
})
}

// 对话记录列表
const chatHistory = ref<ChatHistoryVO[]>([])

/**
* 查询聊天记录
*/
const findHistory = () => {
findChatHistory(conversationId.value).then(response => {
if (response.code == 200) {
chatHistory.value = response.data
}
})
}

onMounted(() => {
// 获取并赋值
conversationId.value = route.params.conversationId as string || ''
// 有对话id就查询聊天记录
if (!!conversationId.value) {
findHistory()
}

})


// 会话列表
const conversationList = ref<Conversation[]>([])

/**
* 加载会话列表
*/
const loadConversationList = () => {
findConversationList().then(response => {
if (response.code == 200) {
conversationList.value = response.data
}
})
}
loadConversationList()

/**
* 创建对话
*/
const createConversation = () => {
insertConversation(content.value).then(response => {
if (response.code == 200) {
conversationId.value = response.data
conversationList.value.unshift({id: conversationId.value, title: content.value})
chatMessage()
}
})
}

/**
* 发送按钮处理
*/
const sendHandle = async () => {
// 为空判断
if (!content.value.trim()) {
alert("输入的内容不能为空")
return;
}

// 如果没有会话id就创建对话先
if (!conversationId.value) {
createConversation()
} else {
chatMessage()
}
}

const chatContainerRef = ref<HTMLElement | null>(null)

// 监听自动跳转到底部
watch(() => chatHistory.value,
async () => {
// 等待 Vue 把新蹦出来的字渲染到 DOM 树中
await nextTick()
chatContainerRef.value!.scrollTo({top: chatContainerRef.value!.scrollHeight, behavior: "auto"});
},
{deep: true}
)

// 是否发送中
const sending = ref<boolean>(false)

/**
* 聊天消息
*/
const chatMessage = () => {
sending.value = true;
// 添加用户自己的消息
chatHistory.value.push({
role: ChatRoleEnum.USER,
content: content.value,
});

let history = reactive({role: ChatRoleEnum.ASSISTANT, content: ''});
// 添加ai消息
chatHistory.value.push(history);
// 创建传输实体
const dto = {id: conversationId.value, content: content.value}
// 情况输入框的值
content.value = "";

sendMessage(dto, (text: string) => {
history.content += text
}).finally(() => {
sending.value = false;
})

}


</script>

<template>
<div class="chat__container">
<aside class="chat__aside">
<div class="aside__header">
<img src="@/assets/logo.png" class="chat__logo" alt="logo"/>
<span>知屿AI</span>
</div>
<button class="aside__add-session">新建会话</button>
<!-- 会话列表 -->
<div class="aside__session-section">
<span class="aside__session-title">最近对话</span>
<div class="aside__session-list">
<a v-for="item in conversationList" :key="item.id"
:href="`/chat/${item.id}`" class="aside__session-item">
<img src="@/assets/book.png" width="17" alt="img">
<span class="aside__session-text">{{ item.title }}</span>
</a>
</div>
</div>
</aside>

<!-- 主体内容部分 -->
<main class="chat__main">
<header class="chat__header">
<div class="chat__header__title">
<img src="@/assets/logo.png" class="chat__logo" alt="logo"/>
<span>AI 智能对话</span>
</div>

<img @click="removeConversation" src="@/assets/remove.png" class="chat__header__remove" alt="删除">
</header>

<div class="chat__main__wrapper">
<div class="chat__content" ref="chatContainerRef">
<div class="chat__content-list" v-if="isExistsChat">
<div :class="`chat__content-item chat__content--${item.role}`" v-for="(item,index) in chatHistory"
:key="index">
<div class="chat__content__avatar" v-if="item.role == ChatRoleEnum.ASSISTANT">
<img src="@/assets/logo.png" width="100%" alt="logo"/>
</div>
<div class="chat__content__text">
{{ item.content }}
</div>
</div>
</div>
<!-- 为空的样式 -->
<div class="chat__content-empty" v-else>
<img src="@/assets/logo.png" class="chat__content-empty__img" alt="logo"/>
<span class="chat__content-empty__title"> 你好,我是知屿 AI</span>
<span class="chat__content-empty__desc">清晰思考,自由创造。从一个问题开始。</span>
</div>
</div>

<div class="chat__input-container">
<textarea @keydown.enter="handleKeyDown" class="chat__input-wrapper"
v-model="content" ref="textareaRef" placeholder="有问题,尽管问"/>
<button class="chat-send-btn" :disabled="sending" @click="sendHandle">发送</button>
</div>

<div class="chat__main__footer">
内容由 AI 生成,请注意甄别与核实
</div>
</div>

</main>
</div>
</template>

<style lang="scss" scoped>
// 页面整体
.chat__container {
height: 100vh;
display: flex;
}

// 侧边栏部分
.chat__aside {
display: flex;
flex-direction: column;
gap: 25px;
padding: 20px 12px 12px;
background-color: #fcfcfc;
width: 240px;
border: 1px solid #eeeeee;
}

// 侧边栏标题
.aside__header {
display: flex;
align-items: center;
gap: 10px;
font-size: 18px;
color: #333333;
font-weight: 600;
}

// logo
.chat__logo {
width: 30px;
}

// 新建会话按钮
.aside__add-session {
font-weight: 500;
display: flex;
align-items: center;
justify-content: center;
height: 40px;
background-color: #4e6ef2;
border-radius: 12px;
color: white;
font-size: 14px;
border: none;
cursor: pointer;

&:hover {
background-color: #405fdc;
}
}

// 侧边栏的会话记录部分
.aside__session-section {
min-height: 0;
flex: 1;
display: flex;
flex-direction: column;
gap: 5px;
}

// 侧边栏的会话记录小标题
.aside__session-title {
padding-left: 10px;
color: #94a3b8;
font-size: 12px;
font-weight: 500;
}

// 侧边栏会话列表
.aside__session-list {
overflow-y: auto;
flex: 1;
display: flex;
flex-direction: column;

}

// 侧边栏会话项
.aside__session-item {
display: flex;
align-items: center;
gap: 8px;
font-size: 14px;
color: #64748b;
padding: 10px;
border-radius: 12px;
text-decoration: none;
flex-shrink: 0;
}

// 侧边栏会话项文本
.aside__session-text {
white-space: nowrap;
overflow: hidden;
text-overflow: ellipsis;
flex: 1;
}

// 主体内容部分样式
.chat__main {
display: flex;
flex-direction: column;
flex: 1;
background-color: #f8f8f8;
}

// 头部
.chat__header {
flex-shrink: 0;
display: flex;
align-items: center;
justify-content: space-between;
padding: 0 30px;
height: 60px;
background-color: #fcfcfc;
border-bottom: 1px solid #eeeeee;
}

// 头部标题
.chat__header__title {
display: flex;
align-items: center;
justify-content: center;
gap: 10px;
font-size: 18px;
color: #333333;
font-weight: 600;
}

// 头部删除按钮
.chat__header__remove {
cursor: pointer;
width: 20px;
}

// 对话内容主部分
.chat__main__wrapper {
min-height: 0;
background-color: #f7f8fa;
flex: 1;
display: flex;
flex-direction: column;
align-items: center;
}

// 对话内容部分
.chat__content {
width: 100%;
padding: 26px 32px;
display: flex;
justify-content: center;
flex: 1;
overflow-y: auto;

// 滚动条轨道
&::-webkit-scrollbar {
width: 8px; // 滚动条宽度
}

// 滚动条滑块
&::-webkit-scrollbar-thumb {
background-color: #888; // 滑块颜色
border-radius: 4px; // 滑块圆角
}

// 滚动条滑块悬停状态
&::-webkit-scrollbar-thumb:hover {
background-color: #555; // 悬停时滑块颜色
}

// 滚动条轨道背景
&::-webkit-scrollbar-track {
background-color: #f1f1f1; // 轨道背景颜色
border-radius: 4px; // 轨道圆角
}
}

// 聊天内容列表
.chat__content-list {
width: 100%;
display: flex;
flex-direction: column;
gap: 26px;
}

// 聊天的每一项
.chat__content-item {
align-items: flex-start;
display: flex;
width: 100%;
gap: 12px;
min-width: 0;
}

// 聊天文本部分样式
.chat__content__text {
max-width: 80%;
font-size: 14px;
border-radius: 15px;
padding: 14px 18px;
line-height: 28px;
white-space: pre-wrap;
word-break: break-all;
overflow-wrap: anywhere;
}

// ai的内容样式
.chat__content--assistant {
justify-content: flex-start;

// 头像部分
.chat__content__avatar {
height: 40px;
width: 40px;
line-height: 80px;
}

// 文本部分
.chat__content__text {
color: #333333;
background-color: white;

// 为空显示正在思考
&:empty::after {
content: "正在思考...";
display: inline-block;
color: #999;
font-style: italic;
font-size: 14px;
}
}
}

// 用户的内容样式
.chat__content--user {
justify-content: flex-end;

// 文本部分
.chat__content__text {
color: white;
background-color: #4e6ef2;
}
}

// 对话空内容外层容器
.chat__content-empty {
display: flex;
flex-direction: column;
align-items: center;
justify-content: center;
}

// 对话空内容的图片
.chat__content-empty__img {
width: 55px;
margin-bottom: 20px;
}

// 空内容提示标题
.chat__content-empty__title {
font-size: 32px;
color: #1e293b;
font-weight: 600;
margin-bottom: 10px;
}

// 空内容提示描述
.chat__content-empty__desc {
font-size: 14px;
color: #64748b;
}

// 对话底部
.chat__main__footer {
padding: 12px;
text-align: center;
font-size: 12px;
color: #94a3b8;
}

// 输入部分的容器
.chat__input-container {
margin-top: 20px;
position: sticky;
display: flex;
align-items: flex-end;
gap: 10px;
padding: 8px 20px;
background-color: white;
border: 2px solid #eeeeee;
border-radius: 15px;
box-shadow: 0 8px 30px rgba(29, 39, 64, 0.08);
width: 90%;
max-width: 900px;
}

// 输入里部分
.chat__input-wrapper {
width: 100%;
flex: 1;
outline: none;
border: none;
resize: none;
box-sizing: border-box;
padding: 10px 0;
line-height: 1.5;
min-height: 50px;
font-size: 14px;
color: #333333;
}


// 发送按钮
.chat-send-btn {
height: 40px;
font-size: 12px;
padding: 8px 16px;
border-radius: 10px;
color: white;
background-color: #4e6ef2;
font-weight: 500;
border: none;

&:hover {
background-color: #405fdc;
}
}

// 禁用状态
.chat-send-btn:disabled {
background-color: #c0c4cc;
color: #ffffff;
cursor: not-allowed;
opacity: 0.7;
}
</style>


演示看最后一个视频

13

细节调整

前端完整代码如下


<script setup lang="ts">

import {computed, nextTick, onMounted, reactive, ref, watch} from "vue";
import type {Conversation} from "@/types/conversation.ts";
import {findConversationList, insertConversation, removeConversationById} from "@/api/conversation.ts";
import {type ChatHistoryVO, ChatRoleEnum} from "@/types/chat.ts";
import {findChatHistory, sendMessage} from "@/api/chat.ts";
import {useRoute, useRouter} from "vue-router";

const router = useRouter()
const route = useRoute()

const textareaRef = ref<HTMLTextAreaElement | null>(null)

const handleKeyDown = (e: any) => {
// 过滤中文输入法状态下的 Enter(例如选词敲回车不触发发送或换行)
if (e.isComposing) return

// 判断是否按下了组合键 shift+enter
const hasModifierKey = e.shiftKey
if (hasModifierKey) {
// 组合键按下:阻止默认行为并插入换行
e.preventDefault()
const el = textareaRef.value
if (!el) return

const start = el.selectionStart
const end = el.selectionEnd
// // 在光标处插入换行
content.value = content.value.substring(0, start) + '\n' + content.value.substring(end)
// 保持光标位置在新行的开头
nextTick(() => {
el.selectionStart = el.selectionEnd = start + 1
})
} else {
// 单独按下 Enter:阻止默认换行,触发发送
e.preventDefault()
sendHandle()
}
}

// 最大高度限制 (px)
const maxHeight = window.innerHeight * 0.5

// 动态调整高度
const adjustHeight = () => {
const el = textareaRef.value
if (!el) return

// 先重置高度
el.style.height = 'auto'

// 根据滚动高度动态计算
if (el.scrollHeight > maxHeight) {
el.style.height = `${maxHeight}px`
el.style.overflowY = 'auto'
} else {
el.style.height = `${el.scrollHeight}px`
el.style.overflowY = 'hidden'
}
}

// 输入的内容
const content = ref<string>("");

watch(content, () => {
nextTick(() => {
adjustHeight()
})
})

/**
* 是否存在聊天
*/
const isExistsChat = computed(() => {
return !!conversationId.value &&
chatHistory.value.length > 0
})


// 会话id
const conversationId = ref<string>("");

/**
* 删除会话
*/
const removeConversation = () => {
removeConversationById(conversationId.value).then(response => {
if (response.code == 200) {
router.push('/chat')
window.location.reload()
}
})
}

// 对话记录列表
const chatHistory = ref<ChatHistoryVO[]>([])

/**
* 查询聊天记录
*/
const findHistory = () => {
findChatHistory(conversationId.value).then(response => {
if (response.code == 200) {
chatHistory.value = response.data
}
})
}

onMounted(() => {
// 获取并赋值
conversationId.value = route.params.conversationId as string || ''
// 有对话id就查询聊天记录
if (!!conversationId.value) {
findHistory()
}

})


// 会话列表
const conversationList = ref<Conversation[]>([])

/**
* 加载会话列表
*/
const loadConversationList = () => {
findConversationList().then(response => {
if (response.code == 200) {
conversationList.value = response.data
}
})
}
loadConversationList()

/**
* 创建对话
*/
const createConversation = () => {
insertConversation(content.value).then(response => {
if (response.code == 200) {
conversationId.value = response.data
conversationList.value.unshift({id: conversationId.value, title: content.value})
// 刷新路由参数
router.push({
name: 'Chat',
params: {
conversationId: conversationId.value
}
})
chatMessage()
}
})
}

/**
* 发送按钮处理
*/
const sendHandle = async () => {
// 为空判断
if (!content.value.trim()) {
alert("输入的内容不能为空")
return;
}

// 如果没有会话id就创建对话先
if (!conversationId.value) {
createConversation()
} else {
chatMessage()
}
}

const chatContainerRef = ref<HTMLElement | null>(null)

// 监听自动跳转到底部
watch(() => chatHistory.value,
async () => {
// 等待 Vue 把新蹦出来的字渲染到 DOM 树中
await nextTick()
chatContainerRef.value!.scrollTo({top: chatContainerRef.value!.scrollHeight, behavior: "auto"});
},
{deep: true}
)

// 是否发送中
const sending = ref<boolean>(false)

/**
* 聊天消息
*/
const chatMessage = () => {
sending.value = true;
// 添加用户自己的消息
chatHistory.value.push({
role: ChatRoleEnum.USER,
content: content.value,
});

let history = reactive({role: ChatRoleEnum.ASSISTANT, content: ''});
// 添加ai消息
chatHistory.value.push(history);
// 创建传输实体
const dto = {id: conversationId.value, content: content.value}
// 情况输入框的值
content.value = "";

sendMessage(dto, (text: string) => {
history.content += text
}).finally(() => {
sending.value = false;
})

}


</script>

<template>
<div class="chat__container">
<aside class="chat__aside">
<div class="aside__header">
<img src="@/assets/logo.png" class="chat__logo" alt="logo"/>
<span>知屿AI</span>
</div>
<a href="/chat" class="aside__add-session">新建会话</a>
<!-- 会话列表 -->
<div class="aside__session-section">
<span class="aside__session-title">最近对话</span>
<div class="aside__session-list">
<a v-for="item in conversationList" :key="item.id"
:href="`/chat/${item.id}`"
:class="[ 'aside__session-item',
{ 'aside__session-item--active': conversationId === item.id }]">
<img src="@/assets/book.png" width="17" alt="img">
<span class="aside__session-text">{{ item.title }}</span>
</a>
</div>
</div>
</aside>

<!-- 主体内容部分 -->
<main class="chat__main">
<header class="chat__header">
<div class="chat__header__title">
<img src="@/assets/logo.png" class="chat__logo" alt="logo"/>
<span>AI 智能对话</span>
</div>

<img @click="removeConversation" src="@/assets/remove.png" class="chat__header__remove" alt="删除">
</header>

<div class="chat__main__wrapper">
<div class="chat__content" ref="chatContainerRef">
<div class="chat__content-list" v-if="isExistsChat">
<div :class="`chat__content-item chat__content--${item.role}`" v-for="(item,index) in chatHistory"
:key="index">
<div class="chat__content__avatar" v-if="item.role == ChatRoleEnum.ASSISTANT">
<img src="@/assets/logo.png" width="100%" alt="logo"/>
</div>
<div class="chat__content__text">
{{ item.content }}
</div>
</div>
</div>
<!-- 为空的样式 -->
<div class="chat__content-empty" v-else>
<img src="@/assets/logo.png" class="chat__content-empty__img" alt="logo"/>
<span class="chat__content-empty__title"> 你好,我是知屿 AI</span>
<span class="chat__content-empty__desc">清晰思考,自由创造。从一个问题开始。</span>
</div>
</div>

<div class="chat__input-container">
<textarea @keydown.enter="handleKeyDown" class="chat__input-wrapper"
v-model="content" ref="textareaRef" placeholder="有问题,尽管问"/>
<button class="chat-send-btn" :disabled="sending" @click="sendHandle">发送</button>
</div>

<div class="chat__main__footer">
内容由 AI 生成,请注意甄别与核实
</div>
</div>

</main>
</div>
</template>

<style lang="scss" scoped>
// 页面整体
.chat__container {
height: 100vh;
display: flex;
}

// 侧边栏部分
.chat__aside {
display: flex;
flex-direction: column;
gap: 25px;
padding: 20px 12px 12px;
background-color: #fcfcfc;
width: 240px;
border: 1px solid #eeeeee;
}

// 侧边栏标题
.aside__header {
display: flex;
align-items: center;
gap: 10px;
font-size: 18px;
color: #333333;
font-weight: 600;
}

// logo
.chat__logo {
width: 30px;
}

// 新建会话按钮
.aside__add-session {
text-decoration: none;
font-weight: 500;
display: flex;
align-items: center;
justify-content: center;
height: 40px;
background-color: #4e6ef2;
border-radius: 12px;
color: white;
font-size: 14px;
border: none;
cursor: pointer;

&:hover {
background-color: #405fdc;
}
}

// 侧边栏的会话记录部分
.aside__session-section {
min-height: 0;
flex: 1;
display: flex;
flex-direction: column;
gap: 5px;
}

// 侧边栏的会话记录小标题
.aside__session-title {
padding-left: 10px;
color: #94a3b8;
font-size: 12px;
font-weight: 500;
}

// 侧边栏会话列表
.aside__session-list {
overflow-y: auto;
flex: 1;
display: flex;
flex-direction: column;

}

// 侧边栏会话项
.aside__session-item {
display: flex;
align-items: center;
gap: 8px;
font-size: 14px;
color: #64748b;
padding: 10px;
border-radius: 12px;
text-decoration: none;
flex-shrink: 0;
}

// 侧边栏选中样式
.aside__session-item--active{
color: #1e293b;
background-color: #f1f5f9;
}

// 侧边栏会话项文本
.aside__session-text {
white-space: nowrap;
overflow: hidden;
text-overflow: ellipsis;
flex: 1;
}

// 主体内容部分样式
.chat__main {
display: flex;
flex-direction: column;
flex: 1;
background-color: #f8f8f8;
}

// 头部
.chat__header {
flex-shrink: 0;
display: flex;
align-items: center;
justify-content: space-between;
padding: 0 30px;
height: 60px;
background-color: #fcfcfc;
border-bottom: 1px solid #eeeeee;
}

// 头部标题
.chat__header__title {
display: flex;
align-items: center;
justify-content: center;
gap: 10px;
font-size: 18px;
color: #333333;
font-weight: 600;
}

// 头部删除按钮
.chat__header__remove {
cursor: pointer;
width: 20px;
}

// 对话内容主部分
.chat__main__wrapper {
min-height: 0;
background-color: #f7f8fa;
flex: 1;
display: flex;
flex-direction: column;
align-items: center;
}

// 对话内容部分
.chat__content {
width: 100%;
padding: 26px 32px;
display: flex;
justify-content: center;
flex: 1;
overflow-y: auto;

// 滚动条轨道
&::-webkit-scrollbar {
width: 8px; // 滚动条宽度
}

// 滚动条滑块
&::-webkit-scrollbar-thumb {
background-color: #888; // 滑块颜色
border-radius: 4px; // 滑块圆角
}

// 滚动条滑块悬停状态
&::-webkit-scrollbar-thumb:hover {
background-color: #555; // 悬停时滑块颜色
}

// 滚动条轨道背景
&::-webkit-scrollbar-track {
background-color: #f1f1f1; // 轨道背景颜色
border-radius: 4px; // 轨道圆角
}
}

// 聊天内容列表
.chat__content-list {
width: 100%;
display: flex;
flex-direction: column;
gap: 26px;
}

// 聊天的每一项
.chat__content-item {
align-items: flex-start;
display: flex;
width: 100%;
gap: 12px;
min-width: 0;
}

// 聊天文本部分样式
.chat__content__text {
max-width: 80%;
font-size: 14px;
border-radius: 15px;
padding: 14px 18px;
line-height: 28px;
white-space: pre-wrap;
word-break: break-all;
overflow-wrap: anywhere;
}

// ai的内容样式
.chat__content--assistant {
justify-content: flex-start;

// 头像部分
.chat__content__avatar {
height: 40px;
width: 40px;
line-height: 80px;
}

// 文本部分
.chat__content__text {
color: #333333;
background-color: white;

// 为空显示正在思考
&:empty::after {
content: "正在思考...";
display: inline-block;
color: #999;
font-style: italic;
font-size: 14px;
}
}
}

// 用户的内容样式
.chat__content--user {
justify-content: flex-end;

// 文本部分
.chat__content__text {
color: white;
background-color: #4e6ef2;
}
}

// 对话空内容外层容器
.chat__content-empty {
display: flex;
flex-direction: column;
align-items: center;
justify-content: center;
}

// 对话空内容的图片
.chat__content-empty__img {
width: 55px;
margin-bottom: 20px;
}

// 空内容提示标题
.chat__content-empty__title {
font-size: 32px;
color: #1e293b;
font-weight: 600;
margin-bottom: 10px;
}

// 空内容提示描述
.chat__content-empty__desc {
font-size: 14px;
color: #64748b;
}

// 对话底部
.chat__main__footer {
padding: 12px;
text-align: center;
font-size: 12px;
color: #94a3b8;
}

// 输入部分的容器
.chat__input-container {
margin-top: 20px;
position: sticky;
display: flex;
align-items: flex-end;
gap: 10px;
padding: 8px 20px;
background-color: white;
border: 2px solid #eeeeee;
border-radius: 15px;
box-shadow: 0 8px 30px rgba(29, 39, 64, 0.08);
width: 90%;
max-width: 900px;
}

// 输入里部分
.chat__input-wrapper {
width: 100%;
flex: 1;
outline: none;
border: none;
resize: none;
box-sizing: border-box;
padding: 10px 0;
line-height: 1.5;
min-height: 50px;
font-size: 14px;
color: #333333;
}


// 发送按钮
.chat-send-btn {
height: 40px;
font-size: 12px;
padding: 8px 16px;
border-radius: 10px;
color: white;
background-color: #4e6ef2;
font-weight: 500;
border: none;

&:hover {
background-color: #405fdc;
}
}

// 禁用状态
.chat-send-btn:disabled {
background-color: #c0c4cc;
color: #ffffff;
cursor: not-allowed;
opacity: 0.7;
}
</style>


14

markdown处理

首先 安装依赖

输入以下命令 如图1所示

pnpm add markdown-it
pnpm add -D @types/markdown-it


如图2所示添加以下代码


const md = new MarkdownIt({
// 将换行符转换为 <br> 标签
breaks: true,
// 禁止解析 HTML 标签
html: false,
// 自动识别并转换链接
linkify: true
})

/**
* 转html
* @param content
*/
const markdownToHtml = (content: string) => {
return md.render(content)
}


然后如图3把内容展示的代码换成 以下代码

<div class="chat__content__text" v-html="markdownToHtml(item.content)"/>


最后添加一点css即可

.chat__content__text {
p {
display: inline;
}
}

// 多行代码块 样式
pre {
background-color: #282c34; // 经典深色黑板背景
color: #abb2bf;
padding: 12px 16px;
border-radius: 8px;
margin: 10px 0;
overflow-x: auto; // 超长代码允许横向滚动
box-shadow: 0 4px 12px rgba(0, 0, 0, 0.15);

// 解决 pre 内部 code 样式冲突
code {
background-color: transparent;
color: inherit;
padding: 0;
border-radius: 0;
font-family: 'Fira Code', Consolas, Monaco, monospace;
font-size: 13px;
line-height: 1.5;
white-space: pre; // 严格保留代码的空格和换行
word-break: normal;
}
}

效果如图4

15

完整代码&演示

完整代码在附件里 有问题可以私信我或评论

ZIP
zhiyu-chat.zip
67.90KB
ZIP
zhiyu-ai.zip
83.56KB
阅读记录0
点赞0
收藏0
禁止 本文未经作者允许授权,禁止转载
猜你喜欢
评论/提问(已发布 0 条)
头像
评论 评论
收藏 收藏
分享 分享
pdf下载 下载
pdf下载 举报