Arduino Nano驱动0.96寸SSD1306 OLED动画教程
 0
0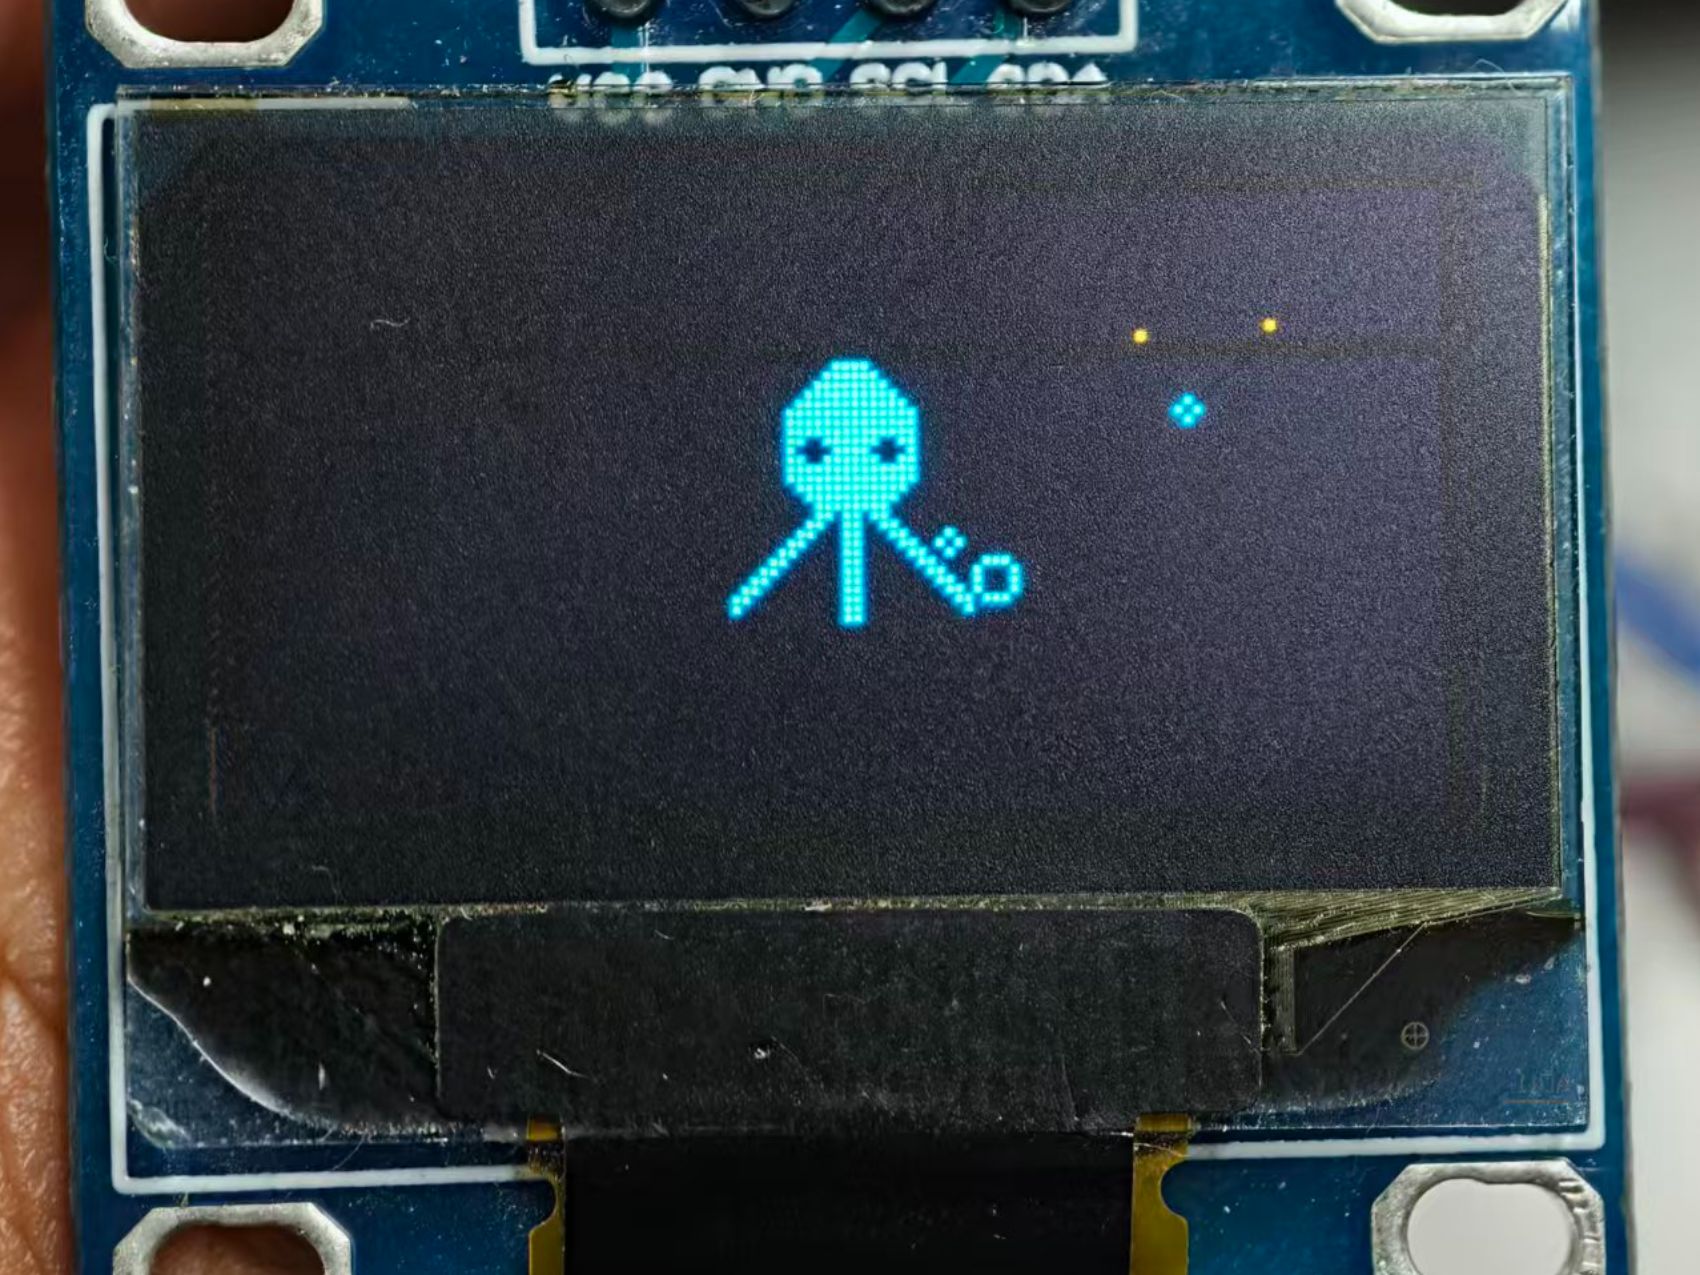
用 Arduino Nano 驱动 0.96 寸 SSD1306 OLED 屏,其实没那么难!这篇教程教你用 U8g2 库通过 I2C 接线,轻松显示文字、图形,甚至做点小动画。接线简单,代码清晰,适合新手上手,让你的小屏幕也能“活”起来。
准备工作:
材料:
材料名称
数量
备注
Arduino Nano
1
主控
0.96OLED屏幕
1
杜邦线
4
母对母
mini口数据线
1
1
SSD1306

SSD1306 0.96OLED屏幕针脚名称以及功能:
引脚 | 描述 |
VCC | 正极 |
SCL | I2C总线时钟线 |
SDA | I2C 总线数据线 |
GND | 电源地 |
SSD1306 0.96OLED参数:
名称 | 参数 |
尺寸 | 0.96寸 |
模块电压 | 3~5V |
分辨率 | 128*64 |
驱动 | SSD1306 |
接口 | IIC |
2
接线示意图


12
根据图中进行接线
- VCC ---> 5V
- GND ---> GND
- SCL ---> A5
- SDA ---> A4
3
I2C地址扫描


12
#include <Wire.h>
void setup() {
Wire.begin();
Serial.begin(9600);
while (!Serial); // 等待串口监视器打开(仅适用于 Leonardo/Micro,Nano 可省略)
Serial.println("I2C Scanner");
}
void loop() {
byte error, address;
int nDevices = 0;
Serial.println("Scanning...");
for (address = 1; address < 127; address++) {
Wire.beginTransmission(address);
error = Wire.endTransmission();
if (error == 0) {
Serial.print("I2C device found at address 0x");
if (address < 16) {
Serial.print("0");
}
Serial.println(address, HEX);
nDevices++;
} else if (error == 4) {
Serial.print("Unknown error at address 0x");
if (address < 16) {
Serial.print("0");
}
Serial.println(address, HEX);
}
}
if (nDevices == 0) {
Serial.println("No I2C devices found\n");
} else {
Serial.println("Done!\n");
}
delay(5000); // 每5秒扫描一次
}
4
安装依赖

打开 Arduino IDE 软件后,在左侧菜单栏中点击 “库管理”。在搜索框中输入 “U8g2”,找到并安装 “U8g2”。
5
安装Nano开发板


123
打开 Arduino IDE 软件后,在左侧菜单栏中点击 “开发板管理器”(Board Manager)。在搜索框中输入 “Nano”,找到并安装 “Arduino AVR Boards”(由 Arduino 官方提供)。安装完成后,点击顶部菜单栏的 “工具” → “开发板” → “Arduino AVR Boards” → 选择 “Arduino Nano”。接着,再次进入 “工具” → “端口”,选择对应的串口(电脑默认的通常为 COM3 或 COM4,选择这两个以外的串口)。
6
代码烧录

代码编写完成后,点击左上角的 “上传” 按钮(右箭头图标),即可将程序烧录到 Arduino Nano 开发板中。
7
功能实现

12
#include <Arduino.h>
#include <U8g2lib.h>
#include <Wire.h>
// 第一步:声明 U8g2 对象
// Nano的I2C引脚:A4(SDA), A5(SCL)
U8G2_SSD1306_128X64_NONAME_F_HW_I2C u8g2(U8G2_R0, /* reset=*/ U8X8_PIN_NONE);
// ==================== 章鱼动画帧(存在 Flash 里,省 RAM)====================
// 4 帧逐帧动画,每帧 32×32 像素,XBM 点阵格式
const unsigned char animation_frame_0[] PROGMEM = {
0x00, 0x00, 0x00, 0x00, 0x00, 0x00, 0x00, 0x00, 0x00, 0xF8, 0x07, 0x00,
0x00, 0xFE, 0x3F, 0x00, 0x80, 0xFF, 0x7F, 0x00, 0xC0, 0xFF, 0xFF, 0x00,
0xE0, 0xFF, 0xFF, 0x01, 0xF0, 0xFF, 0xFF, 0x03, 0xF0, 0xFF, 0xFF, 0x03,
0xF0, 0xFF, 0xFF, 0x03, 0xF0, 0xF3, 0xF3, 0x03, 0xF0, 0xF0, 0xF0, 0x03,
0xF0, 0xF3, 0xF3, 0x03, 0xF0, 0xFF, 0xFF, 0x03, 0xE0, 0xFF, 0xFF, 0x01,
0xC0, 0xFF, 0xFF, 0x00, 0x80, 0xFF, 0x7F, 0x00, 0x00, 0xEF, 0x3D, 0x00,
0x00, 0xEF, 0x3D, 0x00, 0x00, 0xC7, 0x38, 0x00, 0x00, 0xC7, 0x38, 0x00,
0x80, 0xC3, 0x70, 0x00, 0x80, 0xC3, 0x70, 0x00, 0x80, 0xC1, 0x60, 0x00,
0x80, 0xC1, 0x60, 0x00, 0xC0, 0xC0, 0xC0, 0x00, 0xC0, 0xC0, 0xC0, 0x00,
0x40, 0x80, 0x80, 0x00, 0x00, 0x00, 0x00, 0x00, 0x00, 0x00, 0x00, 0x00,
0x00, 0x00, 0x00, 0x00, 0x00, 0x00, 0x00, 0x00
};
const unsigned char animation_frame_1[] PROGMEM = {
0x00, 0x00, 0x00, 0x00, 0x00, 0x00, 0x00, 0x00, 0x00, 0x00, 0x00, 0x00,
0x00, 0xFC, 0x0F, 0x00, 0x00, 0xFF, 0x3F, 0x00, 0x80, 0xFF, 0x7F, 0x00,
0xC0, 0xFF, 0xFF, 0x00, 0xE0, 0xFF, 0xFF, 0x01, 0xE0, 0xFF, 0xFF, 0x01,
0xE0, 0xE7, 0xE7, 0x01, 0xE0, 0xE1, 0xE1, 0x01, 0xE0, 0xE7, 0xE7, 0x01,
0xE0, 0xFF, 0xFF, 0x01, 0xC0, 0xFF, 0xFF, 0x00, 0x80, 0xFF, 0x7F, 0x00,
0x00, 0xFF, 0x3F, 0x00, 0x00, 0xFE, 0x1F, 0x00, 0x00, 0xDE, 0x1E, 0x00,
0x00, 0xCF, 0x3C, 0x00, 0x80, 0xC7, 0x78, 0x00, 0xC0, 0xC3, 0xF0, 0x00,
0xE0, 0xC1, 0xE0, 0x01, 0xE0, 0xC0, 0xC0, 0x01, 0xC0, 0xC0, 0xC0, 0x00,
0x80, 0xC0, 0x40, 0x00, 0x00, 0xC0, 0x00, 0x00, 0x00, 0x00, 0x00, 0x00,
0x00, 0x00, 0x00, 0x00, 0x00, 0x00, 0x00, 0x00, 0x00, 0x00, 0x00, 0x00,
0x00, 0x00, 0x00, 0x00, 0x00, 0x00, 0x00, 0x00
};
const unsigned char animation_frame_2[] PROGMEM = {
0x00, 0xF0, 0x00, 0x00, 0x00, 0xF8, 0x01, 0x00, 0x00, 0xFC, 0x03, 0x00,
0x00, 0xFE, 0x07, 0x00, 0x00, 0xFF, 0x0F, 0x00, 0x80, 0xFF, 0x1F, 0x00,
0x80, 0xFF, 0x1F, 0x00, 0x80, 0xFF, 0x1F, 0x00, 0x80, 0xF9, 0x19, 0x00,
0x80, 0xF0, 0x10, 0x00, 0x80, 0xF9, 0x19, 0x00, 0x80, 0xFF, 0x1F, 0x00,
0x80, 0xFF, 0x1F, 0x00, 0x00, 0xFF, 0x0F, 0x00, 0x00, 0xFE, 0x07, 0x00,
0x00, 0xFC, 0x03, 0x00, 0x00, 0x6C, 0x03, 0x00, 0x00, 0x66, 0x06, 0x00,
0x00, 0x63, 0x0C, 0x00, 0x80, 0x61, 0x18, 0x00, 0xC0, 0x60, 0x30, 0x00,
0x60, 0x60, 0x60, 0x00, 0x30, 0x60, 0xC0, 0x00, 0x18, 0x60, 0x80, 0x01,
0x0C, 0x60, 0x00, 0x03, 0x06, 0x60, 0x00, 0x06, 0x02, 0x60, 0x00, 0x04,
0x00, 0x60, 0x00, 0x00, 0x00, 0x00, 0x00, 0x00, 0x00, 0x00, 0x00, 0x00,
0x00, 0x00, 0x00, 0x00, 0x00, 0x00, 0x00, 0x00
};
const unsigned char animation_frame_3[] PROGMEM = {
0x00, 0x00, 0x00, 0x00, 0x00, 0xF8, 0x07, 0x00, 0x00, 0xFE, 0x3F, 0x00,
0x80, 0xFF, 0x7F, 0x00, 0xC0, 0xFF, 0xFF, 0x00, 0xE0, 0xFF, 0xFF, 0x01,
0xF0, 0xFF, 0xFF, 0x03, 0xF0, 0xFF, 0xFF, 0x03, 0xF0, 0xFF, 0xFF, 0x03,
0xF0, 0xF3, 0xF3, 0x03, 0xF0, 0xF0, 0xF0, 0x03, 0xF0, 0xF3, 0xF3, 0x03,
0xF0, 0xFF, 0xFF, 0x03, 0xE0, 0xFF, 0xFF, 0x01, 0xC0, 0xFF, 0xFF, 0x00,
0x80, 0xFF, 0x7F, 0x00, 0x00, 0xFF, 0x3F, 0x00, 0x00, 0xF6, 0x06, 0x00,
0x00, 0xF6, 0x06, 0x00, 0x00, 0x63, 0x0C, 0x00, 0x00, 0x63, 0x0C, 0x00,
0x80, 0x61, 0x18, 0x00, 0x80, 0x61, 0x18, 0x00, 0x80, 0x60, 0x10, 0x00,
0x80, 0x60, 0x10, 0x00, 0x40, 0x60, 0x20, 0x00, 0x40, 0x60, 0x20, 0x00,
0x00, 0x00, 0x00, 0x00, 0x00, 0x00, 0x00, 0x00, 0x00, 0x00, 0x00, 0x00,
0x00, 0x00, 0x00, 0x00, 0x00, 0x00, 0x00, 0x00
};
// 把 4 帧指针放进数组,方便循环访问
const unsigned char* animation_frames[] = {
animation_frame_0, animation_frame_1, animation_frame_2, animation_frame_3
};
const int TOTAL_FRAMES = 4;
const unsigned long FRAME_DELAY = 120; // 帧间隔(毫秒),改小就变快,改大就变慢
int currentFrame = 0;
unsigned long lastFrameTime = 0;
const int SPRITE_SIZE = 32; // 章鱼点阵尺寸 32×32
// ==================== 泡泡粒子系统 ====================
#define MAX_BUBBLES 8 // Nano内存较小,减少到8个泡泡
struct Bubble {
float x; // 当前 X 坐标
float y; // 当前 Y 坐标
float radius; // 当前半径(浮点数,方便逐帧缩小)
float speedY; // 每帧上浮的像素数
float wobble; // 左右摇摆的随机相位偏移
bool active; // 这个泡泡"活着"吗
};
Bubble bubbles[MAX_BUBBLES]; // 对象池,避免动态分配内存
void setup() {
Serial.begin(9600); // Nano通常用9600波特率
// 第二步:用随机种子让每次开机的泡泡都不一样
randomSeed(analogRead(A0)); // Nano使用A0作为随机种子引脚
// 第三步:初始化 I2C,Nano的I2C引脚固定为A4(SDA), A5(SCL)
Wire.begin();
u8g2.begin();
// 第四步:把所有泡泡标记为未激活
for (int i = 0; i < MAX_BUBBLES; i++) {
bubbles[i].active = false;
}
Serial.println("章鱼水族箱启动成功!");
}
void loop() {
unsigned long currentTime = millis();
// 用非阻塞计时代替 delay(),保证动画流畅
if (currentTime - lastFrameTime >= FRAME_DELAY) {
lastFrameTime = currentTime;
// ======== 第一步:用 Lissajous 曲线计算章鱼位置 ========
// 两个不同频率的正弦波叠加,产生优雅的 8 字形游动轨迹
float t = currentTime * 0.0008;
float waveX = sin(t * 0.8) * 0.6 + sin(t * 0.3) * 0.4;
int posX = 48 + (int)(waveX * 48); // 横向范围大约 0~96
float waveY = cos(t * 0.7) * 0.6 + sin(t * 0.4) * 0.4;
int posY = 16 + (int)(waveY * 16); // 纵向范围大约 0~32
// ======== 第二步:15% 概率在章鱼嘴边生成一个新泡泡(降低概率节省计算资源)========
if (random(100) < 15) {
for (int i = 0; i < MAX_BUBBLES; i++) {
if (!bubbles[i].active) {
bubbles[i].active = true;
bubbles[i].x = posX + 16 + random(-6, 6); // 嘴部附近随机偏移
bubbles[i].y = posY + 24 + random(0, 4);
bubbles[i].radius = random(15, 30) / 10.0; // 1.5~3.0 像素
bubbles[i].speedY = random(10, 20) / 10.0; // 上浮速度随机
bubbles[i].wobble = random(0, 100) / 10.0; // 摇摆相位随机
break; // 一帧只生成一个
}
}
}
// ======== 第三步:清空缓冲区,开始绘制 ========
u8g2.clearBuffer();
// 绘制章鱼本体(XBM 点阵图)
u8g2.drawXBMP(posX, posY, SPRITE_SIZE, SPRITE_SIZE, animation_frames[currentFrame]);
// ======== 第四步:更新并绘制所有存活的泡泡 ========
for (int i = 0; i < MAX_BUBBLES; i++) {
if (bubbles[i].active) {
bubbles[i].y -= bubbles[i].speedY; // 往上浮
// 配合时间轴做左右摇摆,像真水里的气泡
float currentX = bubbles[i].x + sin(t * 3.0 + bubbles[i].wobble) * 3.0;
// 泡泡逐帧缩小,模拟越飘越淡最后消失
bubbles[i].radius -= 0.05;
// 半径太小或飘出屏幕顶部 → 回收这个泡泡
if (bubbles[i].radius <= 0.5 || bubbles[i].y < -5) {
bubbles[i].active = false;
} else {
// 画空心圆——比实心圆更像真实气泡
u8g2.drawCircle((int)currentX, (int)bubbles[i].y, (int)bubbles[i].radius);
}
}
}
// 第五步:把缓冲区内容一次性推送到屏幕
u8g2.sendBuffer();
// 切换到下一帧
currentFrame = (currentFrame + 1) % TOTAL_FRAMES;
}
}
 0
0 0
0 0
0 qq空间
qq空间  微博
微博  复制链接
复制链接 更多相关项目
猜你喜欢
评论/提问(已发布 0 条)