基于 UniApp + Vue3 小程序 实现滑动/点击 筛选数据过滤器
 0
0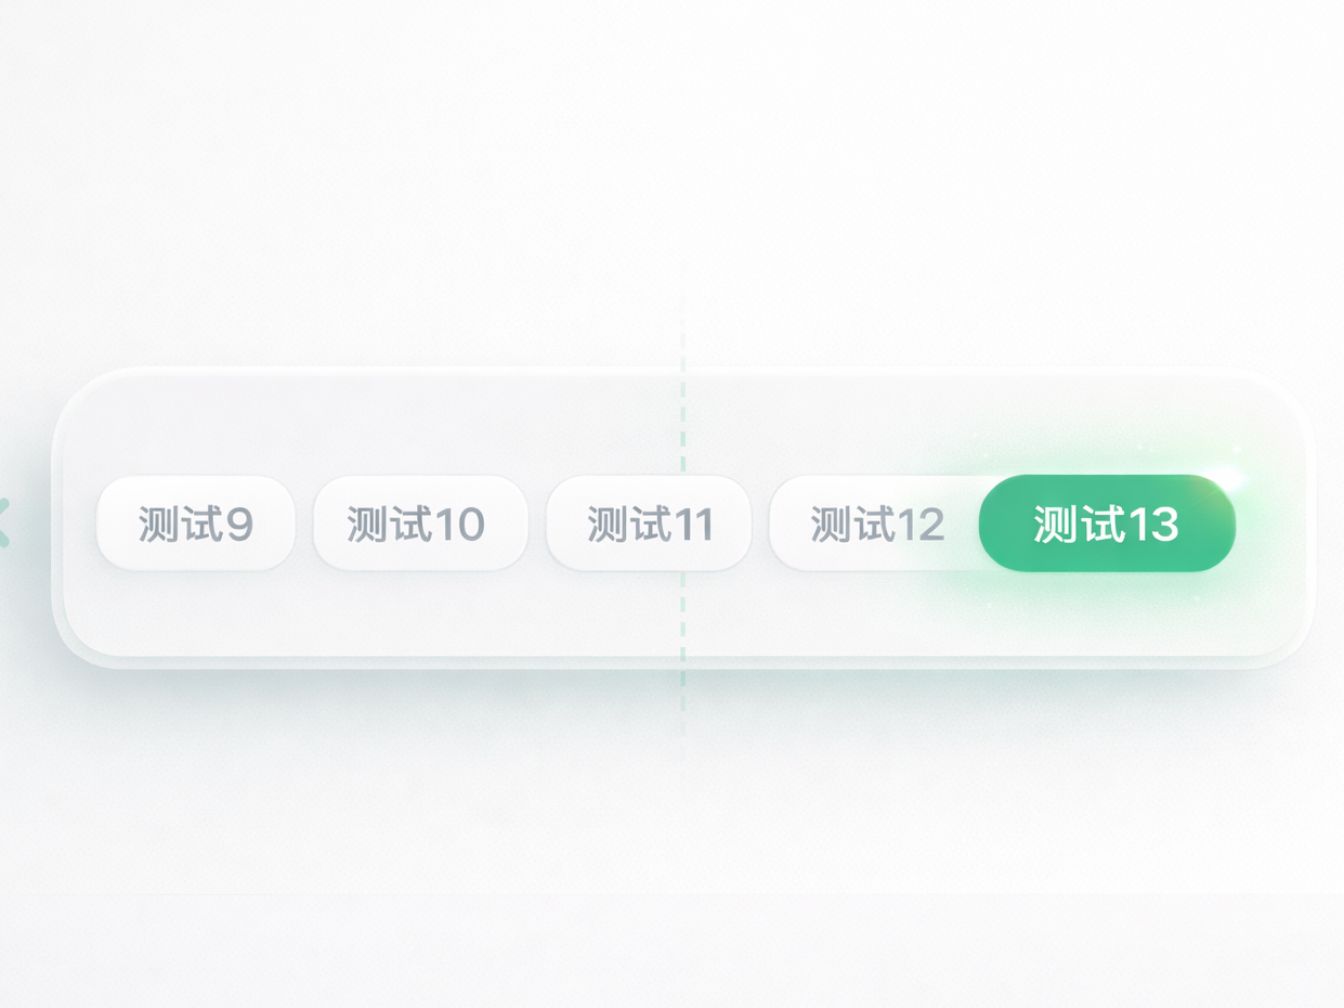
我在网上查找只有步进器也就是点击按钮直接切换页面的,我现在的需求是点击按钮触发点击事件再进行查询数据。
这种模式相比传统的“点击即切换”,多了一层数据驱动的逻辑,也更贴近真实业务。但与此同时,也会带来一些问题,比如如何在点击与请求之间做好衔接,如何避免界面卡顿,以及在滚动标签场景下,如何保证选中项依然能够平滑居中。
本文基于 UniApp 和 Vue3,实现一个既能响应点击事件、又能结合接口请求动态更新数据的标签切换组件,同时兼顾交互体验,让选中项始终保持居中,整体效果更加自然流畅。
1
创建组件


12
如图所示创建一个组件 我的组件叫switcher
2
传参的获取

由于 我们外部传输进来肯定是一个数据数组 但是每个数组又是多样性的 但是我们不可能说把这个数组再额外转化为固定格式 所以我就用以下方法
外部传入进来数组 展示字段的字段名 字段值的字段名 然后用item[valueKey]这种方法进行获取
组件代码如下
<script setup lang="ts">
defineProps<{
list: Array<any>
// 展示的字段
labelKey: string
// 对应数据的值的字段
valueKey: string
}>()
const model = defineModel()
/**
* 选择标签
*/
const switchTag = (value: any) => {
model.value = value
}
</script>
<template>
<scroll-view scroll-x scroll-with-animation class="switcher-scroll">
<view class="switcher-box">
<view v-for="(item, index) in list" :key="index" :id="'switch-item-' + index" @click="switchTag(item[valueKey])" :class="[
'switcher-tag',
item[valueKey] === model
? 'switcher-tag-selected'
: 'switcher-tag-unselect'
]">
{{ item[labelKey] }}
</view>
</view>
</scroll-view>
</template>
<style lang="scss" scoped>
// 横向内容(被撑开)
.switcher-box {
display: inline-flex;
align-items: center;
gap: 10rpx;
}
// 标签
.switcher-tag {
border-radius: 24rpx;
padding: 10rpx 32rpx;
white-space: nowrap;
}
// 选中
.switcher-tag-selected {
background-color: #00c951;
color: white;
font-weight: 500;
font-size: 28rpx;
}
// 未选中
.switcher-tag-unselect {
background-color: white;
color: $color-gray-600;
font-weight: 500;
font-size: 28rpx;
border: 1px solid #ebe6e7;
}
</style>
使用代码如下 效果如图
<script setup lang="ts">
import Switcher from '@/components/Switcher.vue';
import { ref } from 'vue';
const list = [{name:'测试1',value:'123'},{name:'测试2',value:'444'},{name:'测试3',value:'555'}]
const model = ref('')
</script>
<template>
<view style="margin-top: 50px;">
<Switcher :list="list" labelKey="name" valueKey="value" v-model="model"/>
<text>值为:{{model}}</text>
</view>
</template>
<style lang="scss">
</style>
3
滚动效果

但是现在我们还又一个缺陷 就是如果数据多了我们点击一下很干涩 我想要一个点击把点击的属性滚动居中的效果 这时候就需要用到 scroll-view 的 scroll-left 属性 scroll-left 的作用可以理解为滚动条滚动的距离
完整代码如下
switchClick 是一个点击的回掉 因为我们在实际的开发中总是需要一些点击之后触发一些效果的
scrollLeft 是当前偏移的距离
(item.left - scrollView.left) 是当前点击元素距离最左侧的距离 也就是index为0的位置的距离
scrollView.width 是数据展示部分可预览的宽度
item.width 是点击属性的标签宽度 如图所示
如果不减去 - scrollView.width / 2 + item.width / 2 那么滚动条就会在可视部分最前面不会居中
<script setup lang="ts">
import { ref, getCurrentInstance } from 'vue'
defineProps<{
list: Array<any>
labelKey: string
valueKey: string
}>()
const model = defineModel()
const emits = defineEmits(['switchClick'])
// 滚动位置
const scrollLeft = ref<number>(0)
// 当前实例(用于 query in)
const instance = getCurrentInstance()
/**
* 计算滚动居中位置
*/
const calcScrollCenter = (index: number) => {
return new Promise<number>((resolve) => {
const query = uni.createSelectorQuery().in(instance)
query.select('.switcher-scroll').boundingClientRect()
query.select(`#switch-item-${index}`).boundingClientRect()
query.exec((res) => {
// 滚动容器参数
const scrollView = res[0]
// 切换标签参数
const item = res[1]
// 计算滚动条的偏移值
let left =
scrollLeft.value +
(item.left - scrollView.left) -
scrollView.width / 2 +
item.width / 2
resolve(Math.max(0, left))
})
})
}
/**
* 选择标签
*/
const switchTag = async (value: any, index: number) => {
model.value = value
emits('switchClick', value)
scrollLeft.value = await calcScrollCenter(index)
}
</script>
<template>
<scroll-view scroll-x scroll-with-animation :scroll-left="scrollLeft" class="switcher-scroll">
<view class="switcher-box">
<view v-for="(item, index) in list" :key="index" :id="'switch-item-' + index"
@click="switchTag(item[valueKey], index)" :class="[
'switcher-tag',
item[valueKey] === model
? 'switcher-tag-selected'
: 'switcher-tag-unselect'
]">
{{ item[labelKey] }}
</view>
</view>
</scroll-view>
</template>
<style lang="scss">
// 横向内容(被撑开)
.switcher-box {
display: inline-flex;
align-items: center;
gap: 10rpx;
}
// 标签
.switcher-tag {
border-radius: 24rpx;
padding: 10rpx 32rpx;
white-space: nowrap;
}
// 选中
.switcher-tag-selected {
background-color: $color-emerald-500;
color: white;
font-weight: 500;
font-size: 28rpx;
}
// 未选中
.switcher-tag-unselect {
background-color: white;
color: $color-gray-600;
font-weight: 500;
font-size: 28rpx;
border: 1px solid $color-gray-200;
}
</style>
4
效果演示
12
使用代码如下
<script setup lang="ts">
import Switcher from '@/components/Switcher.vue';
import { ref } from 'vue';
const list = ref([
{ name: '测试1', value: '1' },
{ name: '测试2', value: '2' },
{ name: '测试3', value: '3' },
{ name: '测试4', value: '4' },
{ name: '测试5', value: '5' },
{ name: '测试6', value: '6' },
{ name: '测试7', value: '7' },
{ name: '测试8', value: '8' },
{ name: '测试9', value: '9' },
{ name: '测试10', value: '10' },
{ name: '测试11', value: '11' },
{ name: '测试12', value: '12' },
{ name: '测试13', value: '13' }])
const model = ref('')
const switchClick = (item: any) => {
uni.showToast({ title: item })
}
</script>
<template>
<view style="margin-top: 100px;">
<Switcher @switch-click="switchClick" :list="list" labelKey="name" valueKey="value" v-model="model" />
<text>值为:{{ model }}</text>
</view>
</template>
<style lang="scss"></style>
 0
0 0
0 0
0 qq空间
qq空间  微博
微博  复制链接
复制链接 更多相关项目
猜你喜欢
评论/提问(已发布 0 条)