Spring Boot+Vue 前后端分离实战:微光聊天室项目(个人资料页面实现)
 0
0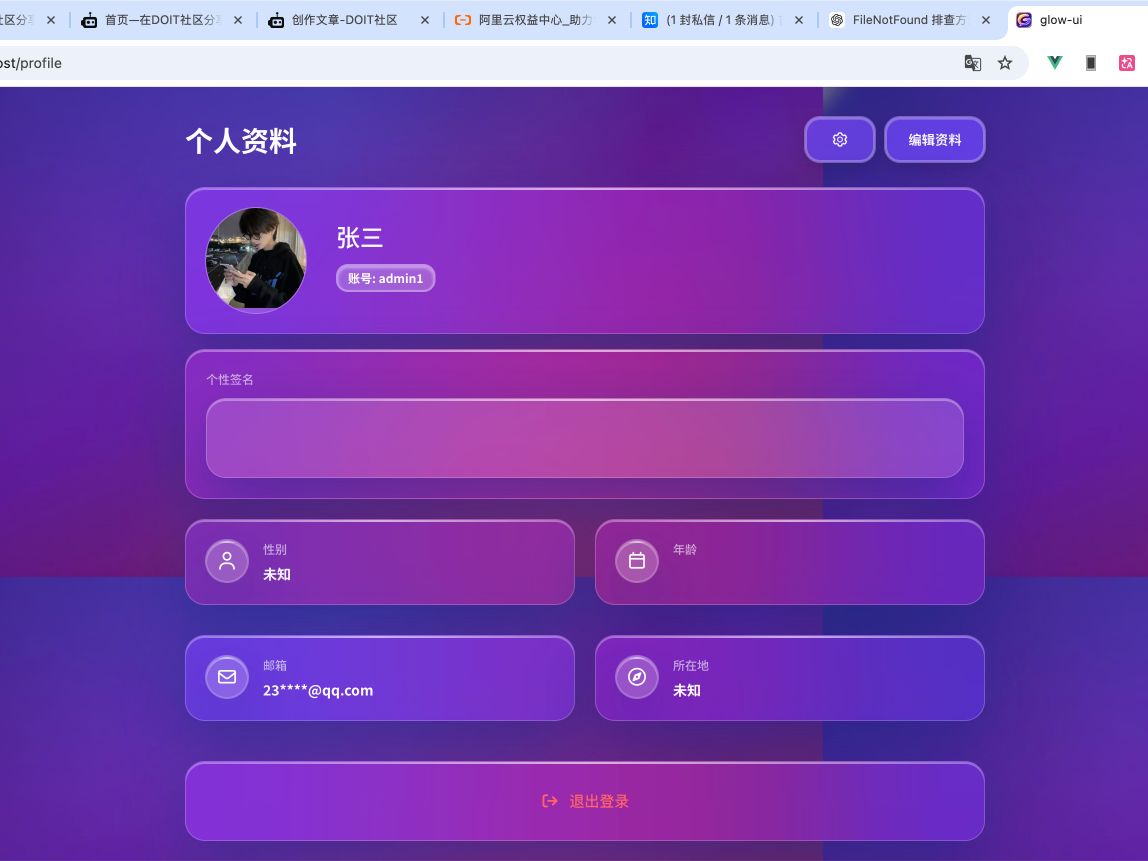
本文基于 Spring Boot + Vue 构建一个前后端分离的实战项目 ——「微光聊天室」,重点讲解个人资料页面的设计与实现过程。文章从接口设计、用户信息管理、头像上传、数据校验到前端页面交互逐步展开,完整演示一个真实业务模块的开发流程。通过本篇实战,你不仅可以掌握前后端协作开发的思路,还能学习常见用户系统功能的实现方式,为搭建完整的 Web 应用打下基础。
1
获取账号信息mapper


12
- 如图所示在登录模块新建一个mapper 里面添加如下代码 如图1所示
/**
* @author gjq
* @version 1.0
* @description: 登录账号相关mapper
* @date 2026/1/13 15:37
*/
public interface AccountMapper {
/**
* 根据用户id查询账号资料
*
* @param id 用户id
* @return 账号资料
*/
UserProfileVO findAccountProfileById(@Param("id") Long id);
}
- 然后我们在resources下面新建一个xml 如图2所示 然后编写相关的service 内容如下 如图3 下面这段代码我们简单说一下邮箱哪里相当于我们进行了一个脱敏的处理然后注册日期我们进行了一个格式的改变 其他的是正常的
<?xml version="1.0" encoding="UTF-8"?>
<!DOCTYPE mapper
PUBLIC "-//mybatis.org//DTD Mapper 3.0//EN"
"http://mybatis.org/dtd/mybatis-3-mapper.dtd">
<mapper namespace="com.glow.login.mapper.AccountMapper">
<resultMap id="AccountProfileMap" type="com.glow.login.vo.UserProfileVO">
<id property="id" column="id" jdbcType="BIGINT"/>
<result property="avatar" column="avatar" jdbcType="VARCHAR"/>
<result property="username" column="username" jdbcType="VARCHAR"/>
<result property="nickname" column="nickname" jdbcType="VARCHAR"/>
<result property="gender" column="gender" jdbcType="CHAR"/>
<result property="introduction" column="introduction" jdbcType="VARCHAR"/>
<result property="email" column="email" jdbcType="VARCHAR"/>
<result property="age" column="age" jdbcType="VARCHAR"/>
<result property="age" column="age" jdbcType="VARCHAR"/>
<result property="location" column="location" jdbcType="VARCHAR"/>
<result property="registerTime" column="register_time" jdbcType="VARCHAR"/>
</resultMap>
<!-- 查询用户的账号资料根据id -->
<select id="findAccountProfileById" resultMap="AccountProfileMap">
select ui.id as id,
ui.avatar as avatar,
ui.username as username,
ui.nickname as nickname,
ui.introduction as introduction,
CONCAT(
LEFT(ui.email, 2),
'****',
SUBSTRING(ui.email, LOCATE('@', email))
) as email,
ui.gender,
TIMESTAMPDIFF(YEAR, ui.birthday, CURDATE()) as age,
ui.location as location,
date_format(ui.create_time, '%Y年%m月%d日') as register_time
from user_info ui
where ui.id = #{id}
</select>
</mapper>
2
获取账号信息service


12
- 如图所示新建一个Account Service 以及他的实现类 然后写一个方法 叫做findAccountProfileById(Long id) 如图1所示
- 方法实现类的内容如下 他调用 mapper 层的 findAccountProfileById 如图2所示
3
获取当前账号信息接口

- 如图所示 在账号接口里编写以下代码 也就是调用我们的service方法
/**
* 获取当前登录用户的个人资料
*
* @return 用户资料
*/
@GetMapping("getLoginUserProfile")
public ApiResponse getLoginUserProfile() {
UserProfileVO profile = accountService.findAccountProfileById(SecurityUtil.getUserId());
return ApiResponse.success("查询成功",profile);
}
4
前端api方法

- 如图所示我们在前端api包里 的account.ts文件中添加以下代码 也就是我们刚刚写的接口调用
/**
* 查询登录用户信息
*/
export function getLoginUserProfile() {
return request({
url: '/account/getLoginUserProfile',
method: 'get'
})
}
5
个人资料页面路由

把如下代码添加到路由文件中 相当于访问profile就等于访问了views/profile/index.vue
{
path: '',
component: () => Layout,
children: [{
path: "/profile",
component: () => import('@/views/profile/index.vue'),
}]
},
6
编写vue页面


12
- 然后我们新建一个vue 文件 views/profile/index.vue 如图1所示
- 然后在该文件中添加以下代码 效果如图2所示 现在我们的个人资料展示页面就完成了
<script setup lang="ts">
import GlassBtn from "@/components/glass/GlassBtn.vue";
import {Gender, GenderLabel} from "@/types/user/enums/gender.ts";
import ProfileItem from "@/views/profile/components/ProfileItem.vue";
import notification from "@/components/notification/notification.ts";
import {type Ref, ref} from "vue";
import {getLoginUserProfile} from "@/api/account/account.ts";
import type {LoginUserProfile} from "@/types/account/profile.ts";
import {logout} from "@/api/auth/login.ts";
import router from "@/router";
// 用户资料
let userProfile: Ref<LoginUserProfile> = ref({
id: undefined,
nickname: "",
avatar: "",
username: "",
introduction: "",
email: "",
gender: Gender.UNKNOWN,
registerTime: "",
age: "",
location: ""
}
);
/**
* 退出登录
*/
const logOut = () => {
// 提示是否要退出登录
if (confirm("您确定要退出登录吗")) {
// 退出登录
logout().then(response => {
if (response.code == 200) {
notification.success({message: "退出登录成功"})
router.push({path: "/login"})
}
})
}
}
/**
* 查询用户资料
*/
const findUserProfile = () => {
getLoginUserProfile().then(response => {
if (response.code == 200) {
userProfile.value = response.data;
}
})
}
/**
* 复制按钮
*/
const copyUsername = () => {
navigator.clipboard.writeText(userProfile.value.username);
notification.success({message: "账号复制成功"})
}
findUserProfile()
</script>
<template>
<div class="profile-box">
<div class="profile-header">
<span class="profile-header-title">个人资料</span>
<div class="profile-header-function">
<glass-btn class="profile-header-settingBtn">
<img src="@/assets/images/commons/setting.png" alt="设置"/>
</glass-btn>
<glass-btn class="profile-header-editBtn" @click="router.push({path:'/profile/edit'})">
编辑资料
</glass-btn>
</div>
</div>
<div class="glass-card profile-account-box" :title="`加入于${userProfile.registerTime}`">
<div class="profile-avatar glass-container">
<img alt="头像" class="" src="@/assets/images/avatar.png">
</div>
<div class="profile-account">
<div class="profile-nickname" :title="userProfile.nickname">张三</div>
<div class="profile-username glass-badge" @click="copyUsername">
账号: {{ userProfile.username }}
</div>
</div>
</div>
<div class="glass-card profile-item-introduction">
<label class="profile-introduction-subtitle">个性签名</label>
<div class="glass-card profile-introduction-content">
{{ userProfile.introduction }}
</div>
</div>
<div class="profile-subitem-box">
<ProfileItem title="性别" :value="GenderLabel[userProfile.gender]" icon="fa-user"/>
<ProfileItem title="年龄" :value="userProfile.age" icon="fa-calendar"/>
<ProfileItem title="邮箱" :value="userProfile.email" icon="fa-envelope"/>
<ProfileItem title="所在地" :value="userProfile.location" icon="fa-compass"/>
</div>
<button class="profile-exit-btn glass-card" @click="logOut">
<i class="fa-solid fa-arrow-right-from-bracket"></i>
退出登录
</button>
</div>
</template>
<style scoped lang="scss">
.profile-box {
margin: 0 auto;
width: 90%;
max-width: 800px;
display: flex;
flex-direction: column;
gap: 15px;
}
// 个人资料的头部
.profile-header {
margin-top: 30px;
margin-bottom: 10px;
display: flex;
align-items: center;
}
// 个人资料的标题
.profile-header-title {
font-weight: 700;
font-size: 28px;
color: white;
}
// 个人资料的头部功能部分
.profile-header-function {
margin-left: auto;
display: flex;
gap: 10px;
}
// 设置按钮样式
.profile-header-settingBtn {
height: 45px;
width: 70px;
& > img {
width: 20px;
}
}
// 编辑资料按钮样式
.profile-header-editBtn {
height: 45px;
width: 100px;
}
// 账号的边框
.profile-account-box {
gap: 10px;
display: flex;
padding: 20px;
}
// 个人资料的头像部分
.profile-avatar {
margin-right: 20px;
border-radius: 50%;
overflow: hidden;
width: 100px;
& > img {
width: 100%;
}
}
// 个人资料的账号信息部分
.profile-account {
flex: 1;
min-width: 0;
padding-top: 10px;
gap: 10px;
display: flex;
flex-direction: column;
justify-content: flex-start;
align-items: flex-start;
color: white;
font-weight: 500;
overflow: hidden;
}
// 个人资料的昵称部分
.profile-nickname {
max-width: 100%;
font-size: 24px;
overflow: hidden;
white-space: nowrap;
text-overflow: ellipsis;
}
// 个人资料的账号
.profile-username {
font-size: 12px;
max-width: 100%;
}
// 个人信息的简介部分
.profile-item-introduction {
gap: 10px;
display: flex;
padding: 20px;
flex-direction: column;
}
.profile-introduction-subtitle {
color: rgb(255, 255, 255, 0.6);
font-size: 12px;
font-weight: 500;
}
// 个人简介
.profile-introduction-content {
color: white;
font-weight: 500;
font-size: 14px;
min-height: 80px;
}
.profile-subitem-box {
display: flex;
gap: 20px;
flex-wrap: wrap;
}
// 每个子元素样式
.profile-subitem-box > div {
margin: 5px 0;
flex: 0 0 calc(50% - 10px);
}
// 退出登录按钮
.profile-exit-btn {
gap: 10px;
display: flex;
align-items: center;
justify-content: center;
font-size: 15px;
margin-top: 20px;
height: 80px;
font-weight: 500;
color: oklch(70% 0.191 22.216);
transition: all .3s;
}
// 退出登录按钮鼠标悬浮样式
.profile-exit-btn:hover {
transform: translateY(-3px);
color: oklch(85% 0.191 22.216);
}
</style>
7
功能演示

12
功能演示如图和视频 完整代码放附件了 有问题可以私聊我
glow-ui.zip
1.30MB
glow-chat.zip
217.83KB
 0
0 0
0 0
0 qq空间
qq空间  微博
微博  复制链接
复制链接 更多相关项目
猜你喜欢
评论/提问(已发布 0 条)