ESP8266 网络时钟教程:OLED 显示 + NTP 自动对时
 0
0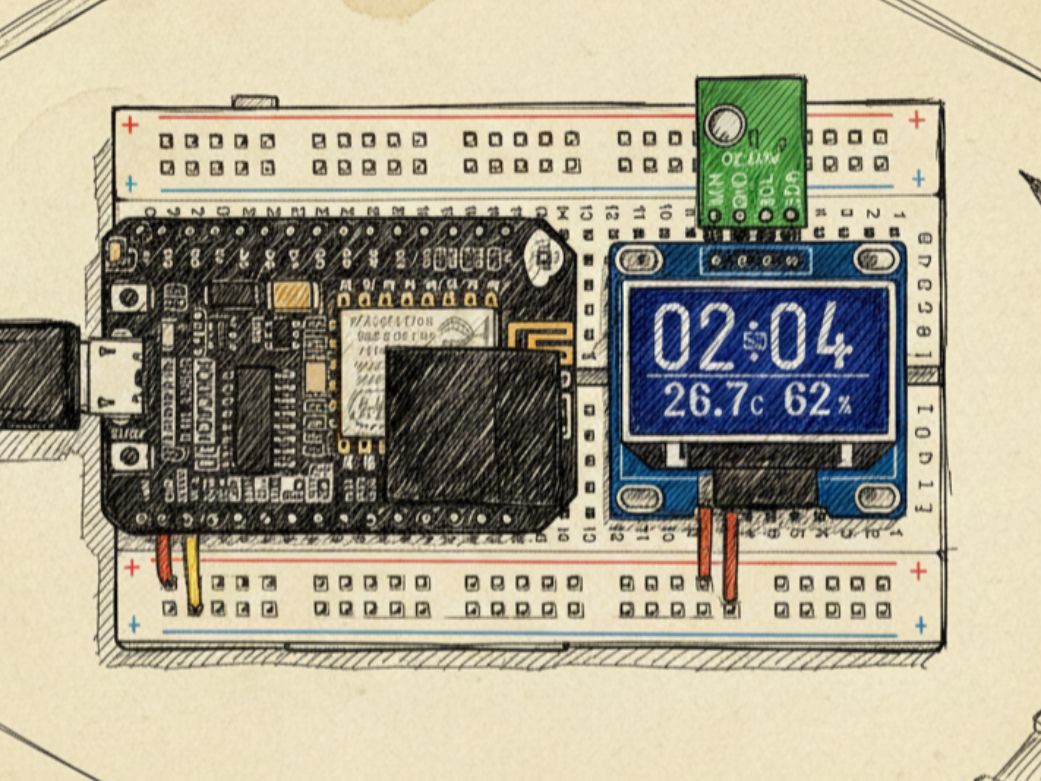
本文详细介绍如何使用 ESP8266 搭建一个高精度网络时钟,通过 Wi-Fi 连接 NTP 服务器自动同步时间,彻底解决断电后时间重置的问题。项目采用 SSD1306 OLED 屏幕显示时分秒、日期及中文星期,针对 U8G2 字库缺失的“星”“六”等汉字,巧妙使用 XBM 位图补全。代码结构清晰,仅需修改 Wi-Fi 账号密码即可运行,适合物联网初学者快速上手,兼具实用性与可扩展性。
准备工作:
材料:
材料名称
数量
备注
ESP8266
1
OLED
1
1
测试

#include <U8g2lib.h>
// OLED 初始化(SSD1306,128x64,硬件 I2C,旋转180度)
U8G2_SSD1306_128X64_NONAME_F_HW_I2C u8g2(U8G2_R2, U8X8_PIN_NONE, /* clock=*/4, /* data=*/0);
// “星”字的 16x16 XBM 位图数据(低位在前,按列存储)
const unsigned char xing[] U8X8_PROGMEM = {
0x00, 0x00, 0xF8, 0x0F, 0x08, 0x08, 0xF8, 0x0F, 0x08, 0x08, 0xF8, 0x0F,
0x80, 0x00, 0x88, 0x00, 0xF8, 0x1F, 0x84, 0x00, 0x82, 0x00, 0xF8, 0x0F,
0x80, 0x00, 0x80, 0x00, 0xFE, 0x3F, 0x00, 0x00
};
// “六”字的 16x16 XBM 位图数据
const unsigned char liu[] U8X8_PROGMEM = {
0x40, 0x00, 0x80, 0x00, 0x00, 0x01, 0x00, 0x01, 0x00, 0x00, 0xFF, 0x7F,
0x00, 0x00, 0x00, 0x00, 0x20, 0x02, 0x20, 0x04, 0x10, 0x08, 0x10, 0x10,
0x08, 0x10, 0x04, 0x20, 0x02, 0x20, 0x00, 0x00
};
// 星期汉字显示位置常量(便于调整布局)
#define WEEKDAY_X_START 80 // “星”的起始 X 坐标
#define WEEKDAY_Y_BASE 49 // 汉字图像的 Y 坐标(顶部)
#define CHAR_SPACING 16 // 每个汉字宽度(16像素)
void setup() {
// OLED 供电控制(根据你的硬件接线)
pinMode(16, OUTPUT);
digitalWrite(16, HIGH); // VDD 使能
pinMode(5, OUTPUT);
digitalWrite(5, LOW); // GND 控制(某些模块需要)
Serial.begin(115200); // 可选:用于调试
u8g2.begin(); // 初始化 OLED
u8g2.enableUTF8Print(); // 启用 UTF-8 支持(用于显示“期”等已有中文字)
oledClockDisplay(); // 首次绘制时钟界面
}
void loop() {
// 静态显示,无需循环刷新
}
/**
* @brief 绘制静态时钟界面,包含时间、日期和“星期六”
*
* 由于 U8G2 内置中文字库不包含“星”和“六”,
* 因此使用 drawXBM 手动绘制这两个字的位图。
*/
void oledClockDisplay() {
u8g2.clearBuffer(); // 清空绘图缓冲区
// 显示时间 "18:56"(大号字体)
u8g2.setFont(u8g2_font_logisoso42_tr); // 42号数字字体
u8g2.setCursor(0, 47);
u8g2.print("18:56");
// 显示秒数 "34"(小号中文字体)
u8g2.setFont(u8g2_font_unifont_t_chinese2);
u8g2.setCursor(54, 35);
u8g2.print("34");
// 显示日期 "2023/04/01"
u8g2.setCursor(0, 64);
u8g2.print("2023/04/01");
// 手动绘制“星期六”:
// - “星”:XBM 位图
u8g2.drawXBM(WEEKDAY_X_START, WEEKDAY_Y_BASE, 16, 16, xing);
// - “期”:使用内置字库(已支持)
u8g2.setCursor(WEEKDAY_X_START + CHAR_SPACING, WEEKDAY_Y_BASE + 14); // Y+14 对齐基线
u8g2.print("期");
// - “六”:XBM 位图
u8g2.drawXBM(WEEKDAY_X_START + 2 * CHAR_SPACING, WEEKDAY_Y_BASE, 16, 16, liu);
u8g2.sendBuffer(); // 将缓冲区内容推送到 OLED 显示
}
2
时间走动

#include <U8g2lib.h>
#include <TimeLib.h>
// 初始化 OLED 显示器 (SSD1306, 128x64, 硬件 I2C, 旋转180度)
U8G2_SSD1306_128X64_NONAME_F_HW_I2C u8g2(U8G2_R2, /* reset=*/ U8X8_PIN_NONE, /* clock=*/ 4, /* data=*/ 0);
// "星"字的 16x16 XBM 位图数据
const unsigned char xing[] U8X8_PROGMEM = { ... }; // 同你之前定义
// "六"字的 16x16 XBM 位图数据
const unsigned char liu[] U8X8_PROGMEM = { ... }; // 同你之前定义
time_t currentDisplayTime = 0; // 当前显示时间
void setup(){
pinMode(16, OUTPUT); digitalWrite(16, HIGH); // OLED供电
pinMode(5, OUTPUT); digitalWrite(5, LOW); // OLED供电
Serial.begin(115200);
u8g2.begin();
setSyncProvider(getTeensy3Time); // 如果有外部时钟源可以同步时间,否则默认从1970开始计时
oledClockDisplay(); // 初始显示
}
void loop(){
if (now() != currentDisplayTime){
currentDisplayTime = now();
oledClockDisplay();
}
}
/**
* @brief 更新 OLED 屏幕上显示的时间和日期信息
*/
void oledClockDisplay(){
int years = year();
int months = month();
int days = day();
int hours = hour();
int minutes = minute();
int seconds = second();
int weekdays = weekday();
// 构建时间字符串
String currentTime = formatTwoDigits(hours) + ":" + formatTwoDigits(minutes);
// 秒数单独处理
String secondsStr = formatTwoDigits(seconds);
// 构建日期字符串
String currentDate = String(years) + "/" + formatTwoDigits(months) + "/" + formatTwoDigits(days);
// 打印调试信息到串口监视器
Serial.printf("%d/%d/%d %d:%d:%d Weekday:%d\n", years, months, days, hours, minutes, seconds, weekdays);
// OLED 清屏并设置内容
u8g2.clearBuffer();
u8g2.setCursor(0, 47);
u8g2.setFont(u8g2_font_logisoso42_tr); // 使用大字体显示时间
u8g2.print(currentTime);
// 小字体显示秒数
u8g2.setCursor(54, 35);
u8g2.setFont(u8g2_font_unifont_t_chinese2);
u8g2.print(secondsStr);
// 设置日期位置
u8g2.setCursor(0, 64);
u8g2.setFont(u8g2_font_unifont_t_chinese2);
u8g2.print(currentDate);
// 星期几显示
u8g2.drawXBM(80, 49, 16, 16, xing); // 固定显示“星”
u8g2.setCursor(95, 63);
u8g2.print("期"); // 固定显示“期”
switch(weekdays){
case 1: // 星期日
u8g2.print("日");
break;
case 2: // 星期一至星期五
case 3:
case 4:
case 5:
case 6:
u8g2.print(String(weekdays - 1, DEC)); // 数字表示星期几
break;
case 7: // 星期六
u8g2.drawXBM(111, 49, 16, 16, liu); // 显示“六”的XBM图像
break;
}
u8g2.sendBuffer(); // 更新显示
}
/**
* @brief 格式化数字为两位字符,不足前面补零
* @param num 需要格式化的整数
* @return 格式化后的字符串
*/
String formatTwoDigits(int num){
if(num < 10){
return "0" + String(num);
}
return String(num);
}
3
时钟对时

利用 __TIME__ 这个编译期常量,可以把 PC 的当前时间“固化”到 ESP8266 中。这样一来,时钟跑起来一秒不差,看起来还挺像那么回事儿!
不过要注意:千万别掉电——因为一旦断电重启,时间就会“穿越”回你上次编译代码的那一刻。
不信?拔掉 USB 线再插回去试试看,你会发现“未来”的时间突然倒流了!
#include <U8g2lib.h>
#include <TimeLib.h>
// OLED 初始化(SSD1306 128x64,硬件 I2C,旋转180度)
U8G2_SSD1306_128X64_NONAME_F_HW_I2C u8g2(U8G2_R2, U8X8_PIN_NONE, /* clock=*/4, /* data=*/0);
// “星”和“六”的 16x16 XBM 位图(保持不变)
const unsigned char xing[] U8X8_PROGMEM = {
0x00, 0x00, 0xF8, 0x0F, 0x08, 0x08, 0xF8, 0x0F, 0x08, 0x08, 0xF8, 0x0F,
0x80, 0x00, 0x88, 0x00, 0xF8, 0x1F, 0x84, 0x00, 0x82, 0x00, 0xF8, 0x0F,
0x80, 0x00, 0x80, 0x00, 0xFE, 0x3F, 0x00, 0x00
};
const unsigned char liu[] U8X8_PROGMEM = {
0x40, 0x00, 0x80, 0x00, 0x00, 0x01, 0x00, 0x01, 0x00, 0x00, 0xFF, 0x7F,
0x00, 0x00, 0x00, 0x00, 0x20, 0x02, 0x20, 0x04, 0x10, 0x08, 0x10, 0x10,
0x08, 0x10, 0x04, 0x20, 0x02, 0x20, 0x00, 0x00
};
// 全局变量:记录上次显示的时间戳,避免重复刷新
time_t currentDisplayTime = 0;
/* ============================================================================
* 自定义 mktime 函数(基于 Linux 算法)
* 注意:year 必须是完整年份(如 2023),不是 23
* 返回自 1970-01-01 00:00:00 UTC 起的秒数(即 Unix Epoch Time)
* ============================================================================
*/
time_t my_mktime(int year, int mon, int day, int hour, int min, int sec) {
if (mon <= 0 || mon > 12) return 0; // 安全检查
if (mon <= 2) {
mon += 12;
year -= 1;
}
// 核心公式(来自 Linux 内核)
unsigned long days = (
(unsigned long)(year / 4 - year / 100 + year / 400)
+ 365UL * year
+ (367UL * mon) / 12
+ day
- 719499UL // 偏移量,使 1970-01-01 对应 0
);
return ((days * 24UL + hour) * 60 + min) * 60 + sec;
}
/* ============================================================================
* 从 __DATE__ 字符串解析年、月、日
* __DATE__ 格式示例: "Apr 19 2023"
* ============================================================================
*/
void parseCompileDate(int &yy, int &mm, int &dd) {
const char* date_str = __DATE__; // 编译时生成的字符串
// 解析月份
const char* months[] = {"Jan", "Feb", "Mar", "Apr", "May", "Jun",
"Jul", "Aug", "Sep", "Oct", "Nov", "Dec"};
mm = 0;
for (int i = 0; i < 12; i++) {
if (strncmp(date_str, months[i], 3) == 0) {
mm = i + 1;
break;
}
}
// 解析日(跳过空格)
dd = atoi(date_str + 4);
// 解析年
yy = atoi(date_str + 7);
}
/* ============================================================================
* 从 __TIME__ 字符串解析时、分、秒
* __TIME__ 格式: "HH:MM:SS"
* ============================================================================
*/
void parseCompileTime(int &hh, int &mm, int &ss) {
const char* time_str = __TIME__;
hh = (time_str[0] - '0') * 10 + (time_str[1] - '0');
mm = (time_str[3] - '0') * 10 + (time_str[4] - '0');
ss = (time_str[6] - '0') * 10 + (time_str[7] - '0');
}
void setup() {
pinMode(16, OUTPUT); digitalWrite(16, HIGH); // OLED VCC
pinMode(5, OUTPUT); digitalWrite(5, LOW); // OLED GND(部分模块需要)
Serial.begin(115200);
u8g2.begin();
u8g2.enableUTF8Print(); // 启用 UTF-8 支持中文
// === 从编译时间自动初始化系统时间 ===
int yy, mm, dd, HH, MM, SS;
parseCompileDate(yy, mm, dd);
parseCompileTime(HH, MM, SS);
// 使用自定义 mktime 计算 Epoch 时间
time_t compileEpoch = my_mktime(yy, mm, dd, HH, MM, SS);
setTime(compileEpoch); // 设置 TimeLib 的内部时间
Serial.printf("Clock initialized to compile time: %d-%02d-%02d %02d:%02d:%02d\n",
yy, mm, dd, HH, MM, SS);
Serial.printf("Epoch: %lu\n", compileEpoch);
oledClockDisplay(); // 首次显示
}
void loop() {
time_t nowTime = now();
if (nowTime != currentDisplayTime) {
currentDisplayTime = nowTime;
oledClockDisplay();
}
}
/* ============================================================================
* 绘制时钟界面到 OLED
* ============================================================================
*/
void oledClockDisplay() {
int years = year();
int months = month();
int days = day();
int hours = hour();
int minutes = minute();
int seconds = second();
int wd = weekday(); // 1=Sun, 2=Mon, ..., 7=Sat
// 格式化时间字符串(带前导零)
String timeStr = (hours < 10 ? "0" : "") + String(hours) + ":" +
(minutes < 10 ? "0" : "") + String(minutes);
String secStr = (seconds < 10 ? "0" : "") + String(seconds);
String dateStr = String(years) + "/" +
(months < 10 ? "0" : "") + String(months) + "/" +
(days < 10 ? "0" : "") + String(days);
// 串口调试输出
Serial.printf("%s %s Weekday:%d\n", dateStr.c_str(), timeStr.c_str(), wd);
// 绘制到 OLED
u8g2.clearBuffer();
u8g2.setFont(u8g2_font_logisoso42_tr);
u8g2.setCursor(0, 47);
u8g2.print(timeStr);
u8g2.setFont(u8g2_font_unifont_t_chinese2);
u8g2.setCursor(54, 35);
u8g2.print(secStr);
u8g2.setCursor(0, 64);
u8g2.print(dateStr);
// 显示“星期X”
u8g2.drawXBM(80, 49, 16, 16, xing); // “星”
u8g2.setCursor(95, 63);
u8g2.print("期"); // “期”
// 根据 weekday() 输出对应汉字
if (wd == 1) u8g2.print("日");
else if (wd == 2) u8g2.print("一");
else if (wd == 3) u8g2.print("二");
else if (wd == 4) u8g2.print("三");
else if (wd == 5) u8g2.print("四");
else if (wd == 6) u8g2.print("五");
else if (wd == 7) u8g2.drawXBM(111, 49, 16, 16, liu); // “六”
u8g2.sendBuffer();
}
4
网络对时

要实现断电后时间依然准确(即“不停摆”),传统做法是外接一个带备用电池的实时时钟模块,比如 DS1302 或 DS3231——就像电脑主板上的那颗 CR2032 纽扣电池,用来在断电时维持时间和 BIOS 设置。
但 ESP8266 不同:它自带 Wi-Fi,因此完全可以跳过硬件 RTC,直接从互联网获取精确时间。这也是为什么智能手机几乎从不需要手动设置时钟——它们默认通过网络自动校准。
这种机制依赖的是 NTP(Network Time Protocol,网络时间协议)。你只需连接 Wi-Fi,就能轻松同步全球标准时间。
在下面的代码中,你只需要修改这一行:
WiFi.begin("SSID", "PASSWORD");
填入你的无线网络名称和密码即可。
整段程序虽然包含几十行 OLED 显示代码、头文件引用和初始化操作,但核心逻辑其实非常简洁:
loop()中仅 3 行用于判断并更新时间;- 自定义函数
getNtpTime()里也仅有 2 行真正负责从网络获取时间
#include <U8g2lib.h>
#include <TimeLib.h>
#include <ESP8266WiFi.h>
#include <WiFiUdp.h>
#include <NTPClient.h>
// ==================== OLED 初始化 ====================
// 使用 SSD1306 128x64 OLED,硬件 I2C 接口,屏幕旋转 180°(U8G2_R2)
U8G2_SSD1306_128X64_NONAME_F_HW_I2C u8g2(U8G2_R2, U8X8_PIN_NONE, /* clock=*/4, /* data=*/0);
// ==================== NTP 客户端配置 ====================
WiFiUDP udp; // UDP 实例,用于 NTP 通信
// 使用阿里云 NTP 服务器(国内访问更快),也可用 "cn.pool.ntp.org"
NTPClient timeClient(udp, "ntp1.aliyun.com");
// ==================== 全局变量 ====================
time_t currentDisplayTime = 0; // 记录上次显示的时间戳,避免重复刷新
// ==================== 汉字 XBM 位图(因 U8G2 中文字库不全)====================
// “星”字 16x16 位图
const unsigned char xing[] U8X8_PROGMEM = {
0x00, 0x00, 0xF8, 0x0F, 0x08, 0x08, 0xF8, 0x0F, 0x08, 0x08, 0xF8, 0x0F,
0x80, 0x00, 0x88, 0x00, 0xF8, 0x1F, 0x84, 0x00, 0x82, 0x00, 0xF8, 0x0F,
0x80, 0x00, 0x80, 0x00, 0xFE, 0x3F, 0x00, 0x00
};
// “六”字 16x16 位图
const unsigned char liu[] U8X8_PROGMEM = {
0x40, 0x00, 0x80, 0x00, 0x00, 0x01, 0x00, 0x01, 0x00, 0x00, 0xFF, 0x7F,
0x00, 0x00, 0x00, 0x00, 0x20, 0x02, 0x20, 0x04, 0x10, 0x08, 0x10, 0x10,
0x08, 0x10, 0x04, 0x20, 0x02, 0x20, 0x00, 0x00
};
// ==================== setup:初始化系统 ====================
void setup() {
// OLED 供电控制(根据某些模块设计,需手动使能 VCC/GND)
pinMode(16, OUTPUT); digitalWrite(16, HIGH); // VCC
pinMode(5, OUTPUT); digitalWrite(5, LOW); // GND
Serial.begin(115200);
while (!Serial); // 等待串口监视器连接(可选)
u8g2.begin(); // 初始化 OLED
u8g2.enableUTF8Print(); // 启用 UTF-8 支持,以便显示“期”等已有中文字
// === 连接 Wi-Fi ===
WiFi.begin("SSID", "PASSWORD"); // ←←←【请在此处填写你的 Wi-Fi 名称和密码】
Serial.println("\n\nConnecting to Wi-Fi...");
while (WiFi.status() != WL_CONNECTED) {
delay(1000);
Serial.print(".");
}
Serial.println("\nWi-Fi connected! IP: " + WiFi.localIP().toString());
// === 初始化 NTP 客户端 ===
timeClient.begin(); // 启动 NTP 客户端(内部会自动选择端口)
// 注意:无需手动调用 udp.begin(),NTPClient 已处理
// 设置时间同步提供者(TimeLib 将定期调用 getNtpTime)
setSyncProvider(getNtpTime);
setSyncInterval(60); // 每 60 秒自动同步一次网络时间
}
// ==================== 主循环 ====================
void loop() {
// 仅当时间变化(秒级)时才刷新 OLED,避免无谓重绘
if (now() != currentDisplayTime) {
currentDisplayTime = now();
oledClockDisplay();
}
}
// ==================== 从 NTP 获取时间(供 TimeLib 调用)====================
time_t getNtpTime() {
Serial.print("Syncing NTP time... ");
// 尝试从 NTP 服务器更新时间
if (timeClient.update()) {
Serial.println("Success!");
// NTP 返回的是 UTC 时间,中国为 UTC+8,需加 8 小时(28800 秒)
return timeClient.getEpochTime() + 28800;
} else {
Serial.println("Failed!");
return 0; // 返回 0 表示同步失败,TimeLib 会继续使用本地计时
}
}
// ==================== OLED 显示函数 ====================
void oledClockDisplay() {
// 获取当前时间各部分
int years = year();
int months = month();
int days = day();
int hours = hour();
int minutes = minute();
int seconds = second();
int wd = weekday(); // 1=星期日, 2=星期一, ..., 7=星期六
// 调试输出到串口
Serial.printf("%04d/%02d/%02d %02d:%02d:%02d Weekday:%d\n",
years, months, days, hours, minutes, seconds, wd);
// 格式化时间字符串(带前导零)
String timeStr = (hours < 10 ? "0" : "") + String(hours) + ":" +
(minutes < 10 ? "0" : "") + String(minutes);
String secStr = (seconds < 10 ? "0" : "") + String(seconds);
String dateStr = String(years) + "/" +
(months < 10 ? "0" : "") + String(months) + "/" +
(days < 10 ? "0" : "") + String(days);
// 清屏并绘制内容
u8g2.clearBuffer();
// 显示主时间(大字体)
u8g2.setFont(u8g2_font_logisoso42_tr);
u8g2.setCursor(0, 47);
u8g2.print(timeStr);
// 显示秒数(小字体,位于冒号附近)
u8g2.setFont(u8g2_font_unifont_t_chinese2);
u8g2.setCursor(54, 35);
u8g2.print(secStr);
// 显示日期
u8g2.setCursor(0, 64);
u8g2.print(dateStr);
// 显示“星期X”
u8g2.drawXBM(80, 49, 16, 16, xing); // “星”
u8g2.setCursor(95, 63);
u8g2.print("期"); // “期”
// 根据星期几显示对应汉字
switch (wd) {
case 1: u8g2.print("日"); break;
case 2: u8g2.print("一"); break;
case 3: u8g2.print("二"); break;
case 4: u8g2.print("三"); break;
case 5: u8g2.print("四"); break;
case 6: u8g2.print("五"); break;
case 7: u8g2.drawXBM(111, 49, 16, 16, liu); // “六”用 XBM 图像
break;
}
u8g2.sendBuffer(); // 将缓冲区推送到 OLED 屏幕
}
5
成品

 0
0 0
0 0
0 qq空间
qq空间  微博
微博  复制链接
复制链接 更多相关项目
猜你喜欢
评论/提问(已发布 0 条)