基于Arduino嵌入式平台的自动垃圾桶
转载
原文链接: https://www.instructables.com/Automatic-Trash-Can-Using-Arduino-Based-Embedded-P/ 发布时间: 2025-08-25 16:28:44 |  0
0 0
0 0
0 0
0
0Arduino
垃圾桶
传感器
超声波
垃圾桶和垃圾管理可能会很麻烦。如果垃圾塞得满满的,那就更麻烦了。但是,当你靠近垃圾桶扔垃圾时,垃圾桶能够感知你的存在,并追踪垃圾的容量?这是否可行,是否智能,还是两者兼而有之?答案是两者兼而有之!
是时候动手,把家里的垃圾桶改造成智能垃圾桶了!只需要两个超声波传感器、一个伺服电机、你的老朋友Evive,再加上一些DIY技巧!准备好用这款独特的DIY智能垃圾桶,让家里的垃圾管理变得智能又简单了吗?那就赶紧行动起来吧!
准备工作:
材料:
- 垃圾桶
- 超声波传感器
- 金属伺服电机及配件
- 公对母跳线 20cm
1
检测感知

我们希望垃圾桶能够感知到我们已经接近垃圾桶并准备扔垃圾。
让我们首先赋予垃圾箱这种意义。
取一个超声波传感器并将其粘在垃圾箱的前面
2
打开盖子


12
当你靠近垃圾桶时,你希望桶盖能够自动打开。
为此,我们将使用伺服电机和线。
取出伺服电机并将其粘在箱子的后面。
将伺服喇叭安装到自由伺服头上。
现在用线将盖子系在伺服喇叭上。
3
检查垃圾箱中的物品数量

我们总是需要打开盖子来检查垃圾桶里的垃圾量。
为了使其自动感知并通知我们垃圾箱已装满的百分比,我们将使用另一个超声波传感器。
取出传感器并将其粘在垃圾箱盖下方。
除了伺服器和传感器与 evive 的连接外,组装几乎完成。
4
连接

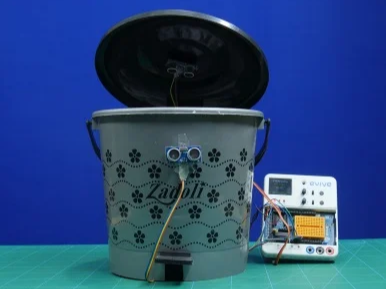
按照图中所示进行连接。
确保已将所有电线从箱子中拉出
5
工作

当你靠近垃圾桶时,第一个超声波传感器就会感应到你的存在,从而通知活动装置。
作为回应,伺服头会旋转,拉动线,从而打开垃圾桶盖。
盖子下方的超声波传感器会感应到垃圾量并向 evive 发出信号。evive 会在屏幕上显示垃圾百分比。
一旦垃圾量达到 90%,evive 就会发出内置蜂鸣器通知用户。
一旦达到90%,安装在垃圾桶前部的超声波传感器在靠近垃圾桶时就不会响应。
因此,垃圾桶不会打开,你肯定需要清理垃圾桶。
6
Arduino代码

要执行相同的功能,应将以下代码上传到 evive。
#include<evive.h>
#define trig1 2
#define echo1 3
#define trig2 4
#define echo2 5
#define servo_pin 44
#define lid_close 0
#define lid_open 80
#define buzz 46
#define ultrasonic_1_threshould 15
#define ultrasonic_2_threshould 3
long duration1;
long duration2;
int distance1;
int distance2;
int temp;
unsigned int counter=0;
unsigned int counter2 =0;
Servo myServo;
void setup() {
// put your setup code here, to run once:
Serial.begin(9600);
myServo.attach(44);
pinMode(trig1,OUTPUT);
pinMode(trig2,OUTPUT);
pinMode(echo1,INPUT);
pinMode(echo2,INPUT);
tft_init(INITR_GREENTAB);
tft.setRotation(1);
tft.fillScreen(1);
tft.setCursor(25,10);
tft.setTextSize(2);
tft.setTextColor(ST7735_WHITE,ST7735_BLACK);
tft.print("STEMpedia");
tft.setCursor(35,40);
tft.setTextSize(1.8);
tft.setTextColor(ST7735_GREEN,ST7735_BLACK);
tft.print("SMART DUSTBIN ");
tft.setCursor(30,60);
tft.setTextSize(1.8);
tft.setTextColor(ST7735_GREEN,ST7735_BLACK);
tft.print("DUSTBIN STATUS");
tft.setTextColor(ST7735_GREEN,ST7735_BLACK);
tft.setCursor(0,105);
tft.setTextSize(1.8);
tft.print("FOR MORE INFORMATION VISIT");
tft.setCursor(30,115);
tft.setTextColor(ST7735_WHITE,ST7735_BLACK);
tft.print("thestempedia.com");
}
void loop() {
// put your main code here, to run repeatedly:
distance1 = calculateDistance1();
distance2 = calculateDistance2();
Serial.print("distance1=");
Serial.println(distance1);
Serial.print("distance2=");
Serial.println(distance2);
Serial.println("---------------------------------------");
if(distance1<= ultrasonic_1_threshould)
{
counter2++;
if(counter2>3)
{
myServo.write(lid_open);
counter2=0;
delay(3000);
}
}
else
{
distance2 = constrain(distance2,0,19);
temp = map(distance2,0,19,100,0);
tft.setCursor(50,70);
tft.setTextSize(1.8);
tft.setTextColor(ST7735_WHITE,ST7735_BLACK);
tft.print(temp);
tft.print(" ");
tft.setCursor(65,70);
tft.print("% FULL");
myServo.write(lid_close);
}
if(distance2<=ultrasonic_2_threshould)
{
counter++;
if(counter>8)
{
while(distance2<=ultrasonic_2_threshould)
{
distance2 = calculateDistance2();
counter=0;
siren();
}
}
}
// else
// {
// distance2 = map(distance2,0,19,100,0);
// tft.setCursor(50,70);
// tft.setTextSize(1.8);
// tft.setTextColor(ST7735_WHITE,ST7735_BLACK);
// tft.print(distance2);
// tft.print(" ");
// tft.setCursor(65,70);
// tft.print("% FULL");
//
// myServo.write(lid_close);
//
// }
}
int calculateDistance1()
{
digitalWrite(trig1, LOW);
delayMicroseconds(2);
// Sets the trigPin on HIGH state for 10 micro seconds
digitalWrite(trig1, HIGH);
delayMicroseconds(10);
digitalWrite(trig1, LOW);
duration1 = pulseIn(echo1, HIGH); // Reads the echoPin, returns the sound wave travel time in microseconds
distance1= duration1*0.034/2;
return distance1;
}
int calculateDistance2()
{
digitalWrite(trig2, LOW);
delayMicroseconds(2);
// Sets the trigPin on HIGH state for 10 micro seconds
digitalWrite(trig2, HIGH);
delayMicroseconds(10);
digitalWrite(trig2, LOW);
duration2 = pulseIn(echo2, HIGH); // Reads the echoPin, returns the sound wave travel time in microseconds
distance2= duration2*0.034/2;
return distance2;
}
void siren()
{
for(int hz = 440; hz < 1000; hz+=25)
{
tone(buzz, hz, 50);
delay(5);
}
// Whoop down
for(int hz = 1000; hz > 440; hz-=25)
{
tone(buzz, hz, 50);
delay(5);
}
}
FBEIPRGJPSNZ2ND.ino
3.85KB
FCUOF23JPSNZ33A.zip
315.00KB
7
结论

有了这个,DIY 智能垃圾桶就可以帮助您管理垃圾并保持房屋清洁!
 0
0 0
0 0
0 qq空间
qq空间  微博
微博  复制链接
复制链接 更多相关项目
猜你喜欢
评论/提问(已发布 0 条)