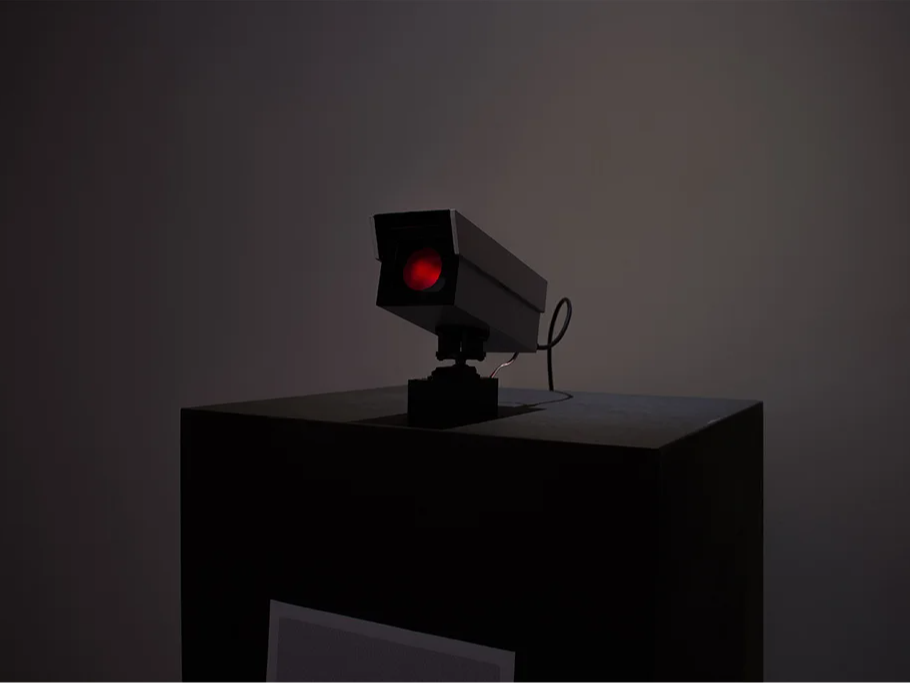
FLW-M3 监控摄像机

木易
转载
发布时间: 2025-07-25 15:11:15 | 阅读数 0收藏数 0评论数 0
封面
这里只是一个简单的指南,介绍如何使用 Arduino、P5.js 和 ML5.js 创建自己的“FLW-M3 监控摄像头”。 FLW-M3 监控摄像头是一款交互式安全摄像头装置,可主动跟踪路人。该装置使用 Arduino UNO 板、网络摄像头、伺服器和红色 LED,并结合 P5.js、P5 serial 等 JavaScript 库以及面向艺术家的机器学习库 ML5.js(特别是 PoseNet)。 最终,通过本教程,我希望您学会如何将 ML5.js 与物理组件以及许多其他东西(例如串行通信)一起使用!:)

准备工作:

材料:

材料名称
数量
备注
Arduino Uno
1
伺服器
1
视差标准伺服器
LED(红色)
1
220k电阻
1
电线
5
中密度纤维板4mm
底漆喷雾罐
1
白色喷漆
1
浅灰色喷漆
1
黑色喷漆
1
黑色太阳镜片
1
1

进行姿势估计

首先,我们要编写一个程序,识别人类并在其鼻子上放置一个点。目标是从该点获取水平 X 轴的数据,并将其发送到 Arduino。

让我们开始吧!

在这个项目中,我们需要一些文件或库来使一切正常工作:

  1. p5.js (您可以下载完整包,因为其中包含 DOM 库)
  2. p5 房子
  3. p5 串行端口 (我使用了包中包含的示例中的 p5.serialport.js 文件)
  4. ML5.js (您可以将其作为链接包含,也可以下载整个库到本地,这样您就不需要互联网连接来使一切正常工作)

一旦我们有了这些,我们就可以在一个简单的 HTML 文件中链接所有内容:

<html>
<head>
<script src="liberaries/ml5.min.js"></script>

<script src="p5.min.js"></script>

<script src="liberaries/p5.dom.min.js"></script>

<script src="liberaries/p5.serialport.js"></script>

<script src="sketch.js"></script>

</head>

<body>
<p id="status"></p>

<p id="noseX_1"></p>
</body>

</html>

接下来是我们的 sketch.js 文件,所有神奇的事情都在这里发生!

var serial;
var portName = 'COM6'; // fill in your serial port name here, you can check the right port in Arduino or P5 serial control
var options = {
baudrate: 19200 //baudrate has to be the same in arduino
};
// this is the message that will be sent to the Arduino:
var oneMessage;
let video;
let poseNet;
let poses = [];
var noseX = []
var ifPerson = true;
//var flipHorizontal = false;
function setup() {
createCanvas(640, 480);
video = createCapture(VIDEO);
video.size(width, height);
frameRate(10);
//--------------------------------------
serial = new p5.SerialPort();
// Get a list the ports available
// You should have a callback defined to see the results. See gotList, below:
serial.list();
// Assuming our Arduino is connected, open the connection to it
serial.open(portName, options);
// When you get a list of serial ports that are available
serial.on('list', gotList);
// When you some data from the serial port
serial.on('data', gotData);
//-----------------------------------------
// Create a new poseNet method with a single detection
poseNet = ml5.poseNet(video, {
flipHorizontal: true,
detectionType: 'single'
}, modelReady);
// This sets up an event that fills the global variable "poses"
// with an array every time new poses are detected
poseNet.on('pose', function (results) {
poses = results;
if (results.length == 0) {
ifPerson = false;
}
//console.log('results: ' + results);
});
// Hide the video element, and just show the canvas
video.hide();
}
function modelReady() {
select('#status').html('Model Loaded');
}
function draw() {
image(video, 0, 0, width, height);
// We can call both functions to draw all keypoints
drawKeypoints();
if (ifPerson == false) {
serial.write('c');
console.log("X");
ifPerson = true;
} else {
oneMessage = map(oneMessage, 1, 640, 65, 115);
serial.write(oneMessage);
console.log("browser: " + oneMessage);
}
}
//---------------------------------
// Got the list of ports
function gotList(thelist) {
console.log("List of Serial Ports:");
// theList is an array of their names
for (var i = 0; i < thelist.length; i++) {
// Display in the console
console.log(i + " " + thelist[i]);
}
}
// Called when there is data available from the serial port
function gotData() {
var currentString = serial.readLine();
console.log(currentString);
}
//-------------------------------------
// A function to draw ellipses over the detected keypoints
function drawKeypoints() {
// Loop through all the poses detected
for (let i = 0; i < poses.length; i++) {
// For each pose detected, loop through all the keypoints
for (let j = 0; j < poses[i].pose.keypoints.length; j++) {
// A keypoint is an object describing a body part (like rightArm or leftShoulder)
let keypoint = poses[i].pose.keypoints["0"];
noseX[i] = keypoint.position.x.toFixed(0);
oneMessage = (parseInt(noseX[0],10));
//console.log(typeof(oneMessage));
select('#noseX_1').html(noseX.toString());
//console.log(typeof(oneMessage))
// Only draw an ellipse is the pose probability is bigger than 0.2
if (keypoint.score > 0.2) {
fill(255, 0, 0);
noStroke();
ellipse(keypoint.position.x, keypoint.position.y, 10, 10);
}
}
}
}

就是这样!打开 html 文件,你会看到摄像头拍摄的画面,鼻子上方有一个红点,但镜像了(否则你的伺服器会偏离你)。你还会看到发送到 Arduino 的 X 数据。


2

使用 P5.serialcontrol

这是一个快速步骤。为了在我的草图和 Arduino 之间建立串行通信,我们需要一个中间人来处理所有串行数据并将其发送给对方。以前人们会使用 Node.js,但使用起来不太方便,p5.serialcontrol 解决了这个问题。您可以在这里下载 p5.serialcontrol。Windows 用户请查看 Alpha 5 版本。

遗憾的是,p5.serialcontrol 并不完善,有时会崩溃。所以请谨慎发送数据。

3

Arduino的环视图

接下来是 Arduino 代码以及连接伺服器和 LED。

#include <Servo.h>
Servo myservo;
const int redPin = 12;
int newval1, oldval1;
int servoValue;
int space = 2;
int ledState = LOW;
int pos = 0;
unsigned long currentMillis = 0; // stores the value of millis() in each iteration of loop()
unsigned long previousServoMillis = 0; // the time when the servo was last moved
unsigned long previousMillis = 0;
const long interval = 500;
int servoPosition = 90;
int servoSlowInterval = 60; // millisecs between servo moves
int servoFastInterval = 10;
int servoInterval = servoSlowInterval; // initial millisecs between servo moves
int servoDegrees = 2; // amount servo moves at each step
int servoMinDegrees = 45; // will be changed to negative value for movement in the other direction
int servoMaxDegrees = 135;
int increment; // increment to move for each interval
int updateInterval; // interval between updates
unsigned long lastUpdate; // last update of position
int counter = 0;
bool executed = false;
void servoSweep() {
if (currentMillis - previousServoMillis >= servoInterval) {
previousServoMillis += servoInterval;
servoPosition = servoPosition + servoDegrees; // servoDegrees might be negative
if (servoPosition <= servoMinDegrees) {
// when the servo gets to its minimum position change the interval to change the speed
if (servoInterval == servoSlowInterval) {
servoInterval = servoSlowInterval; //servoFastInterval
}
else {
servoInterval = servoSlowInterval;
}
}
if ((servoPosition >= servoMaxDegrees) || (servoPosition <= servoMinDegrees)) {
// if the servo is at either extreme change the sign of the degrees to make it move the other way
servoDegrees = - servoDegrees; // reverse direction
// and update the position to ensure it is within range
servoPosition = servoPosition + servoDegrees;
}
// make the servo move to the next position
myservo.write(servoPosition);
digitalWrite(redPin, LOW);
// and record the time when the move happened
}
void ledBlink () {
if (currentMillis - previousMillis >= interval) {
previousMillis = currentMillis;
if (ledState == LOW) {
ledState = HIGH;
} else {
ledState = LOW;
}
digitalWrite(redPin, ledState);
}
}
void setup() {
myservo.attach(9); // servo
Serial.begin(19200); // initialize serial communication
//Serial.setTimeout(10);
pinMode(redPin, OUTPUT);
myservo.write(90);
}
void loop() {
currentMillis = millis();
if (executed == false) {
servoSweep();
delay(50);
}
}
void serialEvent () {
while (Serial.available()) {
newval1 = Serial.read(); //read it
//Serial.println(newval1);
if (newval1 > 0 && newval1 != 'c') {
executed = true;
ledBlink();
//if (newval1 < (oldval1 - space) || newval1 > (oldval1 + space)) { //dead band setup
myservo.write(newval1);
delay(15);
//oldval1 = newval1;
//}
}
if (newval1 == 'c') {
executed = false;
}
}
}

正如您所看到的,我使用了不使用延迟()的代码,因此扫描功能可以随时停止,即当一个人被识别时。

之后,您可以测试整个系统。首先,将装有 LED 和伺服器的 Arduino 插入电路板(我在我的电路板上放了一个箭头进行测试),然后启动 p5.serialcontrol 并打开 html 文件。如果一切正常,箭头将始终指向您。如果您离开摄像头捕捉到的图像范围,伺服器就会开始扫描。


4

制作安全摄像头

有了所有这些软件和代码,我们就可以开始做点什么了!

我模仿了这款安防摄像头的原型,并将其设计用于激光切割机。我用木胶把各个部件组装起来。摄像头内部有足够的空间容纳 Arduino,但需要一些额外的孔来将所有电线穿入。我还把 LED 灯放置在了正确的位置,并在前面安装了黑色镜头,以增强安防摄像头的效果。我还用一些塑料箔片遮挡了 LED 灯的光线。

接下来,我给整个东西上底漆,并将其涂成典型的安全摄像头颜色。


PDF
摄像头组件.pdf
616.11KB
5

安装

最后,关于安装这个装置,我想补充几点。安防摄像头本身没有摄像头或网络摄像头,无法看到前面的人。我的做法是把网络摄像头藏在一根柱子里,并在它前面放了一张带孔的海报来隐藏摄像头,这对于营造合适的效果至关重要。

你也可以把摄像头放在更常见的安防摄像头位置,比如挂在天花板或墙上。不过,你想怎么用就怎么用!


6

最终结果

好了,就是这样。希望你觉得这是一个有趣的项目,也一定要看看视频,看看它的实际效果!

阅读记录0
点赞0
收藏0
禁止 本文未经作者允许授权,禁止转载
猜你喜欢
评论/提问(已发布 0 条)
评论 评论
收藏 收藏
分享 分享
pdf下载 下载