自制基于Arduino的剥线器
发布时间: 2025-06-10 17:37:41 |  0
0 0
0 0
0 0
0
0Arduino
Arduino
线材切割机
在这篇文章中,我使用Nema 23步进电机构建了一台基于Arduino的剥线器
这台机器能够根据小型人机界面提供的数据自动切割和剥线。
准备工作:
材料:
材料名称
数量
备注
Arduino Nano
1
\
Nema 23 步进电机
2
\
TB6600 步进电机驱动
2
\
剥线钳
1
\
12V 10A 120W 开关电源
1
\
2.8 英寸 电阻式触摸显示屏
1
\
舵机
1
20KG
1
底座制作

首先,我使用12毫米厚的木板准备机器的底座,这块木板的尺寸是125 x 125毫米。
我用曲线锯机切割胶合板,并借助台式砂光机打磨边缘使其光滑。
并在木制底座上钻了一些孔,以便将组件安装在上面。
此外,为了更好的抓地力,我在木制底座的底部放置了四个橡胶脚。
2
供电

我使用这个12V 10A 120W 开关电源步进电机供电
3
电机驱动

这是用于运行 nema 23 步进电机的 TB6600 步进电机驱动器。
TB6600 系列Arduino 步进电机驱动器是一款易于使用的专业步进电机驱动器,可以控制两相步进电机。
4
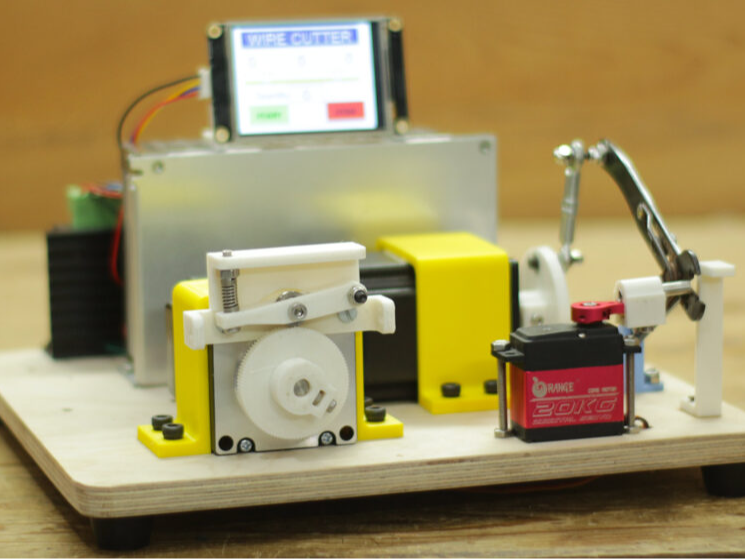
组件固定

把所有组件安装在木制底座上
5
送丝机

使用3D 打印的部件制作了这个送丝机机构
它在Nema 23步进电机的轴上安装了一个较大的夹紧轮。
并通过弹簧的帮助,在这个轮子上压入了一个小的开槽轴承。
电线通过这两个轮子之间的间隙进行供给。
6
舵机引导电线

使用高扭矩伺服电机引导电线穿过剪线钳。
7
连杆连接

我使用连杆连接了切线器的末端和步进电机。
我使用了两个带有中间螺丝的关节,因为它的长度可以根据电线的粗细进行增加或减少。
8
组装成品

最后,机器组装完成了,现在是时候将代码上传到Arduino和HMI了。
9
Arduino代码

#include <Stepper.h>
#include <Arduino.h>
#include "BasicStepperDriver.h"
#include "MultiDriver.h"
#include "SyncDriver.h"
#include <SoftwareSerial.h>
#include <Servo.h>
//SoftwareSerial mySerial(2, 3); // RX, TX
Servo myservo;
int A = 0;
int B = 0;
int state = 0;
String message;
int QTY, numMessages, endBytes;
byte inByte;
int flag = 0;
int C=0;
float D=0;
int E=0;
int Start = 22;
int End = 31;
#define MOTOR_STEPS 200
#define DIR_X 7
#define STEP_X 4
#define DIR_Y 6
#define STEP_Y 3
#define MICROSTEPS 16
#define MOTOR_X_RPM 50
#define MOTOR_Y_RPM 200
BasicStepperDriver stepperX(MOTOR_STEPS, DIR_X, STEP_X);
BasicStepperDriver stepperY(MOTOR_STEPS, DIR_Y, STEP_Y);
SyncDriver controller(stepperX, stepperY);
void setup()
{
numMessages, endBytes = 0;
myservo.attach(10);
Serial.begin(9600);
//mySerial.begin(9600);
stepperX.begin(MOTOR_X_RPM, MICROSTEPS);
stepperY.begin(MOTOR_Y_RPM, MICROSTEPS);
myservo.write(Start);
delay(2000);
}
void loop()
{
data();
if (A > 0 && B > 0 && C > 0) {
delay(2000);
for (int i = 0; i < C; i++){
controller.move(A*25, 0 );
delay(500);
controller.rotate(0, 360 );
delay(500);
controller.move(B*25, 0 );
delay(500);
controller.rotate(0, 360 );
delay(500);
controller.move(A*25, 0 );
delay(500);
myservo.write(End);
delay(500);
controller.rotate(0, 360 );
delay(500);
myservo.write(Start);
delay(500);
Serial.print(i);
}
A=0;
B=0;
C=0;
}
}
void data() {
if (state == 0) {
if (numMessages == 1) { //Did we receive the anticipated number of messages? In this case we only want to receive 1 message.
A = QTY;
Serial.println(A);//See what the important message is that the Arduino receives from the Nextion
numMessages = 0; //Now that the entire set of data is received, reset the number of messages received
state = 1;
}
}
if (state == 1) {
if (numMessages == 1) { //Did we receive the anticipated number of messages? In this case we only want to receive 1 message.
B = QTY;
Serial.println(B);//See what the important message is that the Arduino receives from the Nextion
numMessages = 0; //Now that the entire set of data is received, reset the number of messages received
state = 2;
}
}
if (state == 2) {
if (numMessages == 1) { //Did we receive the anticipated number of messages? In this case we only want to receive 1 message.
C = QTY;
Serial.println(C);//See what the important message is that the Arduino receives from the Nextion
numMessages = 0; //Now that the entire set of data is received, reset the number of messages received
state = 0;
}
}
if (Serial.available()) { //Is data coming through the serial from the Nextion?
inByte = Serial.read();
// Serial.println(inByte); //See the data as it comes in
if (inByte > 47 && inByte < 58) { //Is it data that we want to use?
message.concat(char(inByte)); //Cast the decimal number to a character and add it to the message
}
else if (inByte == 255) { //Is it an end byte?
endBytes = endBytes + 1; //If so, count it as an end byte.
}
if (inByte == 255 && endBytes == 3) { //Is it the 3rd (aka last) end byte?
QTY = message.toInt(); //Because we have now received the whole message, we can save it in a variable.
message = ""; //We received the whole message, so now we can clear the variable to avoid getting mixed messages.
endBytes = 0; //We received the whole message, we need to clear the variable so that we can identify the next message's end
numMessages = numMessages + 1; //We received the whole message, therefore we increment the number of messages received.
//Now lets test if it worked by playing around with the variable.
}
}
}
10
接线图

基于 Arduino 的线切割机接线图
11
屏幕文件

HMI.tft
699.93KB
12
3D 文件


123456
下载3D 文件的链接。
DIY Arduino based wire cutting machine - 5599845.zip
1.83MB
 0
0 0
0 0
0 qq空间
qq空间  微博
微博  复制链接
复制链接 更多相关项目
猜你喜欢
评论/提问(已发布 0 条)