泰山派6--驱动中的file_operations结构体
 0
0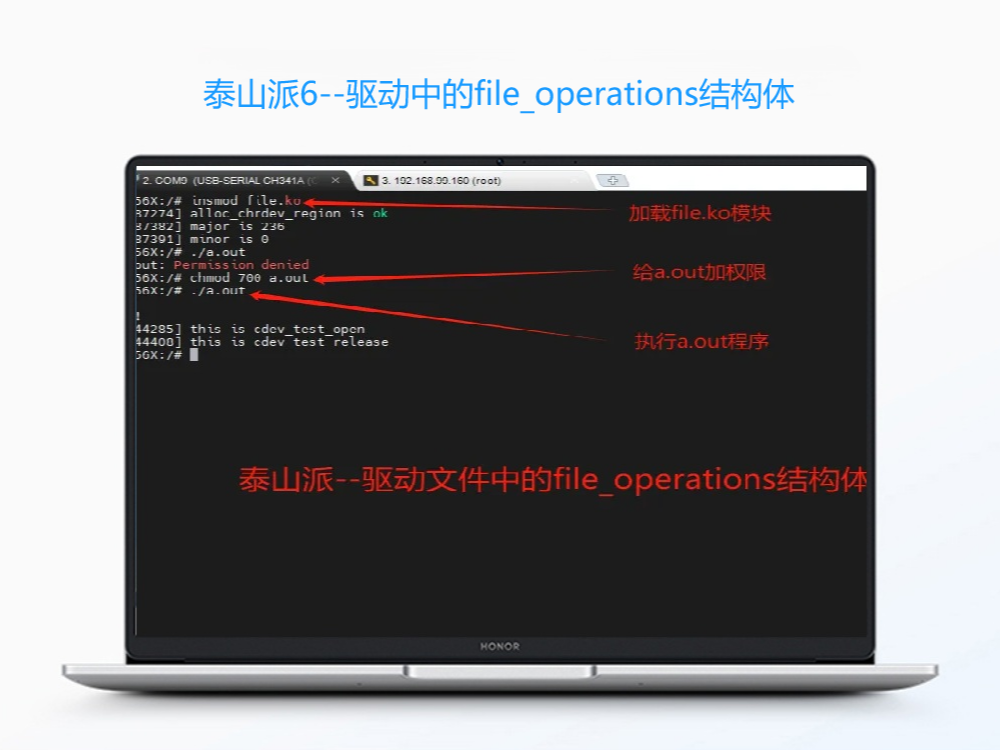
在Linux中一切皆文件,访问一个设备其实就是像访问一个文件一样。在应用程序中我们经常使用open,read,write,close,ioctl这几个系统调用来操作驱动,当我们调用这些系统调用函数的时候,最终都是去执行驱动中的file_operations结构体中的对应的函数。
准备工作:
材料:
- 一台装有Linux虚拟机的PC
- 一个泰山派开发板
- 一个串口烧录器CH341
1
驱动编写的主要步骤

首先,定义一个file_operations结构体,定义一下需要用的成员。然后再写一个你需要用到的成员函数。它的第一个成员.owner是它的属性说明是必写的,一般情况直接写成THIS_MODULE.
2
编写驱动.c文件

我们还是在上篇的基础上继续。我们这次仿写file_operations结构体中的open,read,write,release函数,代码如下:
#include <linux/module.h>
#include <linux/init.h>
#include <linux/moduleparam.h>
#include <linux/fs.h>
#include <linux/kdev_t.h>
#include <linux/cdev.h>
#include <linux/device.h>
static int major=0; //驱动主设备号变量
static int minor=0; //驱动副设备号变量
dev_t dev_num;
struct cdev cdev_test; //设置一个cdev结构体的变量
struct class *class; //设置一个class结构体的指针变量
struct device *device; //设置一个device结构体的指针变量
static int cdev_test_open(struct inode *inode, struct file *file) //自己仿造的open函数
{
printk("this is cdev_test_open\n");
return 0;
}
static ssize_t cdev_test_read(struct file *file, char __user *buf, size_t size, loff_t *off) //自己仿造的read函数
{
printk("this is cdev_test_read\n");
return 0;
}
static ssize_t cdev_test_write(struct file *file, const char __user *buf, size_t size, loff_t *off) //自己仿造的write函数
{
printk("this is cdev_test_write\n");
return 0;
}
static int cdev_test_release(struct inode *inode, struct file *file) //自己仿造的release函数
{
printk("this is cdev_test_release\n");
return 0;
}
static struct file_operations cdev_test_ops = { //文件操作函数--驱动的主要操作部分
.owner = THIS_MODULE,
.open = cdev_test_open,
.read = cdev_test_read,
.write = cdev_test_write,
.release = cdev_test_release};
static int modulecdev_init(void){ //驱动加载函数
int ret;
ret=alloc_chrdev_region(&dev_num,0,1,"alloc_name"); //dong态申请驱动设备号部分
if(ret<0){
printk("alloc_chrdev_region is error\n");
}
printk("alloc_chrdev_region is ok\n");
major = MAJOR(dev_num); //获取驱动主设备号部分
minor = MINOR(dev_num); //获取驱动副设备号部分
printk("major is %d\n", major);
printk("minor is %d\n", minor);
cdev_test.owner = THIS_MODULE;
cdev_init(&cdev_test, &cdev_test_ops);
cdev_add(&cdev_test, dev_num, 1);
class=class_create(THIS_MODULE,"test"); //构建设备文件类
device=device_create(class,NULL,dev_num,NULL,"test"); //构建设备节点函数
return 0;
}
static void modulecdev_exit(void) // 驱动卸载函数
{
unregister_chrdev_region(dev_num, 1); // 删除驱动设备号函数
cdev_del(&cdev_test);
device_destroy(class,dev_num); //删除设备文件类
class_destroy(class); //删除设备节点
printk("bye bye\n");
}
module_init(modulecdev_init); //系统加载驱动框架函数
module_exit(modulecdev_exit); //系统卸载驱动框架函数
MODULE_LICENSE("GPL"); //使用协议信息
MODULE_AUTHOR("lxh"); //作者信息
MODULE_VERSION("V1.0"); //版本信息
file.c
3.34KB
3
写测试程序app.c

代码如下:
#include <stdio.h>
#include <sys/types.h>
#include <sys/stat.h>
#include <fcntl.h>
#include <unistd.h>
int main(int argc,char *argv[])
{
int fd;
char buf[64]={0};
printf("at app!\n");
fd = open("/dev/test",O_RDWR);
if(fd < 0)
{
perror("open error \n");
printf("at 2 app!\n");
return fd;
}
printf("at 1 app!\n");
close(fd);
return 0;
}
app.c
398B
4
编译

编译驱动成模块,编译测试程序,别忘了设置环境。
a.out
13.01KB
file.ko
224.73KB
5
测试

把file.ko和a.out拷贝到泰山派开发板上,先insmod file.ko,再运行a.out.
 0
0 0
0 0
0 qq空间
qq空间  微博
微博  复制链接
复制链接 更多相关项目
猜你喜欢
评论/提问(已发布 0 条)