虚拟窥视孔
发布时间: 2025-06-14 15:08:33 |  0
0 0
0 0
0 0
0
0树莓派
RaspberryPi
据估计,全球有 7.7 亿个监控摄像头。其中一些仍然有默认密码,任何有互联网连接的人都可以轻松访问它们。
这个虚拟窥视孔是一种监视一些不安全的摄像头的设备。每次打开窥视孔时,都会显示不同的摄像头。
准备工作:
材料:
1 Arduino 微型
1 个光敏电阻
1 Raspberry Pi 3 B 型
1 个 Raspberry Pi 屏幕
1 木箱
1 个门眼
工具:
1 个钻
1 把螺丝刀
1
Raspberry Pi 和 Arduino 设置

虚拟窥视孔由 2 个独特的部分组成:Raspberry Pi(带小屏幕)和 Arduino Micro。Raspberry Pi 连接到 Internet 并显示一个网站,该网站显示一个随机的摄像头源。 窥视孔内有一个光传感器,用于检测它是打开还是关闭。每当窥视孔关闭时,就会向 Raspberry Pi 发送信号(通过 Arduino Micro),并且网站会切换到另一个摄像头源。我用于此项目的相机数据是从 Insecam 中抓取的,该网站注册了超过 73,000 个不安全的相机。
2
要显示的网站

3
设置 Raspberry Pi

- 确保您的 Raspberry Pi 正常工作并进行设置(如果您是 Raspberry Pi 的新用户,请参阅本指南)
- 将 LCD 屏幕挂接到 Raspberry Pi
- 让 Raspberry Pi 在启动时打开一个网页
4
设置 Arduino

注意:要制作这个项目,你的 Arduino 板子必须支持键盘库,如库页面上提到的:
支持的型号是基于 32u4 和 SAMD 的板卡(Leonardo、Esplora、Zero、Due 和 MKR 系列)
- 将光传感器连接到 Arduino
- 在 Arduino 上上传代码。 该代码将首先运行校准 5 秒(在此期间将记录光电传感器的最小值和最大值),然后在光值低于阈值时发送“空格”键信号(意味着窥视孔已关闭)。
previousMillis = 0
//because light always varies, we will calibrate the photosesor at each boot.
long calibrationtime = 5000;
long startMillis = 0;
//the max value for an analog sensor is 1024
int sensorMin = 1024;
int sensorMax = 0;
int average = 0;
int threshold = 5;
bool lastState = true;
bool isClosed = true;
void setup() {
Serial.begin(9600); // open the serial port
Keyboard.begin(); // start the keyboard library
startMillis = millis(); //start the counter
}
void loop() {
//stabilize the reading in the first 5 seconds
//then, detect a variation in the stabilization.
unsigned long currentMillis = millis(); //set millis as the current time
int sensorValue = analogRead(A0); //read the sensor
if(currentMillis-startMillis < calibrationtime) {
//as long as we are in the calibration time
//during this calibration time, open and close the peephole to calibrate it.
int elapsedtime = currentMillis - startMillis;
Serial.println(elapsedtime);
Serial.println(sensorMin);
Serial.println(sensorMax);
if(sensorValue < sensorMin){ //register the max and min value for the sensor
sensorMin = sensorValue;
average = (sensorMin + sensorMax )/2;
}
if(sensorValue > sensorMax){
sensorMax = sensorValue;
average = (sensorMin + sensorMax )/2;
}
delay(100); //delay
}
else{ //if the calibration is done
if(sensorValue > average + threshold){ //detect if the peephole is open or closed
isClosed = false;
if(lastState != isClosed){
}
}
else{
isClosed = true;
if(lastState != isClosed){
Keyboard.print(" "); //send a key signal if the peephole is open
}
}
lastState = isClosed;
delay(100);
}
}
5
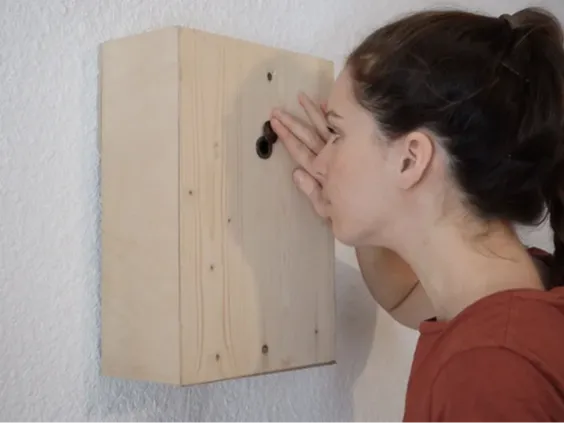
设置盒子


1234
- 在门眼上钻一个孔,以安装光电传感器(这将检测您的窥视孔是打开还是关闭,然后触发网络摄像头更换)。
- 在盒子上钻一个孔,以便可以安装门眼
- 在门眼前面,用屏幕固定 Raspberry Pi(我用了魔术贴)
- 连接 arduino:
- 将光电传感器连接到 arduino
- 在 Rpi 和 Arduino 之间放置一根 USB 电缆。Arduino 将充当键盘,并向 Raspberry Pi 发送关键信号。
6
启动虚拟窥视孔


12
将所有东西放入盒子后,您现在可以运行您的虚拟窥视孔了。
- 将虚拟窥视孔放在墙上
- 将 Rapsberry pi 插入电源
- 您现在将有 5 秒钟的时间来校准位于门眼中的光电传感器,方法是多次打开和关闭它。
虚拟窥视孔现在应该可以工作了!
 0
0 0
0 0
0 微信
微信  qq空间
qq空间  微博
微博  贴吧
贴吧  复制链接
复制链接 更多相关项目
猜你喜欢
评论/提问(已发布 0 条)